background image

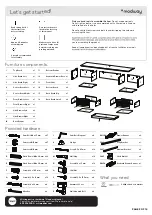
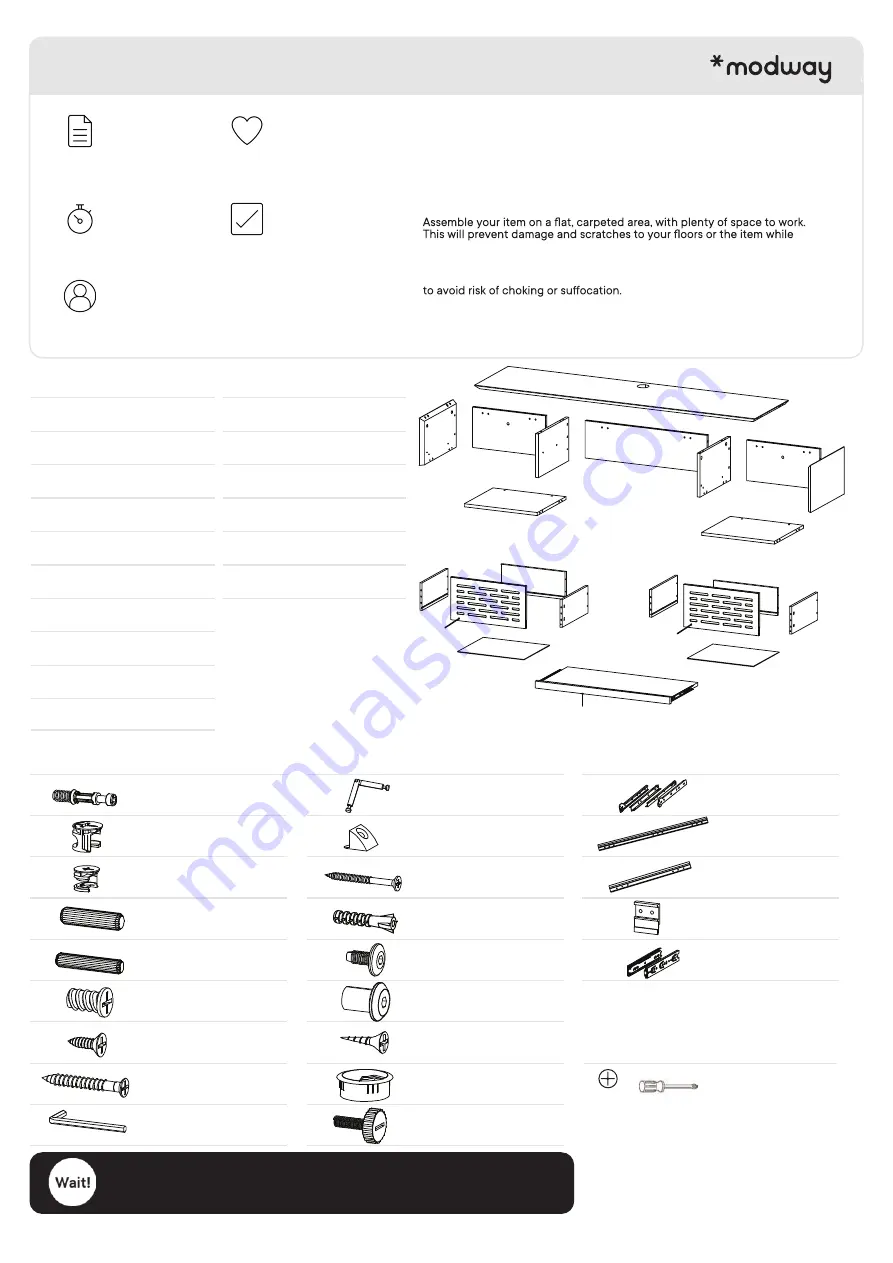
Provided hardware:

Furniture components:

E

F

x8

x20

A

x27

Cam Bolt Ø6 x 35 mm

B

x27

Cam Lock Ø15 mm

D

x36

Wood Dowel Ø8 x 30 mm

C

x8

Cam Lock Ø12 mm

Wood Dowel Ø6 x 30 mm

Screw M 6 x 10.5 mm

G

x12

Screw M 3.5 x 13 mm

x2

x1

x2

x1

x2

1

x1

2

x1

Side Board Left

Top Board

3

x1

Side Board Right

5

7

8

x1

4

Center Board Left

Center Board Right

x1

6

Front Drawer Left

Front Drawer Right

Side Drawer Left

Side Drawer Right

9

10

Back Drawer

Missing parts or hardware? Need assistance?

Contact us before returning your item. We're here to help!

609.256.9000 • cs@modway.com

H

x8

Screw M 8 x 39 mm

I

x2

Allen Key

PAGE 2 OF 14

J

K

x4

x8

Cam Bolt Diagonal

Wedge

Screw 5.5 x 45 mm

L

x16

M

x16

Wall Plug

Only use hand tools to assemble this item

. Do not use power tools.

Do not tighten bolts or screws completely until all hardware is lined up

and inserted into the holes.

Do not over-tighten screws and bolts to avoid stripping the hardware

or cracking the item.

you’re assembling the product.

Keep all components and packaging out of reach of children or animals

Approx. 90 minutes

assembly time

2 people recommended 

for assembly

Care instructions are 

listed in the last step

of this manual

Read through all of

the instructions

before starting

Make sure you have all

parts and components

before discarding any

packing materials

Let’s get started!

x1

11

x2

Bottom Drawer

12

x1

Keyboard Drawer Base

13

x1

Front Skirt

15

x2

14

Bottom Board 

Back Board Big

x2

16

Back Board Small

RM30A

PA63

PA37

PA05

P

x2

x1

x8

x2

x6

Drawer Runner

Long Bracket

Screw M 6 x 15 mm

Short Bracket

Medium Bracket

Screw M 3.5 x 15.5 mm

What you need:

Phillips Head Screwdriver

Phillips

Q

x1

Grommet Cover

R

x2

Wall Mounted Bolt

N

O

x12

x12

JCN Nut

RB25A

x1

Keyboard Drawer Runner

1

2

3

4

5

6

7

8

8

9

9

10

10

11

11

12

13

14

14

15

16

16

Summary of Contents for EEI-5744

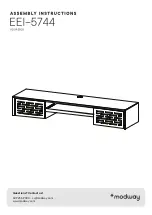
Page 1: ...Questions Contact us 609 256 9000 cs modway com www modway com...

Page 2: ...l all hardware is lined up and inserted into the holes Do not over tighten screws and bolts to avoid stripping the hardware or cracking the item you re assembling the product Keep all components and p...

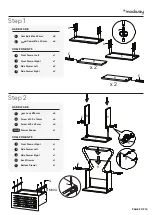
Page 3: ...ght 7 x2 Side Drawer Left 8 x2 Side Drawer Right 9 x4 Cam Lock 12 mm C x4 Screw M 8 x 39 mm H x1 Drawer Runner Step 2 HARDWARE RM30A COMPONENTS x1 Front Drawer Right 7 x1 Side Drawer Left 8 x1 Side Dr...

Page 4: ...14 RM30A 50 60 mm x4 Cam Lock 12 mm C x4 Screw M 8 x 39 mm H x1 Drawer Runner HARDWARE RM30A COMPONENTS x1 Front Drawer Left 6 x1 Side Drawer Left 8 x1 Side Drawer Right 9 x1 Back Drawer 10 x1 Bottom...

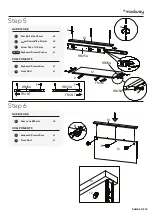
Page 5: ...rd Drawer Runner Step 5 HARDWARE x1 Keyboard Drawer Base 12 x1 Front Skirt 13 COMPONENTS x3 Cam Lock 15 mm B Step 6 HARDWARE PAGE 5 OF 14 RB25A COMPONENTS x1 Keyboard Drawer Base 12 x1 Front Skirt 13...

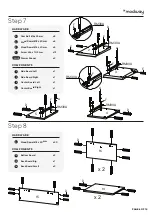
Page 6: ...E COMPONENTS x2 Bottom Board 14 x1 Back Board Big 15 x2 Back Board Small 16 x30 Wood Dowel 8 x 30 mm D Step 8 HARDWARE PAGE 6 OF 14 RM30A COMPONENTS x1 Side Board Left 2 x1 Side Board Right 3 x1 Cente...

Page 7: ...MPONENTS x1 Side Board Left 2 x1 Side Board Right 3 x1 Center Board Left 4 x1 Center Board Right 5 x2 Bottom Board 14 x8 Cam Lock 15 mm B HARDWARE x2 Bottom Board 14 x2 Back Board Small 16 COMPONENTS...

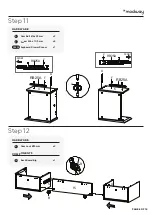
Page 8: ...A x4 Screw M 6 x 10 5 mm F Step 11 HARDWARE x1 Keyboard Drawer Runner Step 12 PAGE 8 OF 14 RB25A RB25A RB25A COMPONENTS x1 Back Board Big 15 x2 Cam Lock 15 mm B HARDWARE FRONT FRONT A F 4 5 A F 15 B 5...

Page 9: ...x 15 mm N x12 JCN Nut O x6 Short Bracket Step 13 HARDWARE Step 14 PAGE 9 OF 14 I PA05 O N PA05 PA05 N O x6 Cam Bolt 6 x 35 mm A x4 Cam Bolt Diagonal J HARDWARE COMPONENTS x1 Top Board 1 x4 Cam Lock 15...

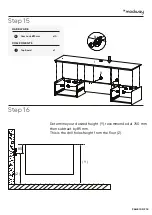
Page 10: ...x1 Top Board 1 x10 Cam Lock 15 mm B Step 15 HARDWARE Step 16 PAGE 10 OF 14 Z Y 85 Determine your desired height Y recommended at 760 mm then subtract by 85 mm This is the drill holes height from the o...

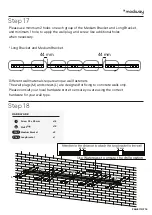
Page 11: ...Different wall materials require unique wall fasteners The wall plugs M and screws L are designed for xing to concrete walls only Please consult your local hardware store to ensure you are using the c...

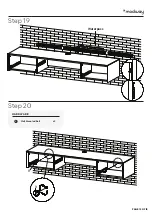
Page 12: ...PAGE 12 OF 14 Step 19 Step 20 x2 Wall Mounted Bolt R HARDWARE R R Waterpass...

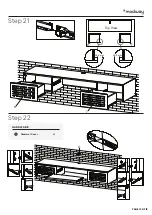
Page 13: ...PAGE 13 OF 14 Step 21 Step 22 x1 Grommet Cover Q HARDWARE Q 6 Top View 7 26 5 mm 26 5 mm 6 7...

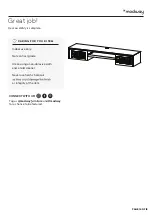
Page 14: ...EM Indoor use only Not contract grade Clean using a non abrasive cloth and a mild cleaner Never use harsh chemicals or integrity of the item CONNECT WITH US Tag us modway_furniture and modway for a ch...

Reviews: