background image

 Anti Tipping Kits x1 


TIPPING RESTRAINTS KIT INSTALLATION GUIDANCE 

Different wall materials require unique wall fasteners. 
Please consult your local hardware store to ensure you are using the correct hardware for your wall type 


Installation Instructions: 

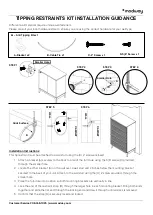
This tip restraint must be attached to a wall stud using the (C) 

2” screw enclosed.


1.


Attach a bracket (A) securely to the back top rail of the furniture using the 

5/8” screw 

(D) provided, 

through the smaller hole. 

2.


Locate the other bracket (A) on the wall over a wall stud and 2 inches below the mounting bracket 
secured to the back of your unit. Attach to the wall stud using the (C) 

2” screw provided, through the 

smaller hole. 

3.


Place the furniture into position so both mounting brackets are vertically in line. 

4.


Lace the end of the restraint strap (B) through the larger hole in each mounting bracket. Bring both ends 
together and slide the flat end through the locking end and draw it through until all slack is removed. 

5.


Confirm that the strap (B) is securely laced and locked. 
 

Customer Service 908-368-1025 | www.modway.com 

C-

2” Screw x 1


D-

5/8” Screw x 1


A-Bracket x 2 

B-Cable Tie x 1 

Smaller Hole 

STEP 1 

STEP 2 

STEP 3 

STEP 4 

B


A

Smaller Hole 

W

A

LL


C

A

B

IN

ET
 

STEP 5 

STEP 6 

W

A

LL


C

A

B

IN

ET
 

Grids Surface 

C


Summary of Contents for MOD-6967-WAL

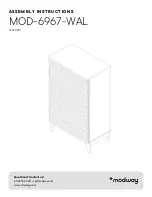
Page 1: ...ASSEMBLY INSTRUCTIONS MOD 6967 WAL V1 01 07 21 Questions Contact us 609 256 9000 cs modway com www modway com...

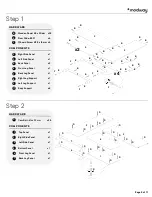
Page 2: ...re components Provided hardware What you need Phillips Head Screwdriver Phillips Missing parts or hardware Need assistance Contact us before returning your item We re here to help 609 256 9000 cs modw...

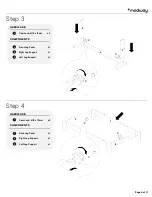
Page 3: ...Leg Support x1 Cam Bolt 6 x 32mm x24 Left Side Panel x1 Bottom Panel x1 Top Panel x1 Right Side Panel x1 3 2 6 7 8 9 B B B B B B B B B B B B B B B B B B B F F F F E E E E D D D D D D D D D D D 1 7 6...

Page 4: ...15 x 12mm x2 Right Leg Support Left Leg Support Front Leg Panel x1 x1 x1 Cam Lock 15 x 12mm x2 Right Leg Support x1 Left Leg Support x1 Back Leg Panel x1 6 9 8 C C C C 7 8 9 HARDWARE COMPONENTS C 6 8...

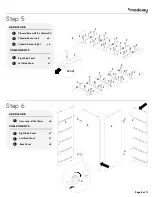
Page 5: ...Runner Left x5 x5 Cam Lock 15 x 12mm x4 Left Side Panel Right Side Panel x1 x1 Back Panel x2 3 2 F C board Runner Right F F F F F F F F F F F F F F F G G H H C C C C 5 5 3 F F F F H G F F F F 2 G F F...

Page 6: ...Left Side Panel x1 Right Side Panel x1 x1 x1 x2 5 5 3 5 2 4 N Body Support 17 N 5 2 3 N N Cam Lock 15 x 12mm x2 Left Side Panel Bottom Panel Back Panel JCBCW M6 x 50mm x4 C C 17 C C HARDWARE COMPONENT...

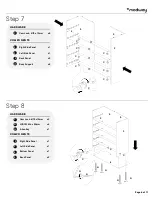
Page 7: ...Back Panel x2 JCBC M6 x 80mm x4 JCBC M6 x 60mm x4 Bottom Panel x1 C C K K A A K A A K 4 C C 1 C 5 5 3 2 6 7 9 8 Front Leg Panel x1 Back Leg Panel x1 Right Leg Support x1 Left Leg Support x1 HARDWARE C...

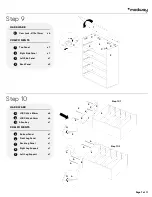
Page 8: ...ack x5 x5 x5 x5 x5 10 11 14 15 Cam Bolt 6 x 32mm x15 Drawer Head x5 C board Screw 4 x 25mm x15 11 15 14 10 B B B B B B B B R R R O O O D D 15 12 12 16 B B B B Drawer Support 16 HARDWARE COMPONENTS R B...

Page 9: ...14 Cam Lock 12 x 9 9mm x15 Drawer Right x5 x5 x5 x5 x5 x5 Drawer Left Drawer Head Drawer Base 11 10 11 14 13 13 11 10 11 10 12 P P L L 16 P Drawer Support x5 16 L 16 16 Drawer Back HARDWARE COMPONENTS...

Page 10: ...Page 10 of 11 Step 15 Step 16 F C board Screw 3 5 x 16mm x30 Drawer Runner Left x5 Drawer Runner Right x5 Drawer Right x5 Drawer Left x5 11 10 F F F F F F I J HARDWARE COMPONENTS I 10 11 J F x5...

Page 11: ...FOR YOUR ITEM Indoor use only Not contract grade Clean using a non abrasive cloth and a mild cleaner Never use harsh chemicals as they could damage the finish or integrity of the item CONNECT WITH US...

Page 12: ...2 inches below the mounting bracket secured to the back of your unit Attach to the wall stud using the C 2 screw provided through the smaller hole 3 Place the furniture into position so both mounting...

Reviews: