INS1987B - 8/16
4
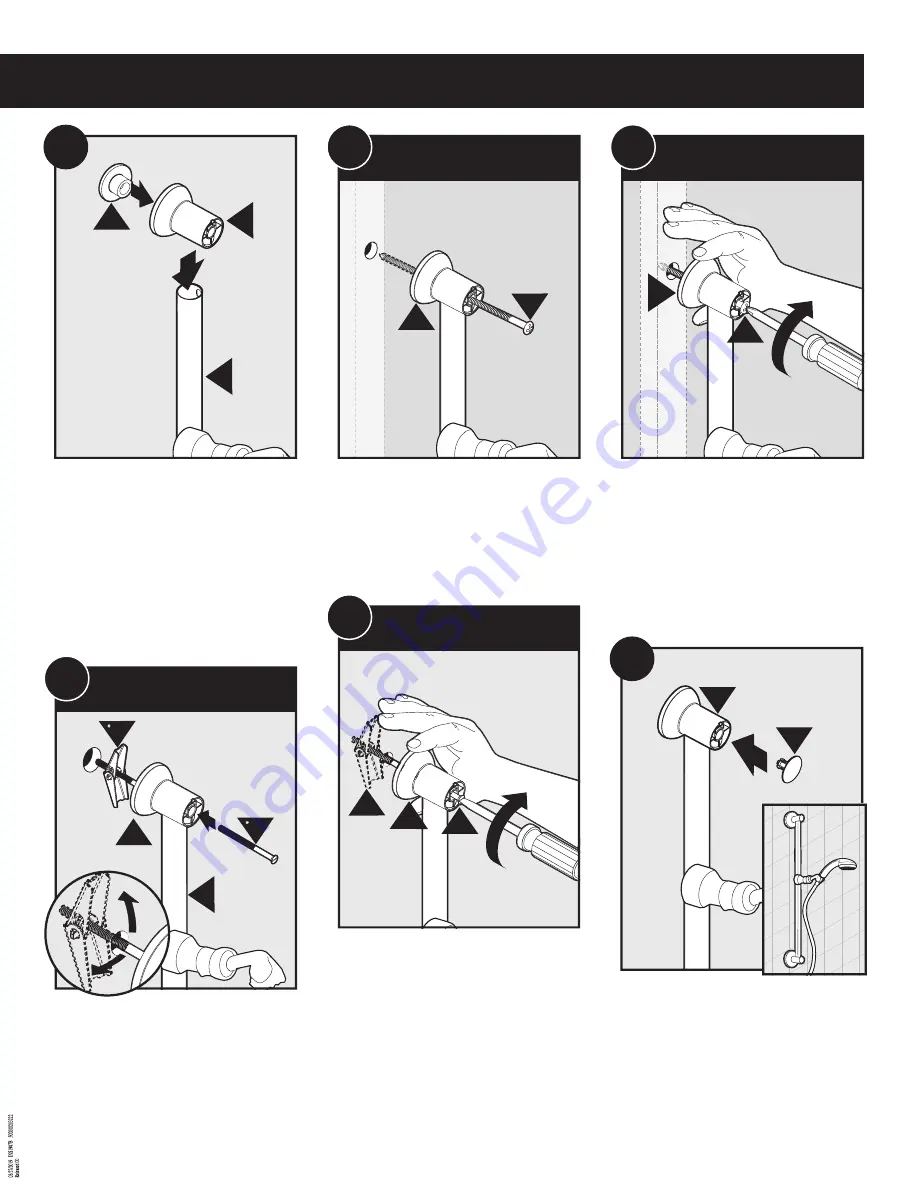
For hollow wall installation, insert Toggle Screw (D) through
Bracket (A) and into Toggle Bracket (D). Insert into hollow
wall as shown. Repeat actions for bottom Bracket (A).
For hollow wall installation, insert Toggle Screw (D) through
Bracket (A) and into Toggle Bracket (D). Insert into hollow
wall as shown. Repeat actions for bottom Bracket (A).
For hollow wall installation, insert Toggle Screw (D) through
Bracket (A) and into Toggle Bracket (D). Insert into hollow
wall as shown. Repeat actions for bottom Bracket (A).
1. Install Bracket Adapter (C) into Brackets (A).
2. Attach Bracket (A) to Slide Bar & Clamp (B). Repeat steps 1
& 2 for bottom portion of Slide Bar. Go to step 4 for wood-
screw install or step 6 for optional hollow wall install.
1. Install Bracket Adapter (C) into Brackets (A).
2. Attach Bracket (A) to Slide Bar & Clamp (B). Repeat steps 1
& 2 for bottom portion of Slide Bar. Go to step 4 for wood-
screw install or step 6 for optional hollow wall install.
1. Install Bracket Adapter (C) into Brackets (A).
2. Attach Bracket (A) to Slide Bar & Clamp (B). Repeat steps 1
& 2 for bottom portion of Slide Bar. Go to step 4 for wood-
screw install or step 6 for optional hollow wall install.
1. Place hand over Bracket (A) and hold as Toggle Bracket
and Screw (D) is securing to wall.
2. Use flathead screwdriver to tighten as shown. Repeat
actions for bottom Bracket (A).
1. Place hand over Bracket (A) and hold as Toggle Bracket
and Screw (D) is securing to wall.
2. Use flathead screwdriver to tighten as shown. Repeat
actions for bottom Bracket (A).
1. Place hand over Bracket (A) and hold as Toggle Bracket
and Screw (D) is securing to wall.
2. Use flathead screwdriver to tighten as shown. Repeat
actions for bottom Bracket (A).
For wood screw installation, insert Wood Screw (F) through
Bracket (A) into wood stud. Repeat for bottom Bracket (A).
For wood screw installation, insert Wood Screw (F) through
Bracket (A) into wood stud. Repeat for bottom Bracket (A).
For wood screw installation, insert Wood Screw (F) through
Bracket (A) into wood stud. Repeat for bottom Bracket (A).
Insert Plug Button (E) into Bracket (A) as shown. Repeat for
bottom Bracket (A). Installation complete.
Insert Plug Button (E) into Bracket (A) as shown. Repeat for
bottom Bracket (A). Installation complete.
Insert Plug Button (E) into Bracket (A) as shown. Repeat for
bottom Bracket (A). Installation complete.
Place hand over Bracket (A) and hold while securing Wood
Screw (F) into wood stud with Phillips screwdriver. Repeat
for bottom Bracket (A). Go to step 8.
Place hand over Bracket (A) and hold while securing Wood
Screw (F) into wood stud with Phillips screwdriver. Repeat
for bottom Bracket (A). Go to step 8.
Place hand over Bracket (A) and hold while securing Wood
Screw (F) into wood stud with Phillips screwdriver. Repeat
for bottom Bracket (A). Go to step 8.
C
A
B
2
1
3
A
F
Wood Screw Installation
Wood Screw Installation
Wood Screw Installation
4
A
F
Wood Screw Installation
Wood Screw Installation
Wood Screw Installation
5
B
D
A
* optional/opcional/facultatif
not included/no incluido/non inclus
sold separately/
sold separately/sold separately
D
Hollow wall installation
Hollow wall installation
Hollow wall installation
6
A
*D
*D
Hollow wall installation
Hollow wall installation
Hollow wall installation
7
E
A
x2
8


