background image

10

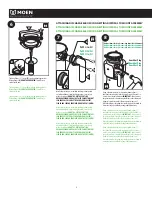
If you are utilizing a dishwasher, complete the following procedure.Connect the dishwasher hose using 

the hose Clamp. A 7/8" inside diameter hose will fit the disposal. If the hose size is different, a Dishwasher 

Connector Kit should be used.

If you are utilizing a dishwasher, complete the following procedure.Connect the dishwasher hose using 

the hose Clamp. A 7/8” inside diameter hose will fit the disposal. If the hose size is different, a Dishwasher 

Connector Kit should be used.

If you are utilizing a dishwasher, complete the following procedure.Connect the dishwasher hose using 

the hose Clamp. A 7/8” inside diameter hose will fit the disposal. If the hose size is different, a Dishwasher 

Connector Kit should be used.

Reconnect the discharge elbow to the drain line. (the reversal 

of page 3, step A) Use a wrench to secure the drain line where it 

attaches to disposal discharge tube. DO NOT OVERTIGHTEN. If you 

are connecting to a dishwasher, go to Step 13. If not, remove any 

tools, packaging or materials used for installation from the sink. 

Make sure all plumbing connections are tight and in accordance with 

all plumbing codes and ordinances (If in doubt, contact a qualified 

plumber). Run water and check for leaks. Then got to page 11 for the 

electrical connection.

13

Optional: Available on MOEN.COM

Optional: Available on MOEN.COM

*Only complete step if

connecting to dishwasher.

*Only complete step if

connecting to dishwasher.

*Only complete step if

connecting to dishwasher.

12

Summary of Contents for INS10477

Page 1: ...8 00 AM to 7 00 PM Eastern Sat 9 00 AM to 3 00 PM Eastern WWW MOEN COM Canada 1 800 465 6130 Mon Fri 7 30 AM to 7 00 PM Eastern WWW MOEN CA Por favor cont ctese primero con Moen Para obtener ayuda de...

Page 2: ...sal do not put the following into a disposal clam or oyster shells caustic drain cleaners or similar products glass china or plastic large whole bones metal such as bottle caps tin cans aluminum foil...

Page 3: ...completestepD Ifyouutilizea plugincord goontostepE Caution Besuretosupportthedisposalwhileperforming thissteporitmayfallwhenthelowermountingringis disconnectedfromthemountingassembly Removedisposal fr...

Page 4: ...t to plug into You do not need to hardwire connection to disposal Disclaimer If you are not familiar with electrical power and procedures call a qualified electrician A Connect the disposal cord to 11...

Page 5: ...werMountingRing J Disposal K DrainElbow L RubberGasket M Screws N Powercord A Stopper A1 RemovableSplashGuard B SinkFlange C FiberGasket D BackupFlange E Screws x3 F MountingRing G SnapRing H CushionM...

Page 6: ...omthedisposalbyturning thelowermountringuntilitdisengagesfromtherampsonthe mountingringandthesinkflangeassemblycanberemoved Loosen the3 mountscrewsuntilthemountingringcanbemoveduptothe backupflange Us...

Page 7: ...thesinkdrainopening Pushthesinkflangedownfirmlyto makeagoodseal Note Excesssealantwillbesquezzedoutduringtheinstallation andshouldnotbecleanedupuntiltheendDONOTmoveor rotatethesinkflangeonceseatedorth...

Page 8: ...XISTING DISCHARGE ELBOW AND GASKET ASTHE GASKET MAY NOT SEAL PROPERLY USE ONLY THE NEW ELBOW GASKET FLANGE AND SCREWS PROVIDED DO NOT OVERTIGHTEN Using a blunt instrument steel punch or wooden dowel k...

Page 9: ...one of the tubes on the lower mounting ring to provide extra leverage to turn the mount ring Turn the lower mounting ring until all 3 mounting tabs lock over the ribs at the top of the ramps If you ar...

Page 10: ...ndcheckforleaks Thengottopage11forthe electricalconnection Reconnectthedischargeelbowtothedrainline thereversal ofpage3 stepA Useawrenchtosecurethedrainlinewhereit attachestodisposaldischargetube DONO...

Page 11: ...ing the disposal OPERATING INSTRUCTIONS The Anti Jam Swivel Impellers make a clicking sound as they swing into place This indicates normal operation A Remove the sink stopper Turn on a medium flow of...

Page 12: ...in the drain when not in use to prevent utensils and foreign objects falling into the disposal C Your disposal is ruggedly built to give you many years of trouble free service It will handle all norma...

Page 13: ...there may be an internal problem that requires service or replacement Reset Button Reset Button Reset Button TROUBLESHOOTING Before seeking repair or replacement we recommend that you review the follo...

Page 14: ...the Product as they are considered improper maintenance and may cause corrosion of metal parts which damage will be detectable and not covered by this warranty Excessive wear beyond normal wear and te...

Page 15: ...s into the Product as they are considered improper maintenance and may cause corrosion of metal parts which damage will be detectable and not covered by this warranty Excessive wear beyond normal wear...

Page 16: ...TALLATION AND USE AND NOTE further DO NOT attempt to lubricate your Product And NEVER put lye or caustic chemical drain cleaners into the Product as they are considered improper maintenance and may ca...

Reviews: