background image

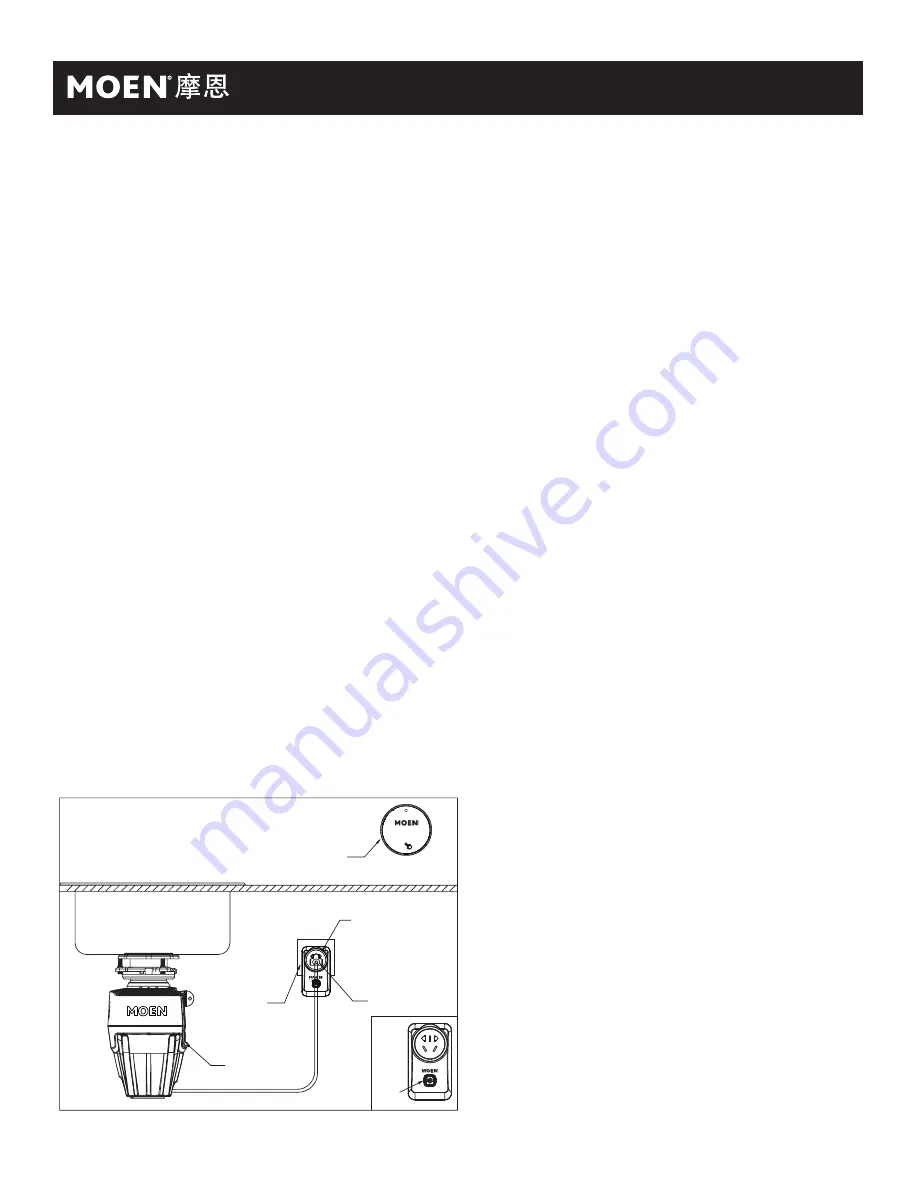
6. 无线移动插座的安装

Install the Wireless Mobile Socket

INS10903A

10


无线移动插座

插座
按键

墙面插座

(三孔)

食物垃圾处理器

水槽

无线开关

wireless switch

Wireless mobile socket

Processor plug

sink

Food waste disposer

Wall socket 

(three holes)

Socket 

button

处理器插头

MAX 2500W

MAX 2500W

垃圾处理器无线移动插座,安装方便,适用于功率
1马力范围的电气装置


• 

无需电墙开关 


• 

方便首次安装


• 

电压的适用范围:220-240V

无线移动插座安装:

注意:


• 

无线开关使用强力双面胶固定,请选择好合适的

• 

无线开关内部设有自发电装置,无需外接电源或

安装电池。

位置再安装。


• 

无线开关请安装在无线移动插座6米范围内的墙

壁或橱柜竖直面上(见下图),避开油烟区域。


• 

如遇积水,请马上停止使用,可使用电吹风完全

吹干后再使用。


• 

无线开关可能被儿童当作玩具,请安装在儿童够

不着的位置。


• 

全不锈钢台面因为会出现信号衰减而导致机器无

法正常接受信号的现象,所以,建议使用全不锈钢
台面的客户,将开关尽可能的置于接近接收装置附
近,如果还是无法有效的控制,则建议客户改用空
气开关安装

Garbage disposer wireless mobile socket is easy 
to install and suitable for electrical devices in the 
power range of 1 horsepower


• 

No wall switch required

• 

Easy to install for the first time

 •

Applicable voltage range: 220-240V

Wireless mobile socket installation:

Note:

    wireless switch, no external power supply or    
    battery installation is required.


• 

The wireless switch is fixed with strong 

    double-sided adhesive, please choose a 
    suitable location before installing.


• 

Please install the wireless switch on the wall 

    or the vertical surface of the cabinet within 6    
    meters of the wireless mobile socket(See 
    Figure Below), Avoid the oily smokey areas.


• 

In case of standing water, stop use immediately.

        Use a hair dryer to completely dry before use.
    

• 

The wireless switch may be viewed as a toy by 

        children - install it out of the reach of children.


• 

A stainless-steel countertop will cause signal 

        attenuation and the machine cannot receive 

        signals normally. Therefore, it is recommended

        that customers who use all-stainless-steel coun-

        tertops place the switch as close to the receiving 

        device as possible. If it still cannot be effectively 

        controlled, then customers are advised to switch 

        to air switch installation.


• 

There is a self-generating device inside the  

 Insert the wireless mobile socket into the wall 

socket in the cabinet,  Insert the power plug of 

the installed processor into the socket of the 

wireless mobile socket. The wireless switch is 

equipped with strong double-sided tape, Choose a 

suitable location and install it (The following 

figure). After the installation is complete, press 

the wireless switch button to start the processor; 

press the wireless switch button to start the 

processor. and press the wireless switch button 

again to shut down the processor. The socket 

button also has a switch function and pressing 

the button controls the power supply on/off.

 将无线移动插座插入橱柜内的墙面插座内,再将已
装好的处理器的电源插头插入无线移动插座的插孔内
。无线开关配有强力双面胶,选择合适的位置安装好
(下图)。安装完成,按下无线开关按钮,处理器启动
;再按下无线开关按钮,处理器关闭。插座按键也具
备开关功能,按压按键可控制电源的通断。

Summary of Contents for MEX50MCL

Page 1: ...djustable Wrench Flathead Screwdriver Phillips Screwdriver Safety Glasses Sealant Tape Measure HELPFUL TOOLS For safety and ease of replacement Moen rec ommends the use of these helpful tools Adjustab...

Page 2: ...ly remove the organic food waste generated in the kitchen before and after meals It is very easy to use you only need to turn on the faucet start the processor and then pour in the food waste The proc...

Page 3: ...food waste other than the above items and household waste is strictly prohibited 11 When the processor is not in use please cover the sink plug to prevent other objects from falling into the processor...

Page 4: ...le is too large you need to purchase a 140mm reducer PJW1010 Pipeline Matching Waste Disposer with Double Slot Waste Disposer with Single Slot Drain Connection Size With Moen Single Solt With Others b...

Page 5: ...Q R Parts list A Lid B Splash proof rubber parts C Stainless steel flange D Flange rubber flat gas E Wax ring F Support ring G Screw 3x H Mounting ring I Clamp J Rubber parts K Connecting ring L Proc...

Page 6: ...rom the flange assembly Use a screwdriver to remove the clamp I of the flange assem bly and remove the other parts from the flange assembly in the order shown in the figure K I I 4 3 G E F G H C 3x C...

Page 7: ...void danger it must be replaced by professionals from the manufacturer its maintenance deparment or similar departments Please note The operating voltage of this waste food disposer has been marked on...

Page 8: ...of installation Insert screwdriver into the hole of the dishwasher stopper pull out the stopper in the direction shown and just Connect the dishwasher hose to the dishwasher port of the processor see...

Page 9: ...own K L J J Slide a screwdriver into the arc opening of the connecting ring K and turn counter clockwise to tighten the processor L and the flange assembly Use the clamp to operate as shown in the fig...

Page 10: ...ore use The wireless switch may be viewed as a toy by children install it out of the reach of children A stainless steel countertop will cause signal attenuation and the machine cannot receive signals...

Page 11: ...en double slot pipe to the waste disposer The outlet pipe of the waste disposer is directly connected and reassembled sink Garbage disposal Drain elbow Floor sink Garbage disposal Piping floor Drain e...

Page 12: ...home kitchens are only used for intermittent use and cannot be used as commercial processors for continuous use To keep the drainage system unobstructed please make sure that there is no food waste in...

Page 13: ...13 B A 30 A B...

Page 14: ...ush the reset button see Figure A If it pops up press it to reset and then turn on the power to start Note there may be times when the reset button cannot be pressed immediately This is due to the mot...

Page 15: ...he top of the sink cleaning it and putting it back in place The splash guard may wear down with long term use If you need to replace it please contact the sales agent During use if you find a black ge...

Page 16: ...e following conditions 1 5 the maintenance cost material cost and labor cost shall still be charged as the case may be 1 Corresponding warranty card and valid invoice cannot be presented 2 Faults were...

Reviews: