background image

USING THE FREEZER

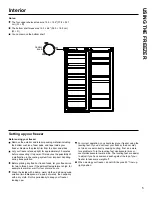
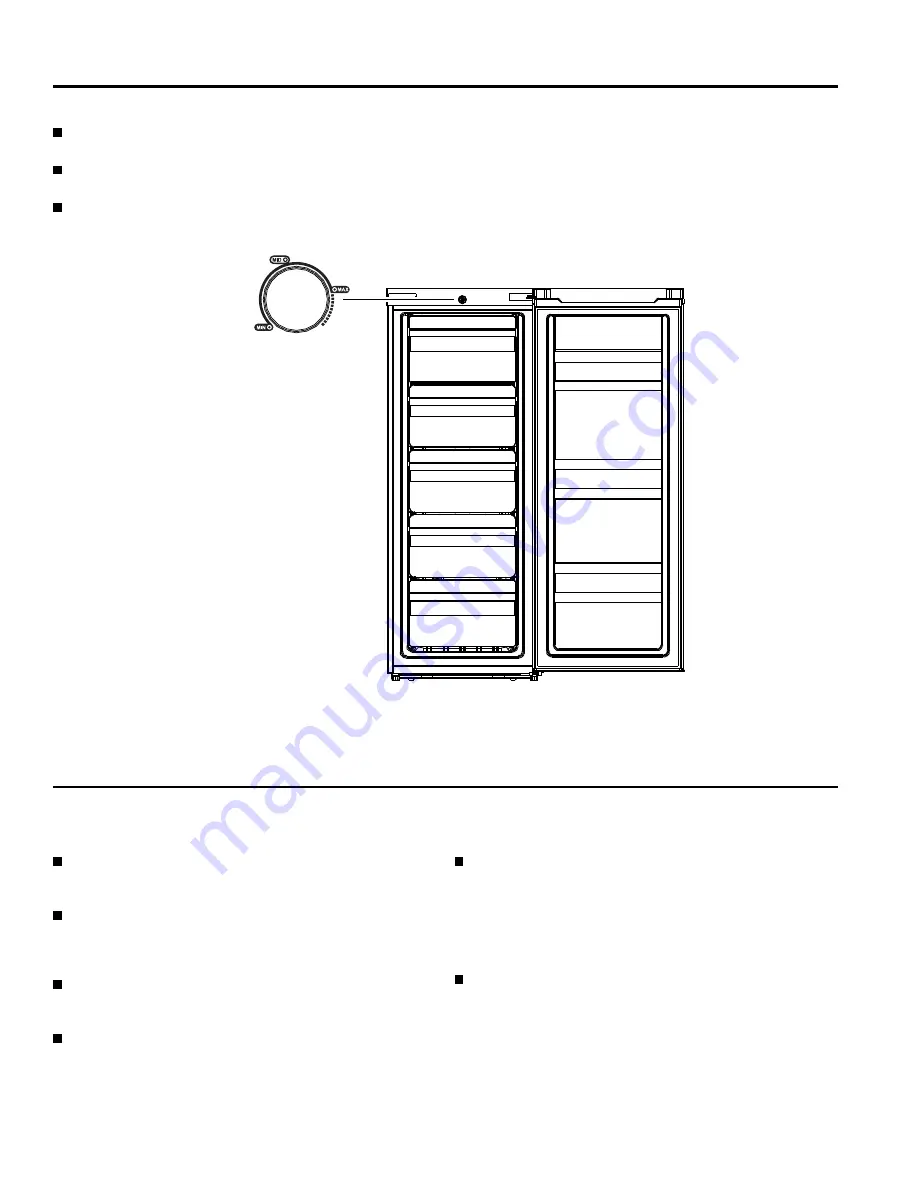
Interior

Notes:

The four upper shelves measure 14.9 × 12.6" (37.8 × 32.1
cm) (W × D)
The bottom shelf measures 15.2 × 6.6" (38.5 × 16.8 cm)
(W × D)
You can remove the bottom shelf.

Control

knob

Setting up your freezer

Before using your freezer

Remove the exterior and interior packing material including
the bottom cushions, foam pads, and tape inside your
freezer. Remove the plastic film from the door and sides.
Let your freezer stand upright for approximately 30 minutes
before connecting it to power. This reduces the possibility of
a malfunction in the cooling system from incorrect handling
during transportation.
Before placing any fresh or frozen foods, let your freezer run
for two to three hours. If the ambient temperature is high, for
example in summer, wait for four or more hours.
Wash the inside with a damp, warm cloth and a baking soda
solution (two tablespoons in a quart of water), then wipe dry
with a dry cloth. Do this periodically to keep your freezer
looking new.

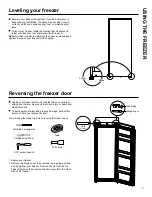
For correct operation, you should level your freezer using the
leveling feet. If you do not level your freezer, the door may
not close or seal correctly, causing cooling, frost, and mois-
ture problems. Turn the leveling feet clockwise to raise or
counterclockwise to lower a side. The leveling feet are easier
to adjust if you have someone push against the top of your
freezer to take some weight off.
When moving your freezer, do not tilt it beyond 45° from up-
right position.

5

Summary of Contents for MUF06DMRWW

Page 1: ...odel and serial numbers here Model Serial 29 6205 1 11 18 M MUF06DMRWW MoffatAppliances ca SAFETY INFORMATION 2 CONSUMER SUPPORT 18 WARRANTY 17 TROUBLESHOOTING TIPS 13 CARE AND CLEANING 11 USING THE F...

Page 2: ...he lid from any freezer before disposing of it or discontinuing its use 7R DYRLG VHULRXV LQMXU RU GHDWK FKLOGUHQ VKRXOG QRW stand on or play in or with the appliance KLOGUHQ DQG SHUVRQV ZLWK UHGXFHG S...

Page 3: ...ke sure the outlet is properly grounded Where a standard 2 prong wall outlet is encountered it is your personal responsibility and obligation to have it replaced with a properly grounded 3 prong wall...

Page 4: ...ensions 21 7 55 cm 55 9 142 cm 19 2 48 7 cm Top of Freezer 36 7 93 1 cm 135 35 9 91 1 cm 21 5 54 5 cm 5 3 cubic foot upright freezer User Guide Note The illustrations shown in this user guide are only...

Page 5: ...lacing any fresh or frozen foods let your freezer run for two to three hours If the ambient temperature is high for example in summer wait for four or more hours Wash the inside with a damp warm cloth...

Page 6: ...of your freezer and the surrounding walls 3 9 inches 10 cm be tween the back of your freezer and the wall and 11 8 inches 30 cm between the top of your freezer and the ceiling This allows for correct...

Page 7: ...ise Reversing the freezer door Top hinge Hinge cover Hole cover Unplug your freezer before you reverse the door Failure to unplug your freezer may result in serious injury or death from electrical sho...

Page 8: ...stall the bottom hinge and leveling feet on the other side 5 Align the door bottom so that the pin on the hinge slides into the hole in the door bottom 4 Remove the door stopper then install it on the...

Page 9: ...the other side of the door Providing the correct power source Make sure that The power outlet accepts a 3 prong grounding plug The third prong on the power cord plug grounds your freezer to minimize...

Page 10: ...n tinuously 2 Wait two to four hours before placing food into your freezer If the room temperature is high wait four or more hours 3 Turn the Control knob to adjust the temperature Your freezer has th...

Page 11: ...ur freezer 1 Unplug your freezer 2 Remove all food from your freezer and place the food into containers that will prevent it from melting 3 To speed the defrosting you can Place a fan blowing on its h...

Page 12: ...s that freeze too slowly may lose qual ity or spoil Wrap foods correctly and wipe containers dry before placing them in your freezer This cuts down on frost build up inside your freezer Do not line th...

Page 13: ...oes not close completely Make sure that no food packages are in the way Make sure that the door gasket seal is clean See Cleaning your freezer on page 13 If the door gasket does not seal try heating t...

Page 14: ...e freezer is hot Heat dissipation from the condenser may make the outside feel hot This is normal and hap pens if The room temperature is high You have too much food in your freezer You open and close...

Page 15: ...ase place in envelope and mail to Veuillez mettre dans une enveloppe et envoyez OWNERSHIP REGISTRATION P O BOX 1780 MISSISSAUGA ONTARIO L4Y 4G1 FOR CANADIAN CONSUMERS ONLY POUR R SIDENTS CANADIENS SEU...

Page 16: ...mmuniquer avec vous si jamais un avis de s curit concernant ce produit tait mis et de communiquer facilement avec vous en vertu de votre garantie si le besoin s en fait sentir REGISTER ON LINE www gea...

Page 17: ...servicing of the air gap device in the drain line Damage caused after delivery including damage from items dropped on the door Extended Warranties Purchase a GE Appliances extended warranty and learn...

Page 18: ...e any day of the year In Canada GEAppliances ca en support service request or call 800 561 3344 during normal business hours Extended Warranties Contact your retailer of choice regarding extended warr...

Page 19: ...les num ros de mod le et de s rie N de mod le N de s rie 29 6205 1 11 18 M MUF06DMRWW MoffatAppliances ca INFORMATION DE S CURIT 2 SERVICE LA CLIENT LE 18 GARANTIE 17 CONSEILS DE D PANNAGE 13 SOIN ET...

Page 20: ...VXIIRFDWLRQ RX G HQIHUPHPHQW retirez le couvercle d un cong lateur avant de le mettre au rebut ou si vous arr tez de l utiliser ILQ GH SUpYHQLU OHV DFFLGHQWV JUDYHV RX OD PRUW OHV enfants ne doivent...

Page 21: ...don et tirez droit pour la retirer de la prise Cessez imm diatement d utiliser un cordon lectrique endommag Si le cordon lectrique est endommag son remplacement doit tre effectu par un technicien en U...

Page 22: ...cm 21 5 po 54 5 cm Caract ristiques Contenu de l emballage Dimensions du produit Cong lateur vertical de 5 3 pi Guide de l utilisateur Remarque Les illustrations de ce Guide de l utilisateur sont fou...

Page 23: ...ure am biante est lev e par exemple en t attendre pendant quatre heu res ou plus Laver l int rieur l aide d un chiffon humide ti de tremp dans une solution de bicarbonate de soude deux cuill res soupe...

Page 24: ...e dos du cong lateur et le mur et 11 8 po 30 cm entre le dessus du cong lateur et le pla fond Cela permet une a ration ad quate R gler les pieds pour maintenir le cong lateur de niveau Si le cong late...

Page 25: ...p rieure du cong lateur afin de l incliner l g rement Inversion de la porte du cong lateur D brancher le cong lateur avant d inverser la porte Si le cong la teur n est pas d branch il peut en r sulter...

Page 26: ...partie inf rieure de la porte afin que l axe de la charni re s ins re dans l orifice de la partie inf rieure de la porte 4 Retirer la but e d ouverture de la porte puis l installer de l autre c t Cons...

Page 27: ...mentation appropri e V rifier que La prise secteur est adapt e une prise mise la terre 3 plots Le troisi me plot de la prise du c ble d alimentation met le cong lateur la terre pour r duire le risque...

Page 28: ...t Si l emballage contient des instructions les suivre avec attention pour la dur e de conservation Les aliments commercialement surgel s pr emball s doivent tre con serv s conform ment aux directives...

Page 29: ...un d givrage plus rapide il est possible de placer un ventilateur sa vitesse la plus lev e c t du cong lateur La glace fondra plus rapidement Lorsque la glace est fondue utiliser des torchons pour ess...

Page 30: ...alit ou s abimer Envelopper les aliments correctement et essuyer les r cipients pour qu ils soient secs avant de les placer dans le cong lateur Cela em p che l accumulation de givre l int rieur du con...

Page 31: ...rifier qu aucun emballage d aliments ne g ne la fermeture V rifier si le joint de la porte est propre Voir Nettoyage du cong lateur la page 12 Si le joint de la porte n est pas suffisamment herm tique...

Page 32: ...rmal et se produit si la temp rature de la pi ce est lev e la quantit d aliments dans le cong lateur est trop importante la porte est ouverte et ferm e de fa on excessive De la condensation se forme l...

Page 33: ...place in envelope and mail to Veuillez mettre dans une enveloppe et envoyez OWNERSHIP REGISTRATION P O BOX 1780 MISSISSAUGA ONTARIO L4Y 4G1 FOR CANADIAN CONSUMERS ONLY POUR R SIDENTS CANADIENS SEULEM...

Page 34: ...niquer avec vous si jamais un avis de s curit concernant ce produit tait mis et de communiquer facilement avec vous en vertu de votre garantie si le besoin s en fait sentir REGISTER ON LINE www geappl...

Page 35: ...l entretien inappropri s de l appareil Toute d fectuosit du produit lorsqu il a t utilis de fa on abusive ou inad quate ou employ toute autre fin que celle pour laquelle il a t con u ou utilis des fi...

Page 36: ...onvient le mieux Au Canada electromenagersge ca fr soutien demande de service ou t l phonez au 1 800 561 3344 durant les heures normales de bureau Pi ces et accessoires Les personnes ayant les comp te...

Reviews: