background image

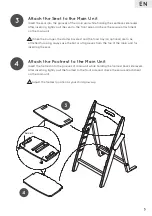
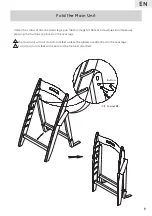
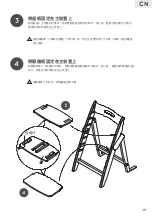
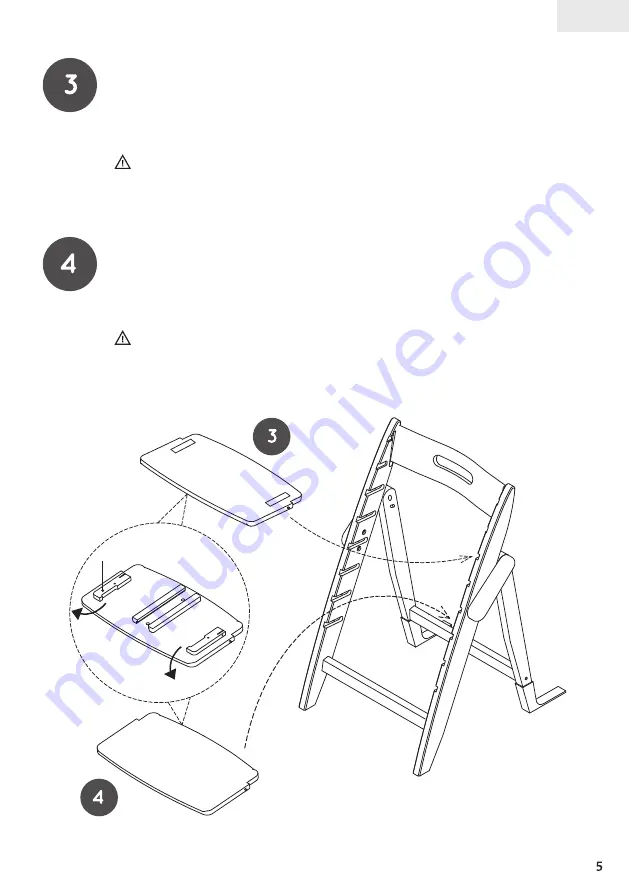
Attach the Seat to the Main Unit

Insert the seat into the grooves of the main unit while holding the seatback side levers.
After inserting, lightly pull the seat to the front side and check the secure attachment 
on the main unit.
     
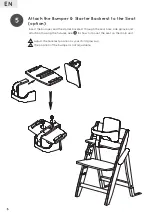
      When the bumper, the starter backrest and the food tray (all optional) are to be
attached for using, always use the 3rd or 4th grooves from the top of the main unit for
inserting the seat.

Attach the Footrest to the Main Unit

Lever

Insert the footrest into the grooves of main unit while holding the footrest back side levers.
After inserting, lightly pull the footrest to the front side and check the secure attachment
on the main unit.

      Adjust the footrest position as your child grows up.

EN

Summary of Contents for YIPPY

Page 1: ...M YIPPY IM IL V02 說明書 EN CN JP ...

Page 2: ......

Page 3: ... store in a place out of reach of children Risk of causing an accident such as suffocation Dispose of the packaging materials immediately after unpacking or store in a place out of reach of children Check for no wall furniture or home electrical appliances such as a fan within reach of the arms or legs while the child is sitting down Do not use this product on a thick carpet or footcloth Do not us...

Page 4: ...omponents Seat Backrest Groove Rear Leg Starter Backrest Bumper Harness Bottom Cross Connection Rear Gliders Footrest Front Leg Bottom Cross Connection Front Food Tray Name of Components Optional Accessories EN ...

Page 5: ...ore assembling Wood chips may be left in the holes or grooves of parts Use a slotted screwdriver to remove The illustrated parts may be slightly different from actual parts Main Unit Seat Footrest Gliders 2 pcs Starter Set Food Tray Harness G Bumper Starter Backrest Fixtures EN ...

Page 6: ...Assembling Procedure Attach the Gliders 2 pcs Attach the gliders 2 pcs on the rear legs Open the Main Unit Push and expand the front legs to the front side while the rear legs are held EN ...

Page 7: ...backrest and the food tray all optional are to be attached for using always use the 3rd or 4th grooves from the top of the main unit for inserting the seat Attach the Footrest to the Main Unit Lever Insert the footrest into the grooves of main unit while holding the footrest back side levers After inserting lightly pull the footrest to the front side and check the secure attachment on the main uni...

Page 8: ...nsert the bumper and the starter backrest through the seat back side groove and attach both using the fixtures See for how to mount the seat on the main unit Adjust the backrest position as your child grows up The position of the bumper is not adjustable EN ...

Page 9: ...nsert the fixture straight in the vertical direction with the side on which R or L is marked facing downward After inserting the fixtures check for secure attachment of fixtures on the seatback side Fig 1 Let a child sit down on the seat and after adjusting the length of the belt insert the buckle of the shoulder belt for the attachment until a click sound is heard Fig 2 EN ...

Page 10: ... the main unit into the 1st or 2nd groove from the top of the main unit Fig 1 Push the rectangular part to ensure it assembles completely with the bumper Fig 2 Turn the locks on the left and right side toward the inside and attach Fig 3 After attachment lightly pull the tray to the front side and confirm the secure attachment Oval part Lock Rectangular part EN ...

Page 11: ...ar legs pull the front legs to the rear side while simultaneously pressing the buttons 2 places on the rear legs The main unit will not stand on its feet unless the gliders are attached to the rear legs It will stand on its feet with seat and the footrest attached EN ...

Page 12: ...lets or wet cloths on the wooden parts Store in a place away from exposure to direct sunlight and the humidity is low The specifications of this product may be changed without prior notice Dimensions Seat Height Footrest Height Withstanding Load Materials Surface Finish Country of Origin Standard H 760 mm W 470 mm D 470 mm 450 590 mm 230 450 mm Starter Set Attached up to 15 kg Starter Set Detached...

Page 13: ...兒童坐在本產品上時 不得高舉或移動本產品 也不得調整座板 腳踏板的高度 本產品的折疊 展開或附件的固定 拆卸須由成人 操作 折疊本產品並存放時 請將其放置在兒童無法觸碰 的地方 為免引起事故的風險 如窒息 開箱後立即處理包裝 材料 或存放于兒童無法觸碰的地方 兒童坐好後 檢查牆壁 傢俱或家用電器 如電扇 是否在其手臂或腿的可及範圍內 請勿在厚地毯或墊子上使用本產品 請勿在樓梯或敞開的窗戶附近使用本產品 請勿將本產品作為梯凳使用 請勿在明火或加熱器附近使用本產品 請勿使本產品受到陽光的直射 請勿對本產品進行任何修改 請注意 天然木材的木紋 顏色等各不相同 木材成分可能因溫度 濕度和使用 儲存條件的改 變而改變或變質 使用過程中可能會損壞地板 將餐盤固定在本產品上時 必須包含初階套件中的 護欄和小靠背 請購買可選配件 請勿使用製造商認可的配件之外的其他配件 本產品的耐受負荷為 90 千克 不包...

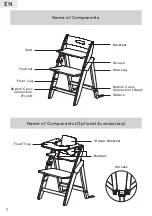
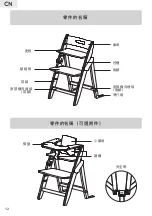
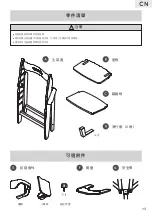
Page 14: ...零件的名稱 座板 靠背 凹槽 後腳 小靠背 護欄 安全帶 底部橫向連接 後腳 滑行套 腳踏板 前腳 底部橫向連接 前腳 餐盤 零件的名稱 可選附件 12 CN ...

Page 15: ...注意 零件清單 可選附件 裝配前檢查所有零件是否齊備 零件的開孔或凹槽內可能留有木屑 可使用一字螺絲刀將其清除 圖示零件可能與實際零件稍有不同 主裝置 座板 腳踏板 滑行套 2 塊 初階套件 餐盤 安全帶 G 護欄 小靠背 固定裝置 13 CN ...

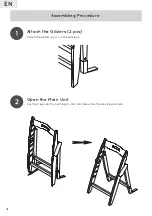
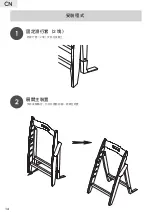
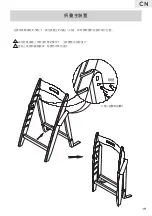
Page 16: ...安裝程式 固定滑行套 2 塊 將滑行套 2 塊 安裝在後腳上 展開主裝置 保持後腳穩定 向前方推動前腳 展開主裝置 14 CN ...

Page 17: ...座板固定在主裝置上 將座板插入主裝置的凹槽中 同時啓動座板底部的控制杆 插入後 輕輕地將座板拉到前方 檢查是否將其緊固在主裝置上 當使用護欄 小靠背和餐盤 均可選 時 須於主裝置頂端下方的第 3 或第 4 個凹槽處 插入座板 將腳踏板固定在主裝置上 將腳踏板插入主裝置的凹槽中 同時啓動腳踏板背面的控制杆 插入後 輕輕地將腳踏板拉到 前方 檢查是否將其緊固在主裝置上 請隨著孩子的成長 調整腳踏板的位置 15 CN ...

Page 18: ...將護欄和小靠背插入座椅後側的凹槽中 並用固定裝置將兩者固定到位 有關將座板安裝到主裝置中的方法 參見 請隨著孩子的成長 調整靠背的位置 護欄的位置是不可調節的 將護欄和小靠背固定在座板上 可選 16 CN ...

Page 19: ...將安全帶固定在座板上 可選 圖 1 圖 2 哢噠 請先確認安全帶固定裝置上所示的 R 右 和 L 左 並確保在安裝時使標記有 R 和 L 的一面朝外 將固定裝置沿垂直方向直線插入 確保標記有 R 或 L 的一面朝下 插入固定裝置後 檢查座椅靠背側的固定裝置是否安裝牢固 圖 1 讓孩子坐在座位上以調整安全帶的長度 然後 將跨肩式安全帶的搭扣插入附件 直到聽到 哢噠聲 圖 2 17 CN ...

Page 20: ... 圖 1 圖 3 圖 2 將餐盤固定在主裝置上 可選 將護欄和小靠背固定到主裝置上之後 將餐盤的橢圓形零件插入到主裝置頂端下方的第 1 或 第 2 個凹槽內 圖 1 推動矩形零件 確保與護欄完全貼合 圖 2 將左右兩側的鎖定器向內側旋轉並固定 圖 3 固定好後 輕輕地將餐盤拉到前端 確認是否緊固到位 橢圓形零件 鎖定器 矩形零件 18 CN ...

Page 21: ...折疊主裝置 按鈕 2 個 左側和右側 在保持後腳穩定的情況下 按住後腳上的按鈕 2 個 同時將裝置的前腳向後方拉動 未在裝置後腳上安裝滑行套的情況下 主裝置無法保持直立 當裝上座板和腳踏板後 裝置仍可保持直立 19 CN ...

Page 22: ...用乾布擦拭 確保徹底擦去表面的水分 被禁止的行為 請勿使用拋光劑 溶劑 汽油 稀釋劑等 請勿將水滴或濕布留在木質零件上 存放在遠離陽光直射且濕度較低的地方 本產品規格如有變更 恕不另行通知 尺寸 座板高度 腳踏板高度 耐受載荷 材質 表面處理 產原地 標準 高度 760mm 寬度 470mm 深度 470mm 450 590mm 230 450mm 使用有初階套件時 達到 15 千克 非使用初階套件時 達到 90 千克 支腿 天然木材 座板 腳踏板 座椅靠背 夾板 噴漆 越南 符合 EN14988 2017 標準 蜂樂母嬰有限公司 電話 852 3996 9956 聯繫我們 20 CN ...

Page 23: ...21 JP ...

Page 24: ...22 JP ...

Page 25: ...G 23 JP ...

Page 26: ...24 JP ...

Page 27: ...25 JP ...

Page 28: ...26 JP ...

Page 29: ...27 JP ...

Page 30: ...28 JP ...

Page 31: ...29 JP ...

Page 32: ...30 JP ...

Page 33: ......

Page 34: ......

Page 35: ......

Page 36: ...www moji family com ...

Reviews: