background image


MOLECULAR DEVICES > CLONEPIX 2 

ROBOT MANUAL 


Molecular Devices > 16 of 39  


Health and Safety 

Important Note 


Before using the robot, it is very important that you have read this manual and have 
understood all the safety instructions. 

Prior to using the robot, please make sure that you have been through the robot Pre-
Power-Up checklist. This checklist ensures that all moving parts on the Robot are 
correctly situated in their datum positions. 

Then follow the procedures as set out in the Power Up section. 


Transport and Storage 

The robot must be stored and transported in temperatures within the range -25

°

C to +55

°

C.  

The machine is fitted with caster wheels for ease of movement. 


Lifting Points  

The machine should not be moved after installation. If relocation is necessary, standard lifting 
gear is adequate but should be undertaken only in the presence of a Molecular Devices 
approved engineer. 

The robot should be moved into position using appropriate handling equipment such as 
forklift trucks or dolly trucks. The machine should be properly balanced on the forks prior to 
lifting. 

Important note: Do not use any part of the exterior bodywork to lift the instrument as this 
may cause irreparable damage. 


External Covers 


Warning

 – If any of the external covers on ClonePix 2 are removed the power supply is not 

automatically interrupted. If it is necessary to remove any of the external covers it is essential 
that the power is switched off first. Do not attempt to use the robot until the covers are 
replaced. 


Electrical Safety 


The robot must be connected to a properly earthed power outlet to protect users from the risk 
of electric shock.  The main chassis of the machine is earthed together with all associated 
electrical components.   
Do not remove any of the fixed covers, as there are no user serviceable parts inside.  All 
internal work should be referred to Molecular Devices approved service personnel. 

In the event of a liquid spillage into the base cavity of the robot, the power supply must be 
disconnected at the mains before any attempt is made to clean up the spillage. 

There should not be any spillage from the Wash Bath in normal use with the Wash Station 
correctly set up. However, spill trays have been fitted where appropriate. 

Summary of Contents for ClonePix 2

Page 1: ...07MAN1186 B ECO 4100 ClonePixTM 2 ROBOT MANUAL...

Page 2: ...10 Robot Enclosure 11 Installation 12 Layout of ClonePix 2 12 Source and Destination Plate Stackers 13 Connecting the Wash Bottles 14 Connecting the Ethanol Bottles 14 Camera Alignment 15 ClonePix 2...

Page 3: ...d Sterile Water Supply 24 Incoming Compressed Air Supply 25 Automated Picking Pin Cleaning 25 Sterility Validation Tests 26 Changing the Picking Head 27 Remove Head 27 Replace Head 27 Changing or Repl...

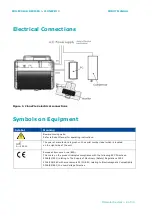
Page 4: ...Devices 4 of 39 Table of Figures Figure 1 ClonePix 2 electrical connections 8 Figure 2 ClonePix 2 PC connections 9 Figure 3 ClonePix 2 layout and dimensions 12 Figure 4 Stacker orientation 13 Figure 5...

Page 5: ...imaging using a choice of five filter sets Colonies selected on the basis of size shape and proximity to neighbors Colonies ranked based on fluorescent intensity of the colony or the secreted product...

Page 6: ...pth x 1495mm height Weight Robot 350 kg maximum Compressor 60 kg Compressed Air Supply Minimum Pressure 6 bar Minimum volume 80L min Operating Environment Indoor use only Temperature 10 C to 40 C Humi...

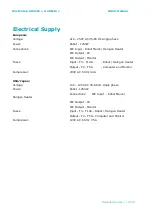
Page 7: ...ater IEC Output PC IEC Output Monitor Fuses Input F3 T10A Robot Halogen Heater Output F2 T5A Computer and Monitor Compressor 230V AC 50Hz 3 4A USA Japan Voltage 100 125V AC 45 66 Hz single phase Power...

Page 8: ...g instructions 2011 The year of manufacture is given on the serial number label which is located on the right side of the unit European Economic Area EEA This mark on the product indicates compliance...

Page 9: ...MOLECULAR DEVICES CLONEPIX 2 ROBOT MANUAL Molecular Devices 9 of 39 PC Connections Figure 2 ClonePix 2 PC connections Mains Input Monitor Camera Ethernet Mouse USB Keyboard Printer...

Page 10: ...yan 4 X4991 standard CloneDetect FITC Fluorescein GFP AF488 470 Blue 3 535 Green 3 X4992 YFP 500 Cyan 2 550 Yellow 2 X4993 CloneDetect 549 R phycoerythrin Rhodamine AF546 530 Green 1 590 Red 1 X4994 C...

Page 11: ...d exhaust fan This creates a horizontal laminar flow of sterile air across the picking area of the bed of the machine whilst the front door is closed The main features are Class 100 type enclosure Off...

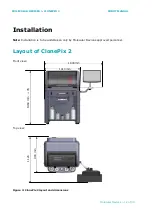
Page 12: ...Molecular Devices 12 of 39 Installation Note Installation is to be undertaken only by Molecular Devices approved personnel Layout of ClonePix 2 Front view Top view Figure 3 ClonePix 2 layout and dimen...

Page 13: ...automatically fed onto the bed individually and the lid is removed as the plate is pushed through the lid lift mechanism The lid is replaced as the plate returns through to the cassette Figure 4 Stack...

Page 14: ...ake sure that they are marked so that the tubes can be re connected correctly The outlets on the machine are in the same order as the bottles on the wash station Figure 5 Wash bottle connections Conne...

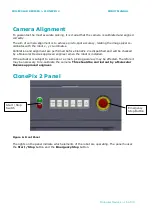
Page 15: ...formed before ClonePix 2 is dispatched and will be checked by a Molecular Devices approved engineer when the robot is installed If the actuator is subject to a knock or a crash picking accuracy may be...

Page 16: ...ne should be properly balanced on the forks prior to lifting Important note Do not use any part of the exterior bodywork to lift the instrument as this may cause irreparable damage External Covers War...

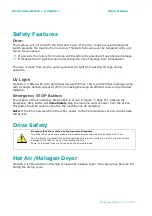
Page 17: ...lamp an efficient source of germicidal radiation Emergency STOP Button The location of the Emergency Stop button is shown in Figure 7 Page 15 Striking the Emergency Stop button will immediately stop...

Page 18: ...ll not exceed 70db measured at a distance of 1 meter Service and Maintenance It is strongly recommend that maintenance be carried out regularly by a Molecular Devices approved service engineer Mainten...

Page 19: ...n left on the bed of the instrument Check that all motor tracks are free of obstruction Check that there are no obstructions to head movement Check that the main robot axes XY are roughly in the centr...

Page 20: ...x 2 application by selecting Exit from the File menu on the main setup screen Close down Windows Click the Start menu at the bottom of the screen then click Shut Down Wait for computer to switch off c...

Page 21: ...pin cleaning procedure below Fill ethanol wash bath with 70 Ethanol For systems fitted with a replenishing ethanol wash bath check that there are no kinks in the supply waste tubing and then run thro...

Page 22: ...air flow For more thorough cleaning use the following procedure 1 Remove picking head from ClonePix 2 see instructions below and remove pins and picking tubing 2 Submerge head into a beaker of 70 Etha...

Page 23: ...w 2 Make a 2 solution 50mls of aQu Clean Pin Cleaning Solution K2505 in a small plastic beaker 3 Place all the items in the solution and sonicate for 10 minutes 4 Rinse thoroughly in de ionized water...

Page 24: ...onditions 121 C at 15 psi 103 kPa for 20 minutes Cleaning of Instrument Interior For efficient decontamination of pathogenic micro organisms all non removable parts within the ClonePix 2 top cover sho...

Page 25: ...pplied oil free compressed air unit draws air from the local environment and filters it to 0 02 microns using a 3 stage filtration process Automated Picking Pin Cleaning The reusable Picking Pins are...

Page 26: ...fter this period there was no contamination on any of the agar plates A general purpose medium which supports the growth of fastidious and nonfastidious microorganisms 2 Mammalian cell picking sterili...

Page 27: ...e right hand side to secure the head Fit the picking tubing to the tube connectors starting at the back and working forward making sure that each tube is fitted to the correct connector Follow the ins...

Page 28: ...lated with eight X4961 F1 Pins X4942 Additional picking head populated with eight X4962 F2 Pins X4949 Additional picking head without pins X4961 F1 ClonePix picking pin 0 40mm diameter Single pin X496...

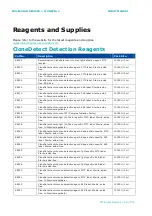
Page 29: ...CIF Complex Initiation Factor 10000U 1ml K8205 CloneDetect human IgG Fc Chain specific FITC label Sterile azide free 10000U 1ml K8206 CloneDetect human IgG Fc Chain specific FITC label Sterile azide...

Page 30: ...20 CloneMatrix optimized for CHO cells 6 x 40ml 6 x 100ml final media volume CloneMedia XPMedia Cat No Description Pack Size K8610 CloneMedia semi solid media for hybridomas myelomas 1 x 90ml K8600 Cl...

Page 31: ...W1105 PetriWell 6 Plate Black with clear base Polystyrene Non TC treated 1 40 W1107 PetriWell 6 Plate Black with clear base Polystyrene Collagen coated 1 40 W1109 PetriWell 6 Plate Black with clear ba...

Page 32: ...in cleaning solution 1L K8080 Sterilizing Agent 1L per Sachet 10 K8085 Sterilizing Agent 1L per Sachet 50 K8150 CaliBeads Fluorescent beads for ClonePix 200 m diameter Pan wavelength 100ml K8010 Adher...

Page 33: ...ystem Purge the supply line Check Z height of pin Not depositing Pin blocked run Purge option or replace pin Dispense volume too low No liquid flow to Wash Station System fluid supply bottle is empty...

Page 34: ...ht option normally used for configuring the robot and for visualising colonies during picking using LEDs located under the source plate being imaged EQUIGLASS A high quality polymer used as the base m...

Page 35: ...ng suspended colonies F2 pins have an internal tip diameter of 700 m and are for picking adherent colonies monolayers PRIMARY PIN The picking pin nearest the front of the robot All other pins are alig...

Page 36: ...in some older systems WASTE BOTTLE 4 liter bottle used to collect purged fluid 1 liter in some older systems WHITE LIGHT Full spectrum LED illumination of which there are two options Transillumination...

Page 37: ...trical supply 7 8 9 10 Emergency 15 17 19 G Germicidal radiation 17 H Head 19 I Initial Operation 19 Installation 11 12 16 Isolator switch 20 L Lifting 16 19 Liquid spillage 16 M Maintenance 18 Maximu...

Page 38: ...MOLECULAR DEVICES CLONEPIX 2 ROBOT MANUAL Molecular Devices 38 of 39 Wash station 14 16 Waste bottles 14...

Page 39: ...t 2012 by Molecular Devices New Milton Ltd All rights reserved No part of this publication may be reproduced stored in a retrieval system or transmitted in any form by any means electronic mechanical...

Reviews: