Chapter 13: Plating Processes
5031498 G
187
Setting Source and Destination Plate Options
To set source and destination plate options:
1. In the Microplate Selection window, from the Source Microplate list, select the plate type for
the source.
2. In the Destination Plate field, select the plate type for the source.
The source and destination plates occupy separate stacker lanes. The source and
destination plates must match the configuration of the stacker lanes for the instrument.
If the plate type that you need is not listed, contact Molecular Devices to add a new plate
type to the list. See
.
3. Select either to dip the pins a number of times or to stir the wells of the destination plate
during inoculation.
To dip the pins a number of times, click Multi Dip and in the Number of Dips field, enter
the number of times to dip the pins.
To stir the wells, click Stir Destination.
4. Click Next to configure the stackers.
Selecting the Stackers
To select the stackers:
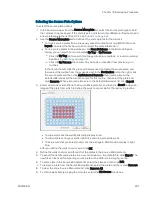
1. In the Stackers window, click the rectangles that represent the stackers to use for the
source and the Destination.
The stacker rectangle changes from yellow to red.
Note: If the stacker you want to use cannot be selected, then it is not compatible
with the plate type selected in the Microplate Selection window.
2. Click Next to set the aspirate and dispense options.
Setting Volume and Depth Options
To set the volume and depth options:
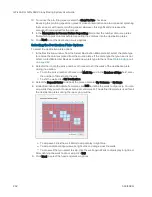
1. In the Volumes window, select the head to use for the plating routine.
2. In the Liquid Volume (ul) field, enter a value from 10 to 130 for the aspiration volume in
microliters (µl).
3. To triturate the liquid, in the Mix Volume (ul) field, enter a value from 10 to 130 for the
dispense and aspirate volume in microliters (µl) and then in the Mix Steps field, enter the
number of times to dispense and aspirate the sample.
4. In the Blowout Volume (ul) field, enter a value from 10 to 130 for the volume in microliters
(µl) to dispense to ensure that all the liquid is dispensed from the pipettors.
5. In the Source Microplate (mm above bottom) field, enter the distance in millimeters (mm)
above the bottom of the source plate where the pipettors start to aspirate the sample.
6. In the Destination Microplate (mm above bottom) field, enter the distance in millimeters
above the bottom of the destination plate where the pipettors start to dispense the sample.
7. In the Number of wells to Aspirate and Dispense field, enter the number of wells to use for
the calibration process.
8. Weight the empty destination plate.
9. Place the prepared source plate and the destination plate in the correct stacker lanes.
10. Make sure that the instrument door is closed.
11. Click Next to start the calibration process.
Summary of Contents for QPix 450
Page 1: ...5031498 G August 2022 QPix 450 or QPix 460 Colony Picking System User Guide ...
Page 6: ...QPix 450 or QPix 460 Colony Picking System User Guide 6 5031498 G ...
Page 22: ...QPix 450 or QPix 460 Colony Picking System User Guide 22 5031498 G ...
Page 56: ...QPix 450 or QPix 460 Colony Picking System User Guide 56 5031498 G ...
Page 102: ...QPix 450 or QPix 460 Colony Picking System User Guide 102 5031498 G ...
Page 158: ...QPix 450 or QPix 460 Colony Picking System User Guide 158 5031498 G ...
Page 176: ...QPix 450 or QPix 460 Colony Picking System User Guide 176 5031498 G ...
Page 218: ...QPix 450 or QPix 460 Colony Picking System User Guide 218 5031498 G ...
Page 226: ...QPix 450 or QPix 460 Colony Picking System User Guide 226 5031498 G ...
Page 250: ...QPix 450 or QPix 460 Colony Picking System User Guide 250 5031498 G ...
Page 256: ...QPix 450 or QPix 460 Colony Picking System User Guide 256 5031498 G ...


