Tool Kit for Sabre™ Flat Blade Crimp Terminal
Doc No: ATS-6381172HM Release Date: 02-12-07
UNCONTROLLED COPY
Page 4 of 8
Revision: C
Revision Date: 09-09-10
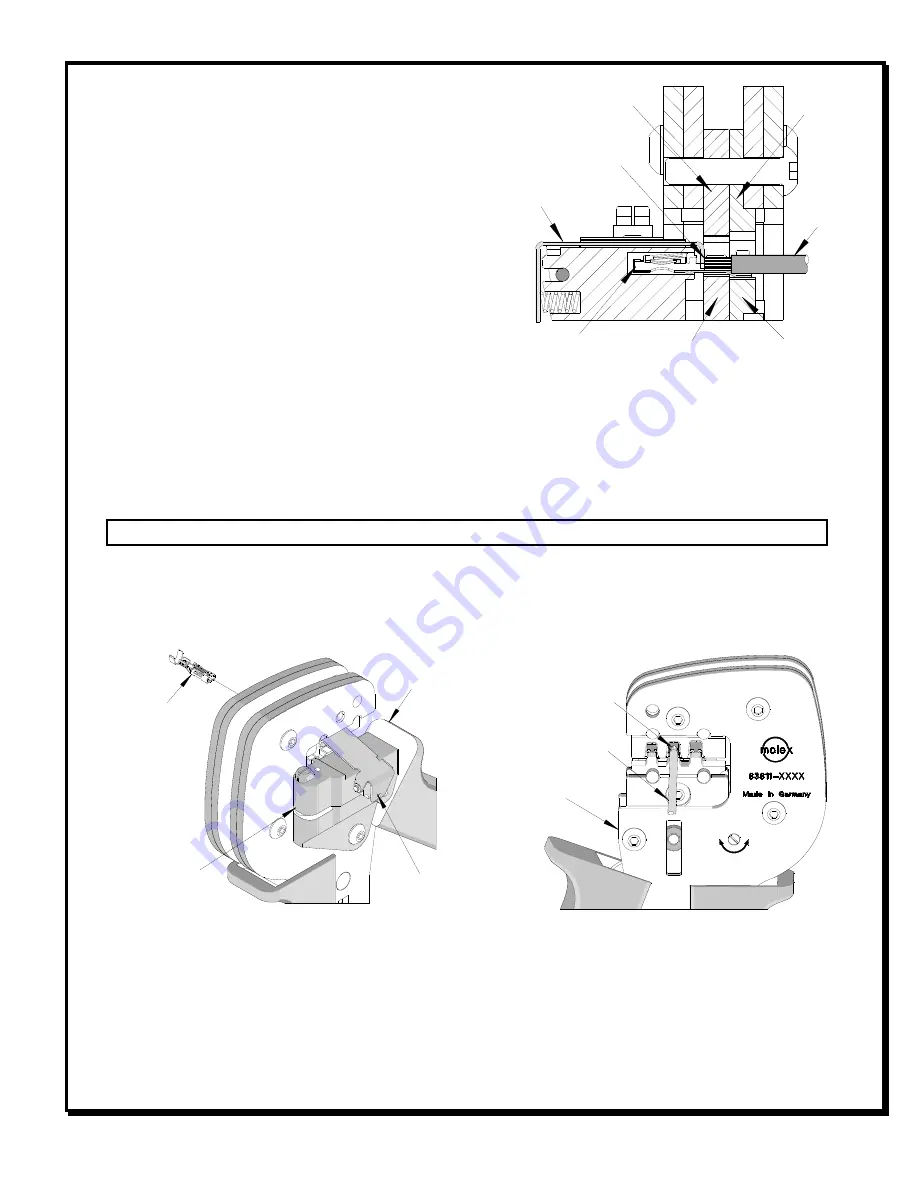
TERMINAL
Figure 6
WIRE IN TERMINAL
JAWS
PARTIALLY
CLOSED
WIRE AGAINST
WIRE STOP
HANDLE
OPEN
LOCATOR
CLOSED
Figure 5
PUSH HERE TO
OPEN WIRE STOP
Crimping Terminals
1.
Select the desired terminal listed in the preceding
charts.
2.
Swing the terminal locator away from the crimp tool
shown in Figure 3. Some terminals with large
insulation grips may interfere with the crimp tooling
when swinging the locator into position. The terminal
must then be loaded into the locator in the closed
crimp position. See Figure 4.
3.
Press down on the wire stop on the locator as shown
in Figure 5. Insert the proper terminal into the proper
nest opening. Make sure when choosing the nest
opening, it will correspond with the A, B, or C profile
on the hand tool. See Figure 4.
4.
Return the locator to its original position.
5.
Insert the proper wire over the terminal. Gently touch
the wire stop with the end of the wire.
See Figure 5 and 6.
6.
Compress the terminal by squeezing the tool handles until the ratchet mechanism cycle has been completed.
Release handles to open the jaws.
Note
: The tamper proof ratchet action will not release the tool until it has been fully closed.
7.
Remove the crimped terminal from the terminal locator by pressing down on the wire stop and gently pulling on
the wire. The terminal locator can be in either position.
8.
Visually inspect the crimped terminal for proper crimp location.
For the Battery Power Tool:
1.
Cycle the Battery Power Tool to crimp the terminal to the wire.
2.
Remove the crimped terminal from the terminal locator by pressing down on the wire stop and gently pulling on
the wire. The terminal locator can be in either position.
3.
Visually inspect the crimped terminal for proper crimp location.
Figure 4
WIRE
INSULATION
PUNCH
CONDUCTOR ANVIL
LOCATOR
INSULATION
ANVIL
WIRES AGAINST
LOCATOR STOP
CONDUCTOR
PUNCH
TERMINAL


