background image

Hand Crimp Tool for Mini KK Crimp Terminals  

Doc No: ATS-6382369HM 

Release Date: 02-24-11 

UNCONTROLLED COPY


Page 3 of 7 

Revision: A 

Revision Date: 02-24-11 

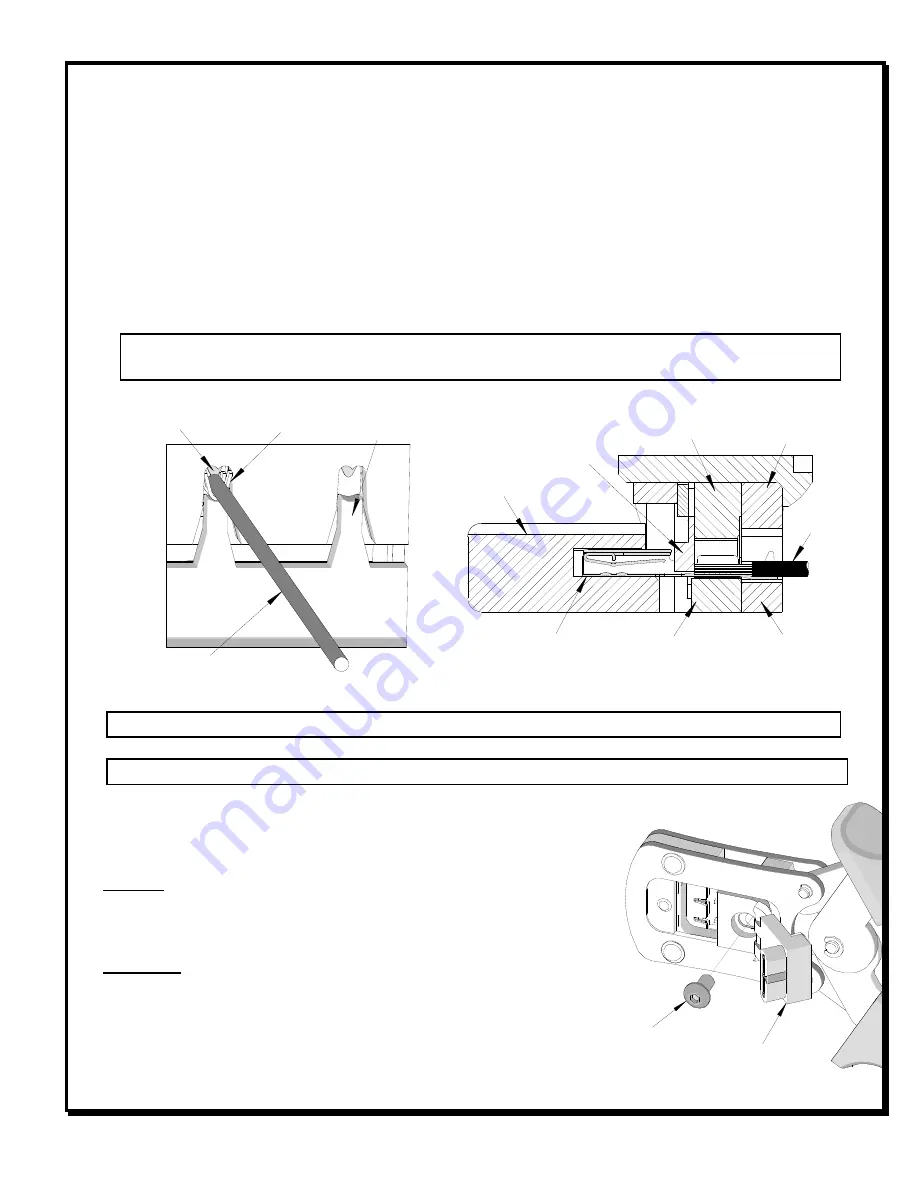
WIRE 

CONDUCTOR 

PUNCH 

TERMINAL 

WIRE STOP 

BLADE 

Figure 2 

Figure 3 

WIRE 

TERMINAL 

LOCATOR 

INSULATION 

PUNCH 

INSULATION 

ANVIL 

WIRE STOP 

BLADE 

CONDUCTOR 

ANVIL 

CONDUCTOR 

PUNCH 


2.


Insert the terminal into the correct profile until the terminal is fully seated and stops.  Make sure the wire 
stop blade is fully seated on the terminal behind the conductor grip section. 

3.


Gently pivot the locator closed. 

4.


Bring down the wire stop blade. 

5.


Slide the pre-stripped wire into the terminal; make sure to aim the wire brush towards the tip point on the 
wire stop blade.  See Figure 2.  Align the wire so that it is parallel and sitting into the terminal.  Maintain a 
light and constant pressure on the wire that is seated in the terminal at all times.  (Do not let go of the 
wire.)  Be sure to hold the wire and terminal in place until the terminal is fully crimped.  See Figure 3. 

6.


Close the tool until the ratchet releases. 

7.


Lift the wire stop blade up. 

8.


Carefully remove the crimped terminal. 


Note:

  To maintain good brush control and a consistent bell mouth the crimping instructions must be 

followed. 


Note:

 The tamper proof ratchet action will not release the tool until it has been fully closed. 


Note:

  To maintain good brush control and a consistent bell mouth the crimping instructions must be followed. 


Terminal Locator Replacement/Change Over 

This section describes the procedure for changing locators. 
 

Removal


1.


With the tool in the open position, pivot the terminal locator outward. 

2.


Remove the M4 BHCS.  See Figure 4. 


Installation


1.


Place the proper locator, (See Chart on page 2), on the hand tool.  
Install the M4 BHCS.  See Figure 4. 

2.


Tighten the screw enough to hold the locator.  Make sure the locator 
can still float freely with hand pressure. 

M4 BHCS 

PIVOT LOCATOR 

Figure 4 

Summary of Contents for 63823-6900

Page 1: ...mpliant and RoHS compliant Modular Crimp Head is removable and can be use in the Air Powered Tool Order No 63816 0100 accompanied by Air Powered Crimp Adapter Order No 63816 0700 Can also be used in the Battery Powered Tool Order No 63816 0200 110 V or 63816 0250 220 V accompanied by Battery Powered Crimp Adapter Order No 63816 0600 SCOPE Products Mini KK Crimp Terminal 22 28 AWG Terminal Series N...

Page 2: ... 12 0 70 0 75 028 030 1 40 055 X 28 0 08 0 66 0 71 026 028 1 40 055 X Terminal Series No Wire Size Insulation Diameter Insulation Crimp Pull Force Minimum Height Ref Width Ref AWG mm2 mm In mm In mm In N Lb 5659 22 0 35 1 60 1 70 063 067 1 70 067 1 85 073 39 23 8 8 24 0 20 1 40 1 50 055 059 1 65 065 1 85 073 29 42 6 6 26 0 12 1 30 1 45 051 057 1 50 059 1 75 069 19 61 4 4 28 0 08 1 20 1 30 047 051 ...

Page 3: ...ated in the terminal at all times Do not let go of the wire Be sure to hold the wire and terminal in place until the terminal is fully crimped See Figure 3 6 Close the tool until the ratchet releases 7 Lift the wire stop blade up 8 Carefully remove the crimped terminal Note To maintain good brush control and a consistent bell mouth the crimping instructions must be followed Note The tamper proof r...

Page 4: ...Wipe excess oil from hand tool particularly from crimping area Oil transferred from the crimping area onto certain terminations may affect the electrical characteristics of an application 5 When tool is not in use keep the handles closed to prevent objects from becoming lodged in the crimping dies and store the tool in a clean dry area Miscrimps or Jams Should this tool ever become stuck or jammed...

Page 5: ...red with no influence from the insulation crimp The insulation should be stripped long 1 2 in so the insulation grips on the terminal do not grip the wire insulation or the conductor Refer to Molex Quality Crimping Handbook 63800 0029 for additional information on crimping and crimp testing 6 Molex does not certify crimp hand tools CAUTION Molex crimp specifications are valid only when used with M...

Page 6: ...ular Crimp Head Order No Tool Order no Tool Description Adapter Order No Adapter Description Figure No 63823 6970 63816 0000 Hand Crimp Frame Short N A N A 6 63816 0050 Hand Crimp Frame Long N A N A 6 63816 0200 Battery Power Tool 110 V 63816 0600 Battery Power Crimp Adapter 7 63816 0250 Battery Power Tool 220 V 63816 0600 Battery Power Crimp Adapter 7 63816 0100 Air Power Tool 63816 0700 Air Powe...

Page 7: ...SE LEVER HANDLE SPRING CRIMPING SPRING 2 LOCATOR 2 1 4 Figure 9 M4 X 8mm LONG BHCS 3 5 6 PARTS LIST Hand Crimp Tool 63823 6900 Item Order Number Description Quantity 1 63823 6970 Modular Crimp Head 1 2 63816 0000 Hand Crimp Frame Short 1 3 63823 6975 Locator 1 4 63816 0001 Locking Pin 2 5 63600 0525 Handle Spring 1 6 63600 0520 Crimping Spring 2 http www molex com ...

Reviews: