background image

Distributor of Molex Connector Corporation: Excellent Integrated System Limited

Datasheet of 0638238000 - HANDTOOL CRIMP 2.5MM WW 22-28AWG 
Contact us: sales@integrated-circuit.com Website: www.integrated-circuit.com

Hand Crimp Tool for 2.5mm (.098") Pitch Wire to Wire Crimp Terminals  

Doc No: ATS-6382380HM 

Release Date: 02-15-11 

UNCONTROLLED COPY


Page 3 of 6 

Revision: C 

Revision Date: 03-27-14 

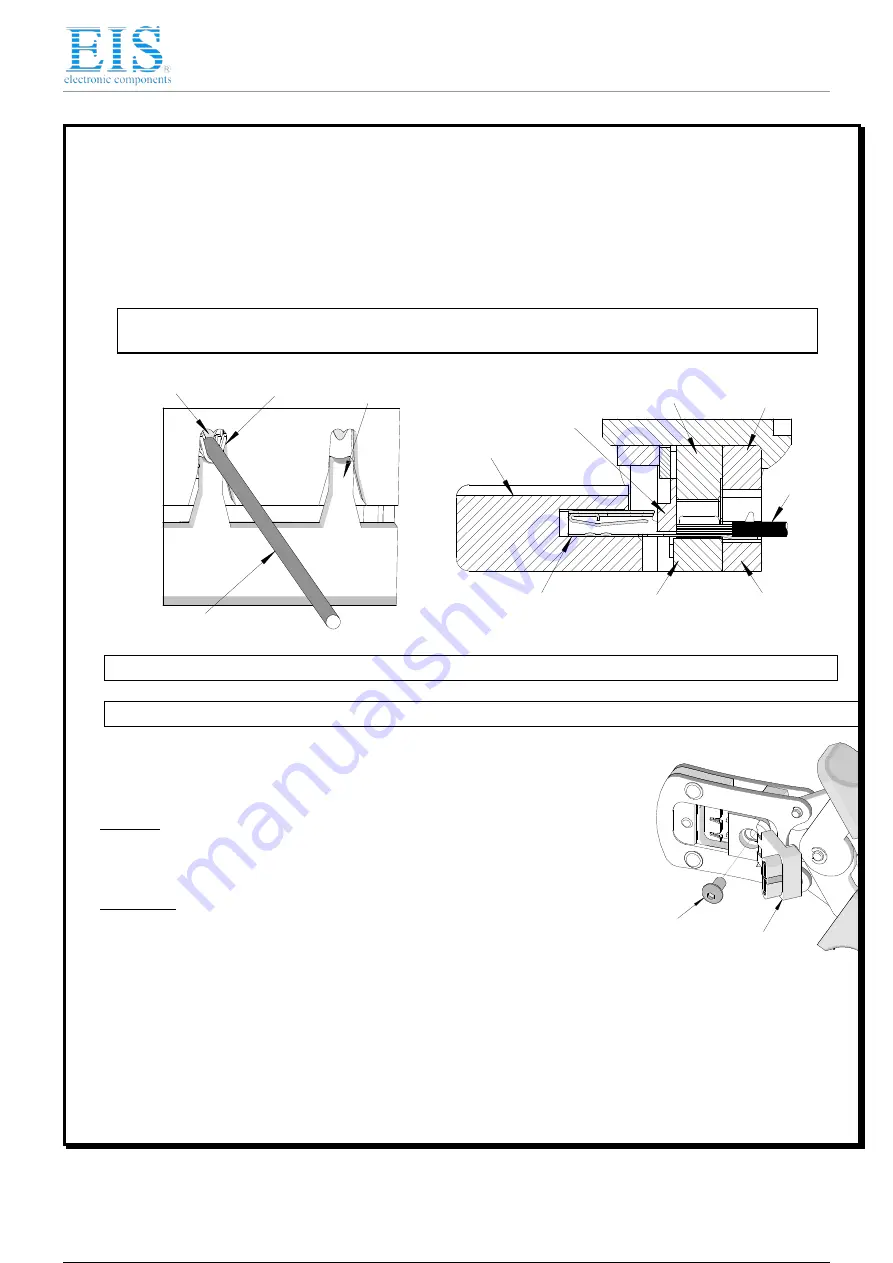
WIRE 

CONDUCTOR 

PUNCH 

TERMINAL 

WIRE STOP 

BLADE 

Figure 2 

Figure 3 

WIRE 

TERMINAL 

LOCATOR 

INSULATION 

PUNCH 

INSULATION 

ANVIL 

WIRE STOP 

BLADE 

CONDUCTOR 

ANVIL 

CONDUCTOR 

PUNCH 


5.


Slide the pre-stripped wire into the terminal; make sure to aim the wire brush towards the tip point on the 
wire stop blade.  See Figure 2.  Align the wire so that it is parallel and sitting into the terminal.  Maintain a 
light and constant pressure on the wire that is seated in the terminal at all times.  (Do not let go of the 
wire.)  Be sure to hold the wire and terminal in place until the terminal is fully crimped.  See Figure 3. 

6.


Close the tool until the ratchet releases. 

7.


Lift the wire stop blade up. 

8.


Carefully remove the crimped terminal. 


Note:

  To maintain good brush control and a consistent bell mouth the crimping instructions must be 

followed. 


Note:

 The tamper proof ratchet action will not release the tool until it has been fully closed. 


Note:

  To maintain good brush control and a consistent bell mouth the crimping instructions must be followed. 


Terminal Locator Replacement/Change Over 

This section describes the procedure for changing locators. 
 

Removal


1.


With the tool in the open position, pivot the terminal locator outward. 

2.


Remove the M4 BHCS.  See Figure 4. 


Installation


1.


Place the proper locator, (See Chart on page 2), on the hand tool.  Install the 
M4 BHCS.  See Figure 4. 

2.


Tighten the screw enough to hold the locator.  Make sure the locator can still 
float freely with hand pressure. 

3.


Insert the proper terminal fully into the correct profile slot until the terminal is fully seated and stops.  Then 
gently pivot the locator closed. 

4.


With hand pressure, slowly slide the locator to the correct position.  See Figure 5. 

5.


Gently pivot the locator open without disturbing the location. 

6.


Hold the locator firmly in place and slowly tighten the M4 BHCS. 

M4 BHCS 

PIVOT 

LOCATOR 

Figure 4 

                               4 / 7

                               4 / 7

Summary of Contents for 63823-8000

Page 1: ...ed Excellent Integrated System Limited Stocking Distributor Stocking Distributor Click to view price real time Inventory Delivery Lifecycle Information Click to view price real time Inventory Delivery Lifecycle Information Molex Connector Corporation Molex Connector Corporation 0638238000 0638238000 For any questions you can email us directly For any questions you can email us directly sales integ...

Page 2: ...es Precisely designed crimping profiles with simple contact positioning Easy handling due to outstanding force ratio A 620 Class 2 compliant and RoHS compliant Modular Crimp Head is removable and can be use in the Air Powered Tool Order No 63816 0100 accompanied by Air Powered Crimp Adapter Order No 63816 0700 Can also be used in the Battery Powered Tool Order No 63816 0200 110 V or 63816 0250 220...

Page 3: ... 19 6 4 4 X 28 0 08 0 67 0 72 026 028 1 20 047 1 60 1 70 063 067 1 75 069 9 8 2 2 X 50398 22 0 35 0 84 0 89 033 035 1 20 047 1 90 2 00 075 079 1 85 073 39 2 8 8 X 24 0 20 0 76 0 81 030 032 1 20 047 1 90 2 00 075 079 1 80 071 29 4 6 6 X 26 0 12 0 71 0 76 028 030 1 20 047 1 60 1 70 063 067 1 75 069 19 6 4 4 X 28 0 08 0 67 0 72 026 028 1 20 047 1 60 1 70 063 067 1 75 069 9 8 2 2 X To Achieve IPC A 62...

Page 4: ...eleases 7 Lift the wire stop blade up 8 Carefully remove the crimped terminal Note To maintain good brush control and a consistent bell mouth the crimping instructions must be followed Note The tamper proof ratchet action will not release the tool until it has been fully closed Note To maintain good brush control and a consistent bell mouth the crimping instructions must be followed Terminal Locat...

Page 5: ...ever become stuck or jammed in a partially closed position Do Not force the handles open or closed The tool will open easily by lifting the ratchet release lever See Figure 9 Warranty This tool is for electrical terminal crimping purposes only This tool is made of the best quality materials All vital components are long life tested All tools are warranted to be free of manufacturing defects for a ...

Page 6: ...for the Modular Crimp Head WARNING NEVER operate service install or adjust this Modular Crimp Head without proper instruction and without first reading and understanding the instructions in the proper Manual or Specification Sheet See Chart below for the correct Manual or Specification Sheet WARNING NEVER install tooling or service this tool while it is into any power source Disconnect the power b...

Page 7: ...ONTROLLED COPY Page 6 of 6 Revision C Revision Date 03 27 14 RATCHET RELEASE LEVER HANDLE SPRING CRIMPING SPRING 2 LOCATOR 2 1 4 Figure 9 M4 X 8mm LONG BHCS 3 5 6 PARTS LIST Hand Crimp Tool 63823 8000 Item Order Number Description Quantity 1 63823 8070 Modular Crimp Head 1 2 63816 0000 Hand Crimp Frame Short 1 3 63823 8075 Locator 1 4 63816 0001 Locking Pin 2 5 63600 0525 Handle Spring 1 6 63600 0...

Reviews: