background image

Hand Crimp Tool For

3.50 (.138”) Wire to Wire Connector, Crimp Pin

Doc No: ATS 638238700

Release Date: 07 13 11

Page 6 of 7

Revision: A

Revision Date: 07 13 11

+ /! 1'

:

;

7

8

?

"@/-

!

"

0

+ /! 1'2

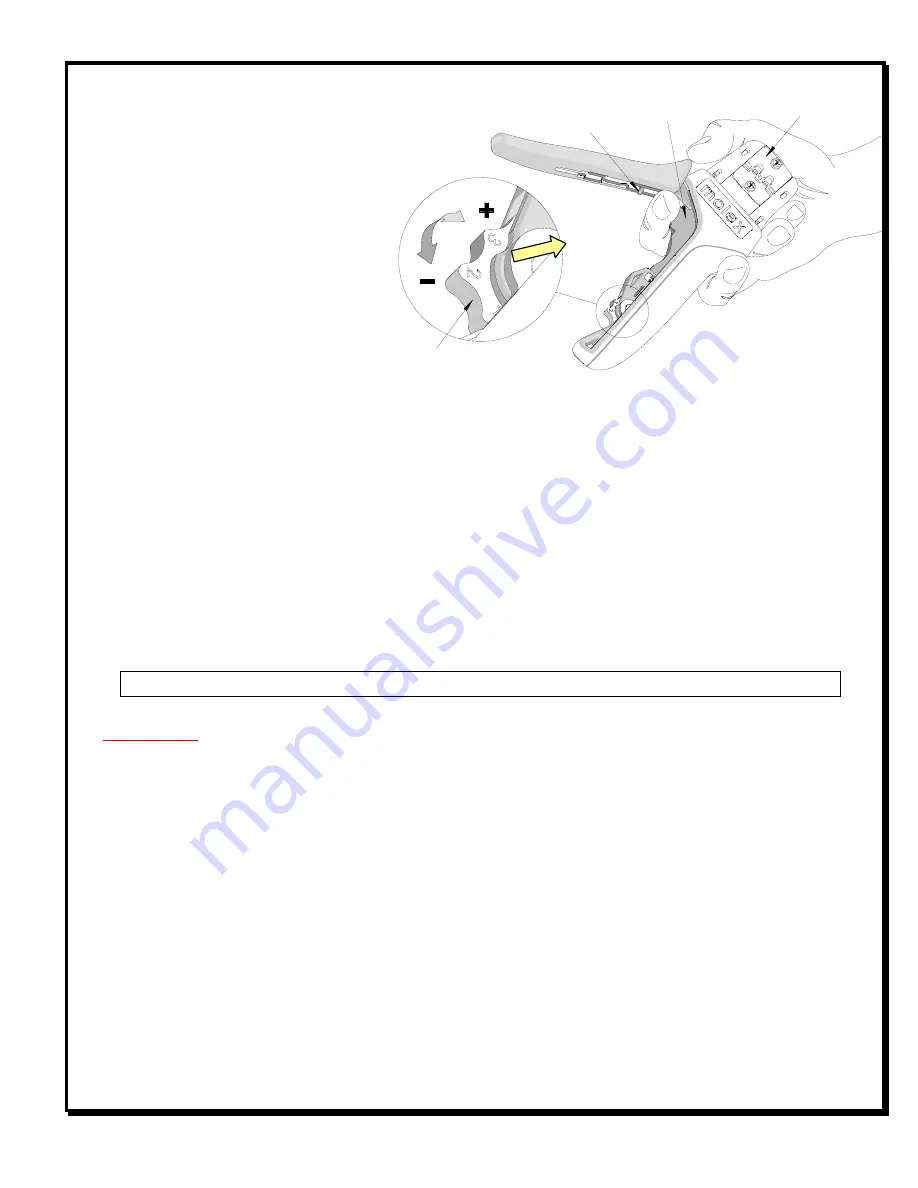
This hand tool is factory preset to 25 45
LBS. preload. It may be necessary over
the life of the tool to adjust tool handle
preload force. Listed below are the steps
required to adjust the crimping force of the
hand tool to obtain proper crimp
conditions:

1. Hold the hand tool in the palm of your

hand as shown in Figure 10. Using
the index finger squeeze the link
towards the top of the hand tool
frame. This will release the preload
adjustment wheel.

2. Rotate the setting wheel counter clockwise (CCW) to increase handle force. The numbers will display higher.

To decrease handle force rotate the setting wheel clockwise (CW).

3. Release the link to lock the setting wheel in place.
4. Check the crimp specifications or conduct a pull test after tool handle preload force is adjusted.

!!

A

This tool is for electrical terminal crimping purposes only. This tool is made of the best quality materials. All vital
components are long life tested. All tools are warranted to be free of manufacturing defects for a period of 30
days. Should such a defect occur, we will repair or exchange the tool free of charge. This repair or exchange will
not be applicable to altered, misused, or damaged tools. This tool is designed for hand use only. Any clamping,
fixturing, or use of handle extensions voids this warranty.

: Molex crimp specifications are valid only when used with Molex terminals and tooling.

5

1. Manually powered hand tools are intended for low volume or field repair. This tool is

NOT

intended for

production use. Repetitive use of this tool should be avoided.

2. Insulated rubber handles are not protection against electrical shock.
3. Wear eye protection at all times.
4. Use only the Molex terminals specified for crimping with this tool.

!

Molex does not certify or re certify hand tools but rather supplies the following guidelines for customers to re certify
hand tools.

%

This tool is qualified to pull force only. See the Molex web site for the Quality Crimp Handbook for more
information on pull testing.

%

If the tool does not meet minimum pull force values, handle preload should be increased and the pull test
rerun, (See How to Adjust Preload).

%

When the hand tool is no longer capable of achieving minimum pull force, it should be taken out of service and
replaced.

Summary of Contents for 63823-8700

Page 1: ...ess mainly focus on the distribution of electronic components Line cards we deal with include Microchip ALPS ROHM Xilinx Pulse ON Everlight and Freescale Main products comprise IC Modules Potentiometer IC Socket Relay Connector Our parts cover such applications as commercial industrial and automotives areas We are looking forward to setting up business relationship with you and hope to provide you...

Page 2: ...s terminals in the proper crimping position Right and Left handed applications This tool is IPC WHMA A 620 Class 2 compliant This tool is RoHS compliant however RoHS compliant is not required Products 3 50 138 Wire to Wire Connector Crimp Pin 18 24 AWG 012 3 50419 50419 9101 50419 9001 18 24 0 87 0 20 1 40 3 00 055 118 3 00 3 50 118 138 Customer to cut off terminal from reel 0 30mm 012 maximum Cut...

Page 3: ...es overlap form geometry in the insulation punch This produces an overlap insulation crimp A620 compliant While the insulation punch profile may appear lopsided this is a normal condition for this tool See figure to the right Some tools with multiple crimp pockets may not have the overlap profile on all pockets 5 A crimp height chart is provided with this manual as Reference Only Due to the wide r...

Page 4: ...ng See Figure 2 3 While holding the locator button in load the terminal into the proper nest opening in the locator based on the wire gauge or terminal type markings on the hand tooling See Figure 3 4 Release the locator button allowing the locator to return to the crimping position 5 Close the tool handle until the first ratchet position engages See Figure 4 6 Insert the properly stripped wire th...

Page 5: ...n the last page of this document for the proper locator order number Follow the steps below to replace the locator 1 Open the crimp hand tool 2 Squeeze gently on the lower area shown in Figure 7A with your thumb and index finger The lower tabs of the locator should disengage from the hand tool 3 Lift and pull away from the hand tool The top locator hooks should slip out of the top slots easily See...

Page 6: ...e for the following maintenance steps 1 Remove dust moisture and other contaminants with a clean brush or soft lint free cloth 2 Do not use any abrasive materials that could damage the tool 3 Make certain all pins pivot points and bearing surfaces are protected with a thin coat of high quality machine oil Do not oil excessively The tool was engineered for durability but like any other equipment it...

Page 7: ... are warranted to be free of manufacturing defects for a period of 30 days Should such a defect occur we will repair or exchange the tool free of charge This repair or exchange will not be applicable to altered misused or damaged tools This tool is designed for hand use only Any clamping fixturing or use of handle extensions voids this warranty Molex crimp specifications are valid only when used w...

Page 8: ...p Pin Doc No ATS 638238700 Release Date 07 13 11 Page 7 of 7 Revision A Revision Date 07 13 11 8 1 1 6 6 A REF 63823 8700 Hand Crimp Tool Figure 13 1 63823 8775 Locator Assembly 1 2 63810 0104 Spring Return 1 3 63810 0105 Spring Ratchet 1 http www molex com ...

Reviews: