background image

Distributor of Molex Connector Corporation: Excellent Integrated System Limited

Datasheet of 0638257400 - HAND CRIMP TOOL 
Contact us: sales@integrated-circuit.com Website: www.integrated-circuit.com

Tool Kit for 250 Slip-in Receptacle Terminals 

Doc No: ATS-6382574HM  Release Date: 05-20-13 

UNCONTROLLED COPY


Page 4 of 8 

Revision: A 

Revision Date: 05-20-13 

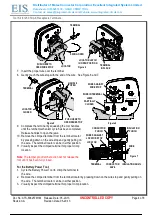
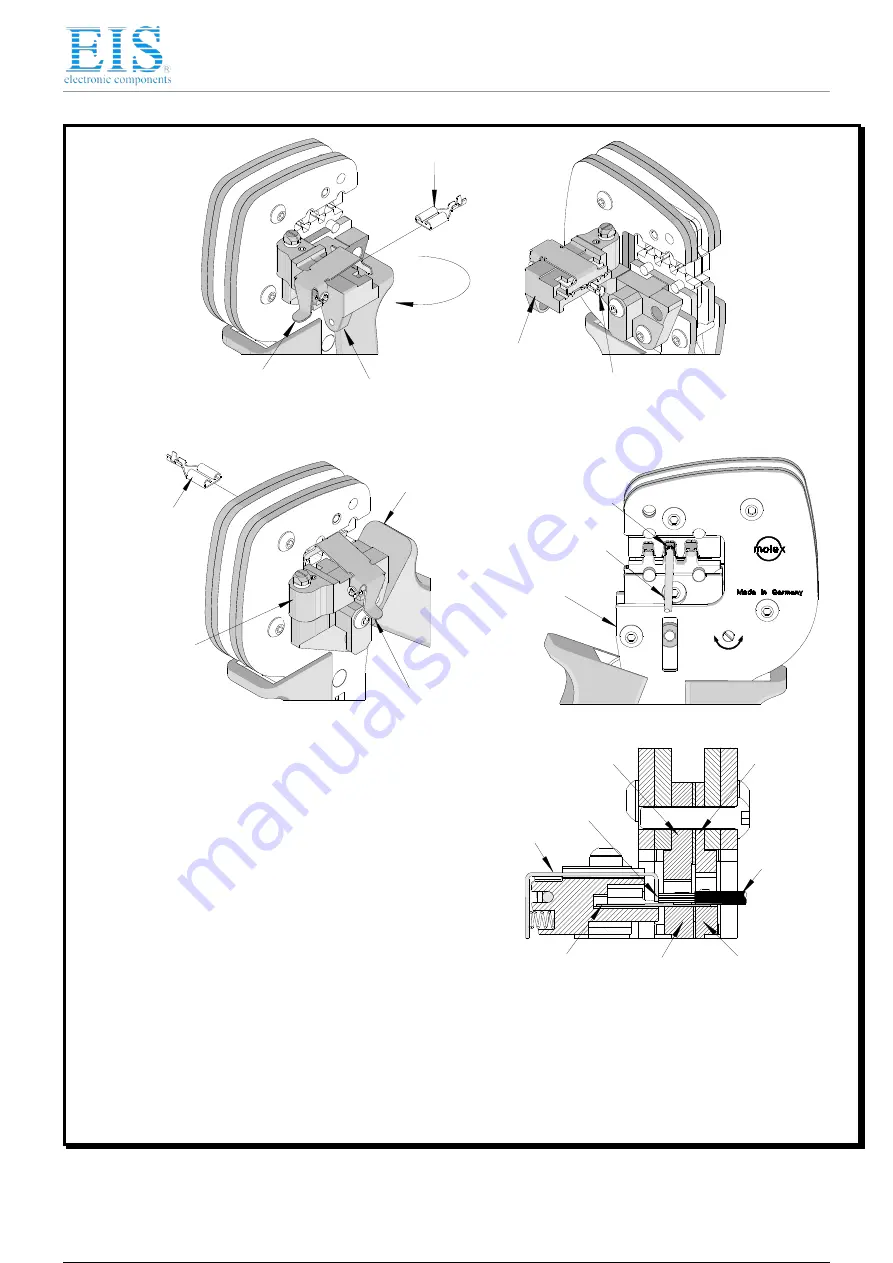
SWING OPEN 

TERMINAL 

PUSH HERE TO 

OPEN WIRE STOP 

LOCATOR 

TERMINAL 

IN PLACE 


Figure 4 

LOCATOR LATCH 

IN OPEN POSITION 

Figure 6 

WIRE IN TERMINAL 

JAWS 

PARTIALLY 

CLOSED 

WIRE AGAINST 

WIRE STOP 

HANDLE 

OPEN 

LOCATOR 

CLOSED 

Figure 5 

TERMINAL 

PUSH HERE TO 

OPEN WIRE STOP 

Figure 7 

WIRE 

INSULATION 

PUNCH 

CONDUCTOR 

ANVIL 

LOCATOR 

INSULATION ANVIL 

WIRES AGAINST 

LOCATOR STOP 

CONDUCTOR 

PUNCH 

TERMINAL 


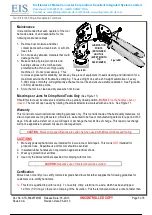
7.


Insert the proper wire over the terminal. 

8.


Gently touch the wire stop with the end of the wire.  See Figure 6 and 7. 


9.


Compress the terminal by squeezing the tool handles 
until the ratchet mechanism cycle has been completed.  
Release handles to open the jaws. 

10.


Remove the crimped terminal from the terminal locator 
by pressing down on the wire stop and gently pulling on 
the wire.  The terminal locator can be in either position. 

11.


Visually inspect the crimped terminal for proper crimp 
location. 


Note

: The tamper proof ratchet action will not release the 

tool until it has been fully closed. 


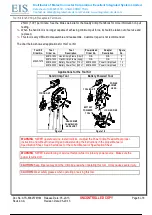
For the Battery Power Tool:


1.


Cycle the Battery Power Tool to crimp the terminal to 
the wire. 

2.


Remove the crimped terminal from the terminal locator by pressing down on the wire stop and gently pulling on 
the wire.  The terminal locator can be in either position. 

3.


Visually inspect the crimped terminal for proper crimp location. 

                               5 / 9

                               5 / 9

Summary of Contents for 63825-7400

Page 1: ...ent Integrated System Limited Stocking Distributor Stocking Distributor Click to view price real time Inventory Delivery Lifecycle Information Click to view price real time Inventory Delivery Lifecycle Information Molex Connector Corporation Molex Connector Corporation 0638257400 0638257400 For any questions you can email us directly For any questions you can email us directly sales integrated cir...

Page 2: ...Tool kits are easily installed into the Hand Crimp Tool or the 63816 0300 Power Crimp Head which is installed into the 63816 0200 110 V or the 63816 0250 220 V Battery Powered Tool Many different Tool kits can be used with a single Battery Powered Tool This tool is IPC WHMA A 620 Class 2 and RoHS compliant SCOPE Products 250 Slip in Receptacle Terminals for 10 14 AWG wire Terminal Series No Termin...

Page 3: ... A B C 35725 10 5 25 2 45 2 55 096 100 3 60 1 42 X 12 3 30 2 05 2 15 081 085 3 60 1 42 X 14 2 00 1 75 1 85 069 073 3 60 1 42 X Terminal Series No Wire Size Insulation Crimp Pull Force Minimum Height Ref Width Ref AWG mm2 mm In mm In N Lbs 35725 10 5 25 5 30 209 5 00 197 353 79 4 12 3 30 4 50 177 4 70 185 294 66 1 14 2 00 4 40 173 4 40 173 275 61 8 Tool Qualification Notes 1 Pull Force should be me...

Page 4: ...nd tool 2 Swing the existing locator open and away from the hand tool 3 Firmly press down on the brass pivot shaft with your thumb while pulling the locator up Slip the locator off the top of the brass pivot shaft OPERATION Open the tool by squeezing the handles together at the end of the closing stroke the ratchet mechanism will release the handles and the hand tool will spring open Crimping Term...

Page 5: ... TERMINAL 7 Insert the proper wire over the terminal 8 Gently touch the wire stop with the end of the wire See Figure 6 and 7 9 Compress the terminal by squeezing the tool handles until the ratchet mechanism cycle has been completed Release handles to open the jaws 10 Remove the crimped terminal from the terminal locator by pressing down on the wire stop and gently pulling on the wire The terminal...

Page 6: ...sed position Do Not force the handles open or closed The tool will open easily by rotating the small slotted screw marked with an arrow See Figure 11 Warranty This tool kit is for electrical terminal crimping purposes only This tool kit is made of the best quality materials All vital components are long life tested All tools are warranted to be free of manufacturing defects for a period of 30 days...

Page 7: ...r Description Figure No 63825 7470 63810 1050 Hand Crimp Frame Short N A N A 9 63810 1000 Hand Crimp Frame Long N A N A 9 63816 0200 Battery Power Tool 110 V 63816 0300 Power Crimp Head 10 63816 0250 Battery Power Tool 220 V 63816 0300 Power Crimp Head 10 Applications for the Tool Kit Hand Crimp Tool Battery Powered Tool Figure 9 Figure 10 WARNING NEVER operate service install tool kits or adjust ...

Page 8: ...als Doc No ATS 6382574HM Release Date 05 20 13 UNCONTROLLED COPY Page 7 of 8 Revision A Revision Date 05 20 13 RATCHET RELEASE SCREW Figure 11 M4 X 8mm LONG BHCS 2 1 3 M4 X 18mm LONG BHCS M4 X 10mm LONG BHCS 2 4 WITH TOOL KIT LOCATOR ONLY HAND TOOL PARTS LIST Item Number Order Number Description Quantity 1 63810 1000 Hand Crimp Frame Long 1 2 63825 7470 Tool Kit with Locator 1 3 63811 4773 Locator...

Page 9: ...c No ATS 6382574HM Release Date 05 20 13 UNCONTROLLED COPY Page 8 of 8 Revision A Revision Date 05 20 13 Figure 12 1 2 2 M4 by 8 Long BHCS M4 by 18 Long BHCS M4 by 10 Long BHCS 1 POWER HEAD PARTS LIST Item Order No Engineering No Description Quantity 1 63816 0300 63816 0300 Power Crimp Head 1 2 63825 7470 63825 7470 Tool Kit with Locator 1 Visit our Web site at http www molex com Powered by TCPDF ...

Reviews: