background image

Hand Crimp Tool for 1.50mm (.059") Pico-SPOX Crimp Terminals 

Doc. No: ATS-6382597HM Release Date: 05-06-13 

UNCONTROLLED COPY


Page 3 of 6 

Revision: B 

Revision Date: 04-26-18 
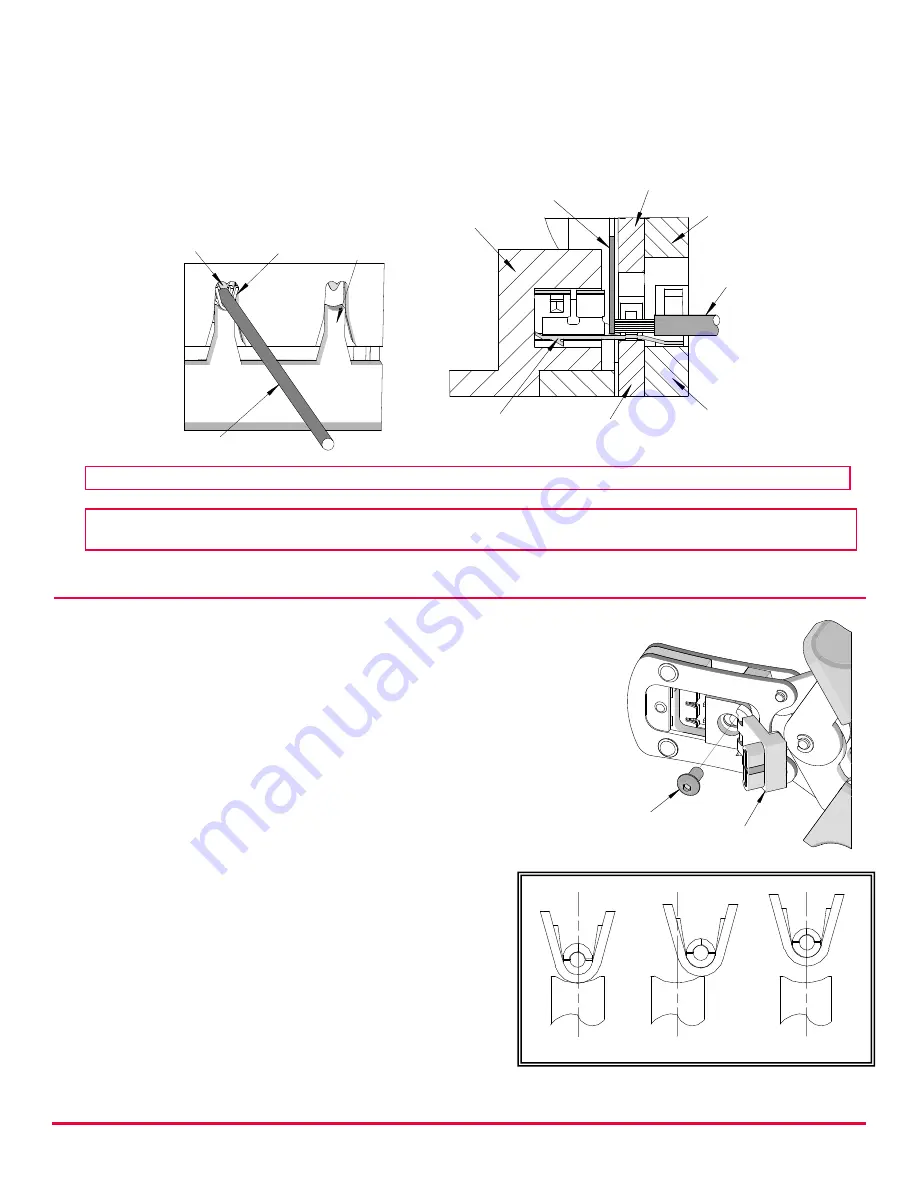
WIRE 

CONDUCTOR 

PUNCH 

WIRE STOP 

BLADE 

INSULATION 

PUNCH 

LOCATOR 

CONDUCTOR 

ANVIL 

INSULATION 

ANVIL 

TERMINAL 

Figure 3 

WIRE 

INSULATION 

ANVIL 

TERMINAL 

WIRE STOP 

BLADE 

Figure 2 

5.


Slide the pre-stripped wire into the terminal. Make sure to aim the wire brush toward the tip 
point on the wire stop blade. See Figure 2. Align the wire so that it is parallel and sitting 
into the terminal. Maintain a light and constant pressure on the wire that is seated in the 
terminal at all times. (Do not let go of the wire.) Be sure to hold the wire in place until the 
terminal is fully crimped. See Figure 3. 

6.


Close the tool until the ratchet releases. 

7.


Lift the wire stop blade. 

8.


Carefully remove the crimped terminal. 


Note:

 The tamper-proof ratchet action will not release the tool until it has been fully closed. 


Note:

 To maintain good brush control and a consistent bell mouth, the crimping instructions must 

be followed. 


TERMINAL LOCATOR REPLACEMENT


This section describes the procedure for changing locators. 
 

Removal 


1.


With the tool in the open position, pivot the terminal 
locator outward. 

2.


Remove the M4 BHCS. See Figure 4. 


Installation 


1.


Place the proper locator on the hand tool. Install the M4 
BHCS. See Figure 4. 

2.


Tighten the screw enough to hold the locator. Make sure 
the locator can still float freely with hand pressure. 

3.


Insert the proper terminal fully into the correct 
profile slot until the terminal is fully seated and 
stops. Then, gently pivot the locator closed. 

4.


With hand pressure, slowly slide the locator to 
the correct position. See Figure 5. 

5.


Gently pivot the locator open without disturbing 
the location. 

6.


Hold the locator firmly in place, and slowly 
tighten the M4 BHCS. 


INCORRECT 

Figure 5 

CORRECT 

INCORRECT 

M4 BHCS 

PIVOT 

LOCATOR 

Figure 4 

Summary of Contents for 63825-9700

Page 1: ...an be used in the Air Powered Tool Order No 63816 0100 accompanied by Air Powered Crimp Adapter Order No 63816 0700 Can also be used in the Battery Powered Tool Order No 63816 0200 110 V or 63816 0250 220 V accompanied by Battery Powered Crimp Adapter Order No 63816 0600 This tool is RoHS compliant SCOPE Products 1 50mm 059 Pico SPOX Crimp Terminal Female 24 26 AWG Terminal Series No Terminal Orde...

Page 2: ...035 045 Profile 26 30 0 80 1 00mm 032 040 Scope Change As of 06 15 2017 Molex Product Engineering does not recommend the use of 28 AWG and 30 AWG wires in 87421 000 terminals Terminal 87421 010 should be used for 28 AWG and 30 AWG wires See the Molex website for appropriate application tooling Tool Qualification Notes 1 Ref means the dimension provided is approximate due to the wide range of wires...

Page 3: ...ed terminal Note The tamper proof ratchet action will not release the tool until it has been fully closed Note To maintain good brush control and a consistent bell mouth the crimping instructions must be followed TERMINAL LOCATOR REPLACEMENT This section describes the procedure for changing locators Removal 1 With the tool in the open position pivot the terminal locator outward 2 Remove the M4 BHC...

Page 4: ...by lifting the ratchet release lever See Figure 9 Warranty This tool is for electrical terminal crimping purposes only This tool is made of the best quality materials All vital components are long life tested All tools are warranted to be free of manufacturing defects for a period of 30 days Should such a defect occur Molex will repair or exchange the tool free of charge This repair or exchange wi...

Page 5: ...or specification sheet WARNING NEVER install tooling or service this tool while it is plugged into any power source Disconnect the power by unplugging or turn off the actuator from its power source CAUTION Keep fingers away from the crimping area when operating this tool It may cause severe injury CAUTION Wear safety glasses when operating or servicing this tool The chart below shows all applicati...

Page 6: ... 3 63816 0001 Locking Pin 2 4 63600 0525 Handle Spring 1 5 63600 0520 Crimping Spring 2 Application Tooling Support Phone 402 458 TOOL 8665 E Mail applicationtooling molex com Website www molex com applicationtooling Molex is a registered trademark of Molex LLC in the United States of America and may be registered in other countries all other trademarks listed herein belong to their respective own...

Reviews: