AT-2214 Head Crimp Tool
Doc No: ATS-640053400
Release Date: 06-23-03
UNCONTROLLED COPY
Page 2 of 7
Revision: B
Revision Date: 09-30-05
Wire Preparation
Pre-twisted wire not required for OEM applications. For Solid wire (OEM only) strip leads to 3/8 of an inch. Insert
into connector and crimp.
For stranded wire strip leads to approximately 3/4 of an inch. Twist the wire combination even and tight. Trim
stripped pre-twisted area to 3/8 of an inch and insert into connector and crimp. For more information follow the
Quality Crimping Handbook.
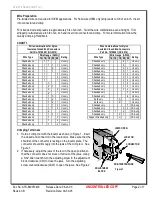
CHART 1
Wire Combinations for Nylon
Insulated Closed End Connectors
Part No. 19160001 (NC-2214)
Wire Type
Wire Gauge (AWG
)
Rating
14 16 18 20 22
Stranded only
1
1
UL only
Stranded only
1
1
1
1
UL only
Stranded only
1
2
UL only
Stranded only
1
1
UL only
Stranded only
1
3
UL only
Stranded only
1
2
UL only
Stranded only
1
1
UL only
Stranded only
3
UL only
Stranded only
2
1
UL only
Stranded only
2
2
UL only
Stranded only
2
1
UL only
Stranded only
1
3
UL only
Stranded only
1
2
UL only
Stranded only
1
2
1
UL only
Stranded only
1
1
3
UL only
Stranded only
1
1
2
UL only
Stranded only
2
UL only
Stranded only
1
1
1
UL only
Stranded only
1
5
UL only
Stranded only
1
4
UL only
Stranded only
1
3
UL only
Wire Combinations for Nylon
Insulated Closed End Connectors
Part No. 19160001 (NC-2214)
Wire Type
Wire Gauge (AWG
)
Rating
14 16 18 20 22
Stranded only
4
1
UL only
Stranded only
4
UL only
Stranded only
3
2
UL only
Stranded only
3
1
UL only
Stranded only
2
4
UL only
Stranded only
2
3
UL only
Stranded only
2
2
UL only
Stranded only
1
6
UL only
Stranded only
1
5
UL only
Stranded only
1
4
UL only
Stranded only
7
UL only
Stranded only
6
UL only
Solid only
3
UL only
Solid only
2
UL only
Stranded only
7 CSA only
Stranded only
2
4 CSA only
Stranded only
1
2
CSA only
Stranded only
2
1
CSA only
Copper Stranded only
3
CSA only
Crimping Terminals
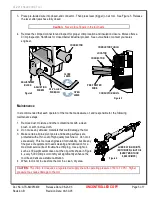
1.
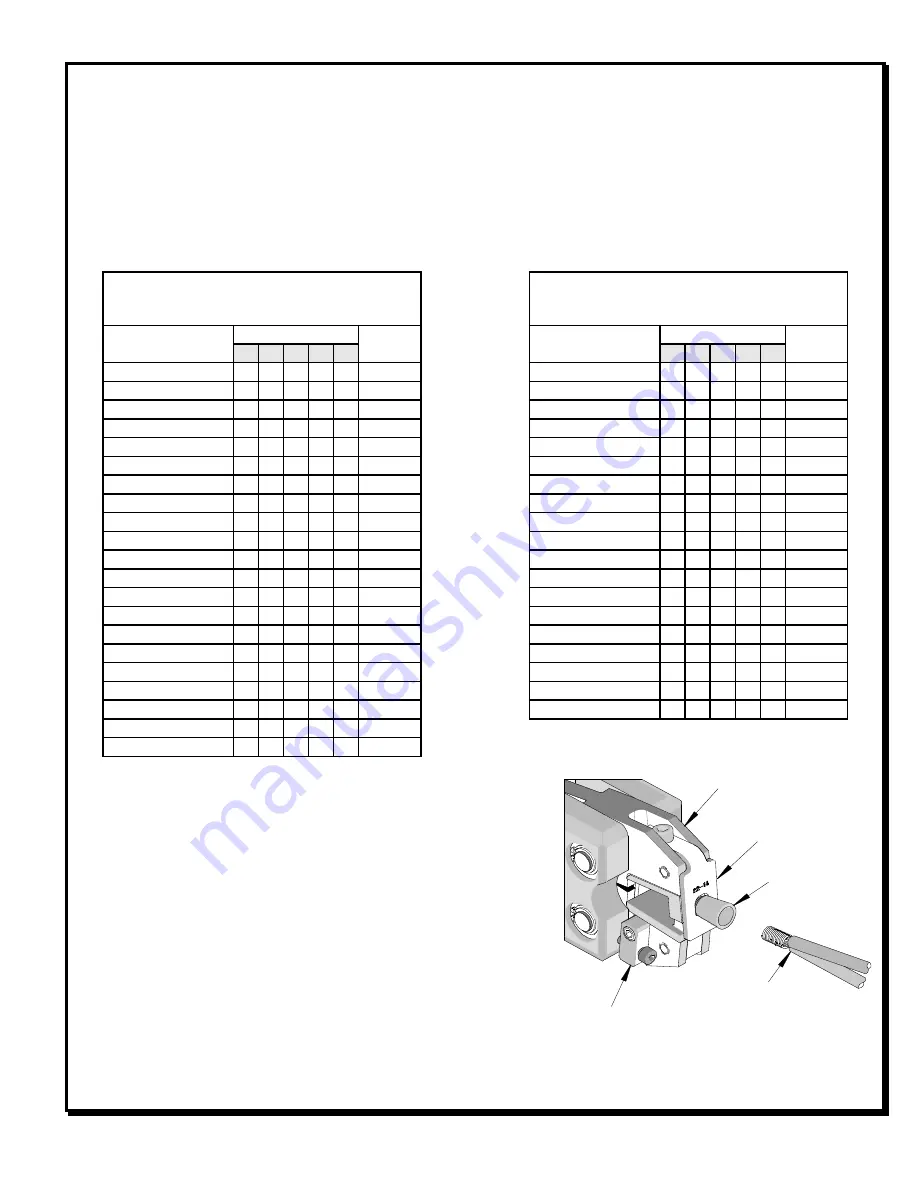
Hold air crimp tool with the locator as shown in Figure 1. Insert
the closed end connector in the locator slot. Make sure that the
shoulder of the connector is resting on the locator plate. The
connector should fit snugly into the jaws of the crimp tool. See
Figure 1.
2.
If necessary, adjust the jaws of the tool in the open position so
that the connector does not move or fall out of the jaws. Using
a 3/32” Allen wrench turn the adjusting screw in the adjustment
block clockwise (CW) to close the jaws. Turn the adjusting
screw counterclockwise (CCW) to open the jaws. See Figure 2.
Figure 1
JAWS OPEN
LOCATOR
PRE-TWISTED WIRE
ADJUSTMENT
BLOCK
CONNECTOR


