background image

Air Head Crimp Tool for InsulKrimp™ Piggyback QD 

Doc. No: ATS-640056200 

Release Date: 09-19-06 

UNCONTROLLED COPY


Page 3 of 7 

Revision: C 

Revision Date: 10-07-14 

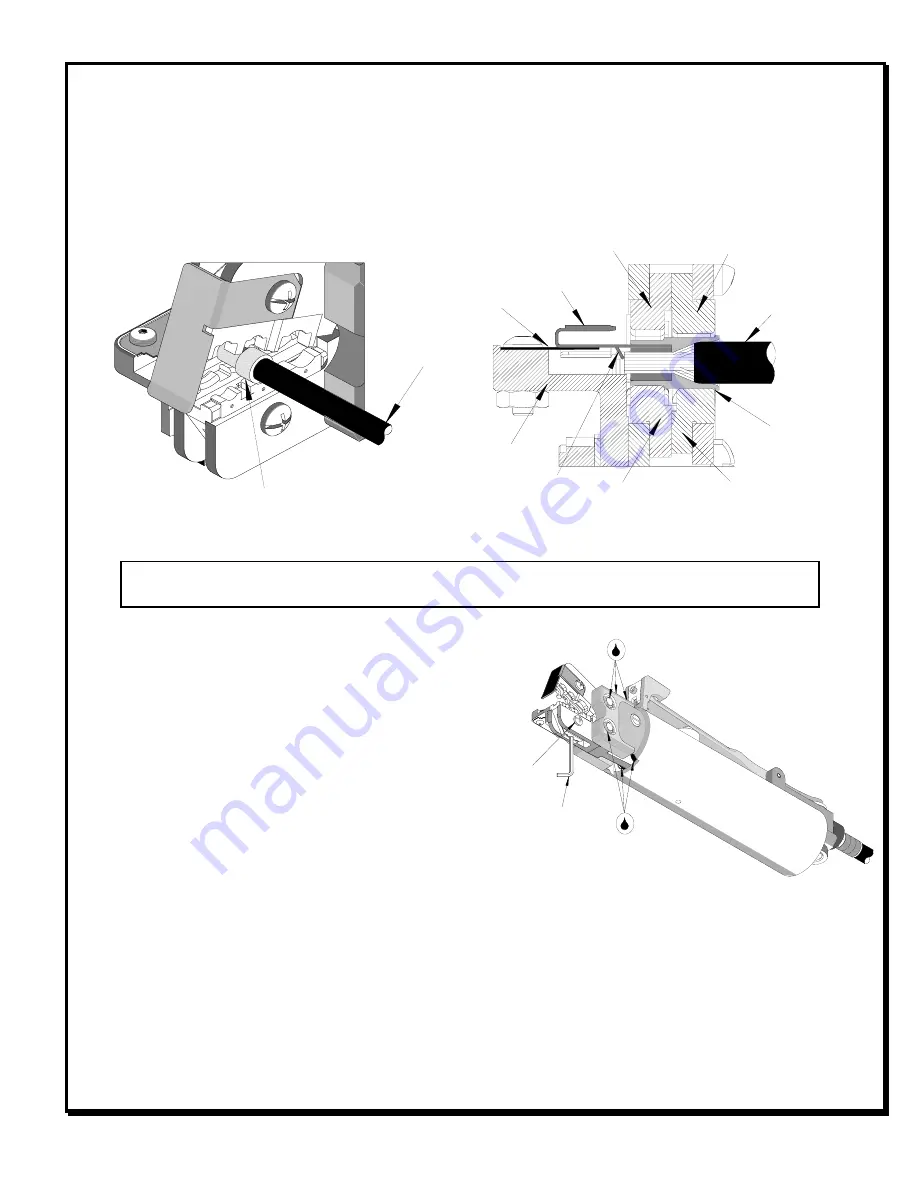
TERMINAL 

BARREL 

TERMINAL TAB 

TAB LOCATOR 

WIRE 

CONDUCTOR PUNCH 

INSULATION ANVIL 

Figure 3 

INSULATION PUNCH 

CONDUCTOR 

ANVIL 

WIRE STOP BUILT 

INTO TERMINAL 

LOCATOR 

 
5.


Remove the crimp and inspect for proper crimp location, and check for insulation closure.  Molex offers a 

Crimp Inspection Handbook for closed barrel industrial product.  See our website or contact your sales 
engineer. 

6.


If the insulation part of the crimp needs to be adjusted, first loosen the M4 screw on the bottom tool jaw, 
then insert a 3/32 hex wrench (supplied) into the bottom of the lower die.  See Figure 4.  A clockwise (CW) 

rotation decreases insulation crimp while a counter-clockwise (CCW) rotation increases insulation crimp.  
After adjusting retighten the M4 screw. 


Note

: Whenever crimping without the locator, make sure the seam of the terminal is oriented up or 

down in the tool if using unbrazed product, as this will provide higher pull force values. 


Maintenance 

 
It is recommended that each operator of the tool be 
made aware of, and responsible for, the following 
maintenance steps: 

 
1.


Remove dust, moisture and other contaminants 
with a clean brush, or soft, lint-free cloth. 

2.


Do not use any abrasive materials that could 

damage the tool. 

3.


Make certain all pins; pivot points and bearing 
surfaces are protected with a thin coat of high 
quality machine oil.  Do not oil excessively.  This tool was engineered for durability, but like any fine piece of 

equipment it needs cleaning and lubrication for a maximum service life of trouble-free crimping.  Use a light 
oil such as 30 weight automotive oil at the oil points shown in Figure 4, every 5,000 crimps or monthly will 
significantly enhance the tool life and ensure a stable calibration. 

4.


When tool is not in use store the tool in a clean, dry area. 

WIRE 

TERMINAL 

Figure 2 

LUBRICATION POINTS 

(BOTH SIDES) 

LIGHT OIL (EVERY MONTH 

OR 5,000 CRIMPS) 

LOOSEN 

M4 SCREW 

Figure 4


3/32” HEX 

WRENCH 

Summary of Contents for 64005-6200

Page 1: ... powered crimp tools help reduce fatigue and discomfort from repetitive manual crimping SCOPE Products InsulKrimp Piggyback Quick Disconnect 10 22 AWG This tool head is intended for use in the 19279 0001 AT 200 either hand held or with optional bench adapter 19078 0307 ATBA and foot switch Testing Mechanical The tensile test or pull test is a means of evaluating the mechanical properties of the cr...

Page 2: ...r to the instruction manual for the 19279 0001 AT 200 for mounting this crimp tool head Crimping Terminals 1 Push the terminal onto the tab locator all the way to the stop in the proper color coded nest The male tab of the terminal should be up See Figure 1 2 The height of the locator may need to be adjusted when changing from one terminal size to another To do this loosen the locator lock nut See...

Page 3: ...locator make sure the seam of the terminal is oriented up or down in the tool if using unbrazed product as this will provide higher pull force values Maintenance It is recommended that each operator of the tool be made aware of and responsible for the following maintenance steps 1 Remove dust moisture and other contaminants with a clean brush or soft lint free cloth 2 Do not use any abrasive mater...

Page 4: ...an Go No Go Red 18 22 0 35 0 80 080 076 084 N A Blue 14 16 1 30 2 00 098 094 102 N A Yellow 10 12 3 30 5 00 140 136 146 N A CAUTION Repetitive use of this tool should be avoided Warranty This tool is for electrical terminal crimping purposes only This tool is made of the best quality materials All vital components are long life tested All tools are warranted to be free of manufacturing defects for...

Page 5: ...escription Quantity 64005 6200 Crimp Tool Head Figure 5 1 64005 0000 Basic Air Tool Head 1 2 64001 6275 Locator Assembly 1 3 64001 6270 Tooling Kit 1 Tooling Kit Only 4 64001 6201 Conductor Punch 1 5 64001 62022 Conductor Anvil 1 6 64001 6203 Insulation Punch 1 7 64001 6204 Insulation Anvil 1 8 N A 4mm Diameter by 5 0mm Long Roll Pins 2 9 N A 10 32 by 5 16 Long Cup Point Set Screw 1 Available from...

Page 6: ...2 2 2 Parts List Continued Item Order No Description Quantity 64005 0000 Basic Air Tool Head Figure 6 1 64005 0103 Nose Guard 1 2 64000 0077 Repair Kit Springs Rods Pivots Rings and Washers 1 3 N A M4 by 12 Long Freedrive Pan Head Screw 1 4 N A M4 by 30 Long Freedrive Pan Head Screw 1 5 N A 3 16 by 3 8 Long Dowel Pin 1 Available from an industrial supply company such as MSC 1 800 645 7270 ...

Page 7: ...___________ Serial Number_____________________ Date of Manufacture Pin Gauge of Conductor Nest Nests or Slug height if the nest is the F Crimp style Range Conductor Nest 1 ____________ Actual ____________ Range Conductor Nest 2 ____________ Actual ____________ Range Conductor Nest 3 ____________ Actual ____________ Technician _______________________ Date of Calibration __________________ Calibrati...

Reviews: