AT-200 Air-Powered Crimp Tool
Doc No: TM-192790001
Release Date: 07-01-02
UNCONTROLLED COPY
Page 11 of 20
Revision: G
Revision Date: 01-17-14
TURN
CLOCKWISE
(CW)
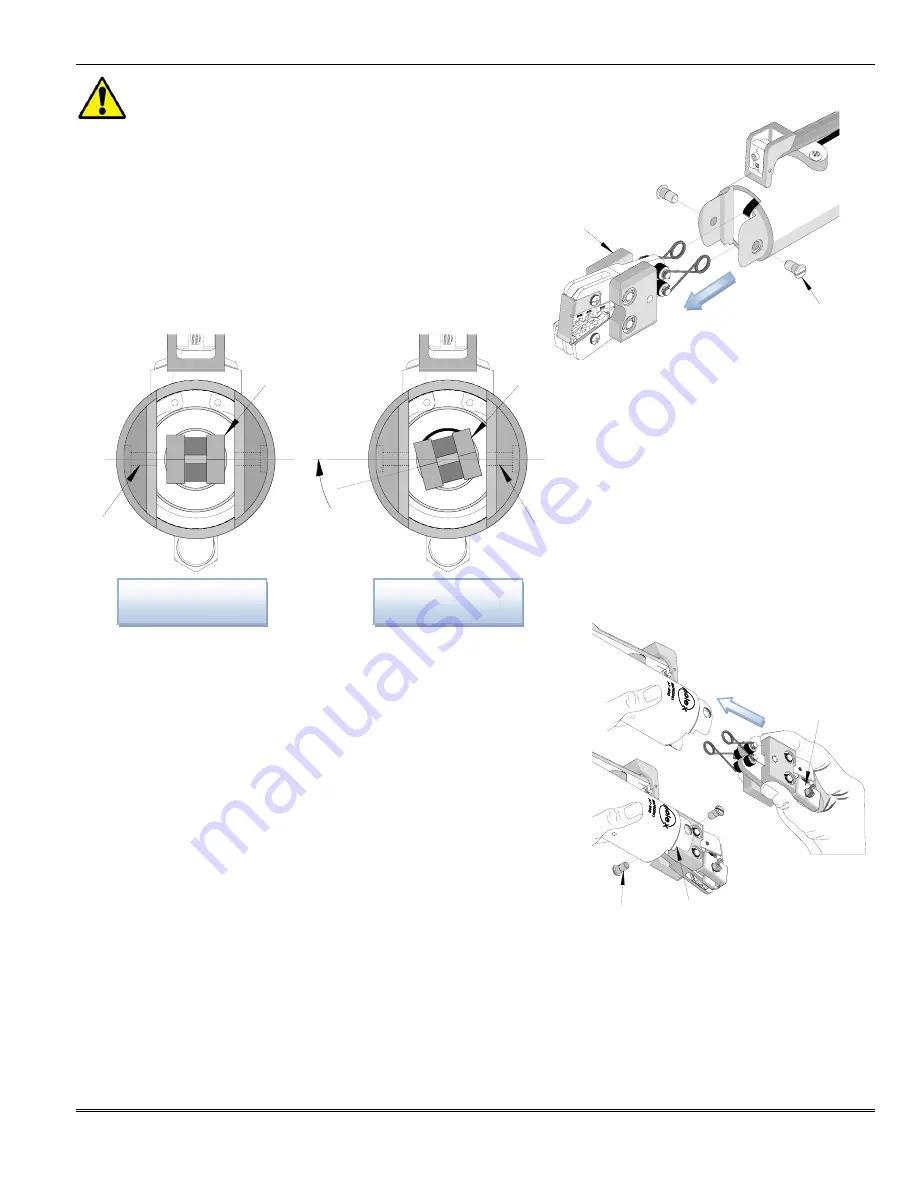
CAM
INCORRECT CAM
ALIGNMENT
#1/4-20
HOLE
CORRECT CAM
ALIGNMENT
Figure 3-2
CAM
#1/4-20
HOLE
CAUTION
: Always disconnect air supply before all maintenance.
3.1 Changing Crimp Tool Heads
1.
Disconnect the air supply.
2.
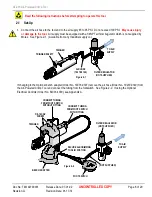
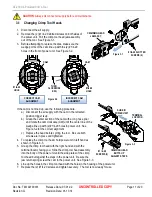
Remove the (2) #1 /4-20 slotted screws on both sides of
the power unit. Pull the crimp tool head jaw assembly
out of the tool. See Figure 3-1.
3.
Before attempting to replace the dies, make sure the
wedge points of the cam line up with the (2) #1/4-20
holes in the front of power unit. See Figure 3-2.
If the cam is not lined up, use the following procedure.
a)
Disconnect the air supply with the cam in the retracted
position trigger is up.
b)
Grasp the center section of the cam with a long nose plier
and rotate the cam clockwise (CW) until the center line of the
wedge line up with (2) #1/4-20 holes in power unit. See
Figure 3-2 for the correct alignment.
c)
Replace the head before cycling the tool. Be sure both
screws are in place and tightened.
4.
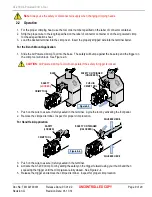
To replace the crimp tool head, hold power unit in left hand as
shown in Figure 3-3.
5.
Grasp the crimp tool head with the right hand and with the
terminal locator facing you. Slide the crimp tool head assembly
into the body of the power unit until the side plates of the crimp
tool head butt against the steps in the power unit. Be sure the
jaw return springs clear the cam in the power unit. See Figure 3-3.
6.
Line up the holes in the crimp tool head with the holes in the housing of the power unit.
7.
Replace the (2) #1/4-20 screws and tighten securely. The tool is now ready for use.
CRIMPIMG HEAD
JAW ASSY
#1/4-20 SLOTTED
SCREWS (2)
Figure 3-1
CRIMPING HEAD
BUTTS UP
AGAINST STEPS
#1/ 4-20
SCREWS (2)
TERMINAL
LOCATOR
SLIDE IN
POWER UNIT
Figure 3-3


