AT 2200 Air Head Crimp Tool
Doc. No. 64005-1500
Release Date: 01-16-03
UNCONTROLLED COPY
Page 3 of 7
Revision: C
Revision Date: 01-10-06
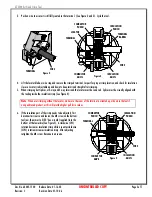
TERMINAL
BARREL
TERMINAL
LOCATOR
WIRE
CONDUCTOR
PUNCH
INSULATION
ANVIL
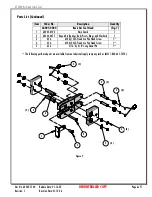
Figure 3
INSULATION
PUNCH
CONDUCTOR
ANVIL
Figure 2
TERMINAL
WIRE
3. Push on wire to assure it is still fully seated in the terminal. (See Figure 2 and 3). Cycle the tool.
4. Lift the locator blade or wire stop and remove the crimped terminal. Inspect for proper crimp location, and check for insulation
closure. Locator is adjustable up and down to keep terminals straight after crimping.
5. When crimping butt splices, or 3-way and 4-way terminals the locator must be removed. Splices must be visually aligned with
the tooling inside the insulation crimp (See Figure 4).
Note
: Whenever crimping without the locator, make sure the seam of the terminal is oriented up or down in the tool if
using unbrazed product, as this will provide higher pull force values.
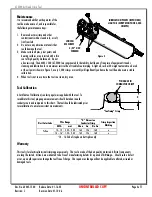
6. If the insulation part of the crimp needs to be adjusted, first
disconnect air source and loosen the M4 screw on the bottom
tool jaw, then insert a 3/32” hex wrench (supplied) into the
bottom of the lower die (See Figure 5). A clockwise (CW)
rotation decreases insulation crimp while a counter-clockwise
(CCW) rotation increases insulation crimp. After adjusting
retighten the M4 screw. Reconnect air source.
CONDUCTOR
ANVIL
Figure 4
INSULATION
ANVIL
WIRE
INSULATION
PUNCH
CONDUCTOR
PUNCH
TERMINAL


