background image

12

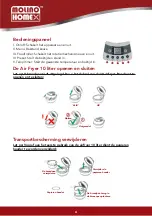
Please note: Before opening the lid, the frying process needs to be stopped. To do 

this, press the locking mechanism (as shown above) to unlock the lid. When doing this, 

be mindful of the hot steam, so as not to injure yourself.

The use of the accessories

Images of these accessories are on page 12 of this intruction manual.

A. Tongs: For gripping items of food, the frying pan or the dual wire rack

B. Dual wire rack - Low wire rack: Suitable for frying larger items of food, such as roasted 

poultry (whole), rice, casserole dishes, and vegetables. High wire rack: Suitable for frying 

medium-sized items of food, such as chicken wings and pizza.

C. Frying basket: Suitable for frying items of food such as French fries and items of food 

that need to be able to roll and heat through consistently

D. Chicken spit: Suitable for frying whole chickens and legs of lamb.

The tongs can be used for handling the accessories and the items of food. If neces-

sary, you can also use oven gloves. To avoid accidents, make sure you move the inner 

pan using both hands, whether the pan is hot or cold.

Preparations for frying

1. Depending on what kind of food you are going to prepare, place the baking tray, the 

low wire rack or the bowl in the fryer before adding the food. When filling the bowl, fill it 

to no more than 15 to 20 mm below the brim for optimum circulation of the hot air. Whe-

nusing the frying basket, put the food in the basket before placing the basket in the pan.

2. Close the lid and make sure that none of the food is touching it.

3. Firmly plug the mains lead into the socket.

4. Press the ‘ON/OFF’ button and set the desired frying time and temperature.

5. The timer will stop and beep three times when the frying time has elapsed so you know 

the food is ready and can remove it from the fryer and serve it. After cooking, the fryer’s 

fan continues running in order to cool the fryer.

6. If the fryer is left unused for too long, it will switch itself off, even if it is plugged into the 

mains. Should this happen, you can switch it on again using the ‘ON/OFF’ switch. The fryer 

must only be switched on when it contains food.

Operation

Plug the fryer into the mains and press ‘ON/OFF’. It will automatically be switched on in 

standby mode and ready for operation. If left, the fryer will switch off automatically after 1 

minute.

Summary of Contents for JMLV2573

Page 1: ...g instructions Thank you for choosing our product Read the manual and the maintenance instructions carefully and thoroughly before using the fryer and keep them for future reference F Mode d emploi Me...

Page 2: ...het apparaat naar een erkend servicepunt voor onderzoek reparatie of afstelling 9 Onjuist niet door de fabrikant aanbevolen gebruik van het apparaat of de hulpstukken kan letsel veroorzaken 10 Het app...

Page 3: ...nstructies Voorbereiding voor het eerste gebruik Wanneer u het apparaat voor het eerst gebruikt kan het apparaat een lichte geur afgeven die niet schadelijk is en na een aantal minuten verdwijnt Dit k...

Page 4: ...ijd in De Air Fryer 10 liter openen en sluiten Let op Hieronder wordt uitgelegd hoe u het deksel van de 10 airfryer liter dient te openen en te sluiten Transportbescherming verwijderen Let op Vooraf a...

Page 5: ...ruikt om hem te verplaatsen om ongelukken te voorkomen Het bakken voorbereiden 1 Afhankelijk van wat u gaat bereiden plaatst u de bakplaat het lage rek of de schaal alvorens etenswaren in het apparaat...

Page 6: ...by mode drukt u op de PRESET knop Stel vervolgens de tijd in met de timerknop De standaardinstelling is 60 minuten Elke klik is een stap van 1 minuut Het instellingsbereik is 0 5 9 uur Houd en lang in...

Page 7: ...ijkmatiger te verhitten drukt u op de rotatieknop Het roll pictogram wordt getoond Druk nogmaals op de knop om de rotatiefunctie te annuleren Bak tabel De aangegeven baktijden zijn slechts een indicat...

Page 8: ...at het apparaat volledig afkoelen alvorens verder te gaan met reinigen 4 Om het ventilatordeksel te reinigen verwijdert u de stekker van het apparaat uit het stopcontact en laat u het apparaat volledi...

Page 9: ...ination repair or adjustment 9 Incorrect use of the fryer or accessories not recommended by the manufacturer may lead to injury 10 The fryer should be used only as specified and is intended solely for...

Page 10: ...ctions below should be followed when using the air fryer for the first time When it is used for the first time the fryer may emit a mild but harmless odour that will disappear after a few minutes The...

Page 11: ...imer Sets the desired temperature and frying time The Air Fryer 10 liter opening and closing Please note Instructions for opening and closing the lid of the air fryer are provided below Removing the t...

Page 12: ...an is hot or cold Preparations for frying 1 Depending on what kind of food you are going to prepare place the baking tray the low wire rack or the bowl in the fryer before adding the food When filling...

Page 13: ...tandby press the PRESET button and set the frying time using the timer button The standard setting is 60 minutes with every click representing an increment of 1 minute You can choose a frying time of...

Page 14: ...ess Rolling function To heat the food more evenly press the button Frying chart Frying times are an indication they are dependent on the quantity temperature weight etc 180 10 15 min 180 low wire rack...

Page 15: ...often while the fryer is heating Unplug the fryer from the mains and allow it to cool fully before continuing cleaning 4 To clean the fan cover unplug the fryer and allow it to cool fully Clean the to...

Page 16: ...signe d endommagement Apportez l appareil un centre SAV agr pour l inspection la r pa ration ou le r glage 9 Ne sous estimez jamais le risque d accident li l utilisation non conforme aux indicati ons...

Page 17: ...fants 23 Conservez le pr sent mode d emploi Pr paration avant utilisation Avant d utiliser la friteuse air chaud puls pour la premi re fois Lorsque vous utilisez l appareil pour la premi re fois il pe...

Page 18: ...ulus Accessoires A Grille basse B Pince C Panier frire D Tourne broche E Fourche volaille Utilisez le tourne broche avec la fourche volaille pour un poulet entier Attention Lisez bien ci dessous comme...

Page 19: ...isson 1 En fonction de ce que vous voulez pr parer mettez la l che frites la grille basse ou la cuve en place avant de mettre les aliments dans l appareil Veillez ce que les aliments soient au maximum...

Page 20: ...age standard est de 60 minutes Chaque clic repr sente une plage horaire de 1 minute La plage de r glage est de 30 minutes 9 heures Maintenez le bouton ou enfonc longtemps pour faire d filer par plage...

Page 21: ...onction rotation Pour chauffer la nourriture de fa on plus uniforme appuyez sur le bouton Tableau de cuisson Les temps de cuisson sont indicatif ls d pendent de la quantit du poids de nourriture cuire...

Page 22: ...eil chauffe D branchez l appareil et laissez le refroidir compl tement avant de poursuivre le nettoyage 4 Pour nettoyer le couvercle de ventilation d branchez l appareil et laissez le refroidir compl...

Reviews: