background image

37 

EN

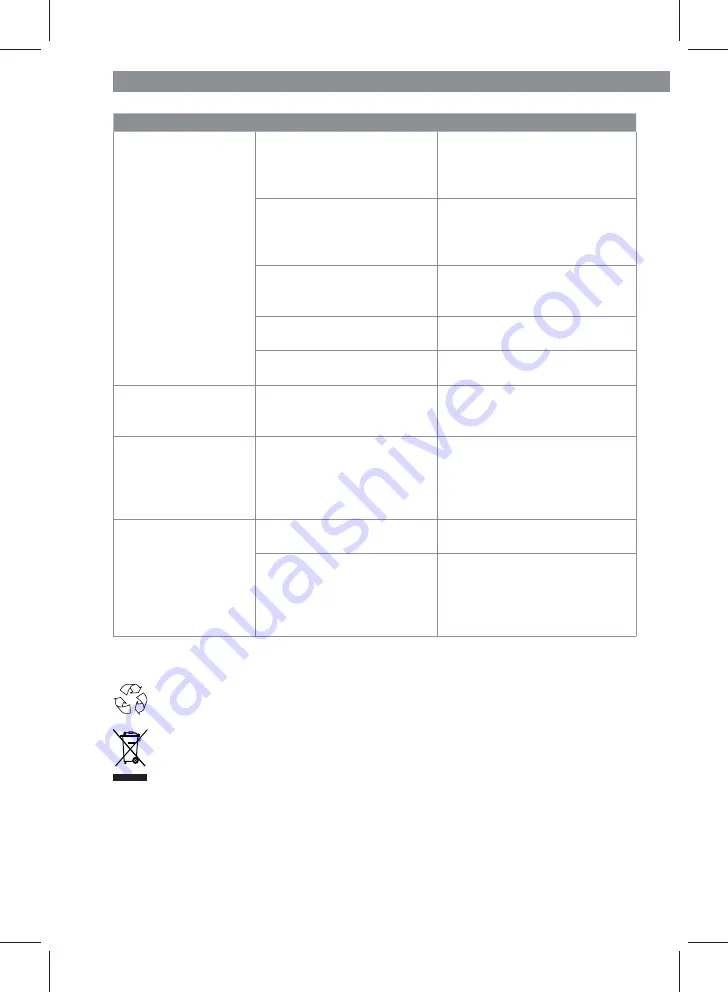
Problem

Possible cause

Fix

The food has not 

been cooked evenly.

Different items of food with 

different cooking times have 

been prepared at the same 

time. 

Place food with a longer cook-

ing time in the device   rst, then 

add ingredients with a shorter 

cooking time later.

Items of food which require 

different cooking tempera-

tures have been prepared at 

the same time.

Prepare items of food with 

different cooking temperatures 

one after the other.

The set cooking time was 

too short or the temperature 

too low.

Increase the cooking time or 

temperature.

The rotating basket or bak-

ing rack is over  lled.

Reduce the amount of food.

The items of food are piled 

on top of one another.

Spread the food and mix it 

around from time to time.

The food is slightly 

burnt.

The selected temperature is 

too high or the cooking time 

too long.

Reduce the temperature or 

cooking time.

Chips made from 

fresh potatoes are not 

crispy.

The potatoes contain too 

much water.

Cut the potatoes into narrower 

pieces. Dab the potato pieces 

dry with some kitchen towel 

and then trickle a little cooking 

oil over them.

During use, an 

unpleasant smell is 

detected.

The device is dirty.

Follow the instructions in the 

"Cleaning" chapter.

The device is being used for 

the   rst time.

A smell often develops when 

new devices are   rst used. 

The smell should disappear 

once the device has been used 

several times.

Disposal

Dispose of the packaging material in an environmentally friendly manner so that 

it can be recycled.
The device is governed by the European Directive 2012/19/EU on waste electri-

cal and electronic equipment (WEEE). Do not dispose of the device as normal 

domestic waste, but rather in an environmentally friendly manner via an of  cially 

approved waste disposal company.

02095_ 02363_ 04180_ 04184_ 04189_de-en-fr-nl_A5_V2.indb   37

12.10.2018   14:43:35

Summary of Contents for MULTI COOK

Page 1: ...sen u veel plezier met uw Molino Healthfryer Merci d avoir choisi notre produit Veuillez lire avec attention le pr sent mode d emploi et les instructions d entretien avant la pre mi re utilisation et...

Page 2: ...uns dass Sie sich f r unsere Hei luftfritteuse entschieden haben Lesen Sie vor dem ersten Gebrauch des Ger tes die Gebrauchsanleitung sorgf ltig durch und bewahren Sie sie zum sp teren Nachlesen auf B...

Page 3: ...r 16 Garraum 17 Halterung f r die Welle und den Drehkorb links 18 Heizelement 19 Bedienfeld 20 Luftaustritts ffnungen 21 Lufteinlassschlitze Bedienfeld 22 Display im Betrieb wechselnde Anzeige von Tem...

Page 4: ...esen Vers umnisse bei der Einhaltung der Sicherheitshinweise und Anweisungen k nnen elektri schen Schlag Brand und oder Verletzungen verursachen Dieses Ger t kann von Kindern ab 8 Jahren sowie von Per...

Page 5: ...vor dem Reinigen stets vom Netz zu trennen Keine Ver nderungen am Ger t vornehmen Auch die An schlussleitung nicht selbst austauschen Wenn das Ger t die Anschlussleitung oder das Zubeh r des Ger tes b...

Page 6: ...schlossene Netzkabel keine Stolpergefahr darstellt Das Netzkabel darf nicht von der Aufstell che herabh ngen um ein Herunterrei en des Ger tes zu verhindern Vorsicht beim ffnen der T r Es besteht Verb...

Page 7: ...e hinten Fettauffangschale Backblech Die Fettauffangschale 8 sollte immer eingesetzt sein damit herabtropfendes Fett Kr mel oder sonstige Lebensmittelreste in ihr aufgefangen werden Sie wird ganz unte...

Page 8: ...dr cken in die gegen berliegende Einkerbung im rechten Gestellrad schieben und einrasten lassen siehe Abbildung B2 6 Die brigen Schaschlikspie e auf diese Weise im Gestell anbringen siehe Abbil dung B...

Page 9: ...spie mit der Entnahmehilfe 5 aus dem Gar raum herausnehmen siehe Abschnitt Entnahmehilfe Zum Entfernen der Drehspie Forken und Abnehmen des Grillgutes immer K chenhandschuhe verwenden Drehkorb Im Dreh...

Page 10: ...sollte ohne Nahrungsmittel statt nden da es auf Grund eventueller Beschichtungsr ckst nde zu einer Geruchs oder Rauch entwicklung kommen k nnte Das Ger t ca 15 Minuten lang ohne Inhalt auf h chs ter...

Page 11: ...ureinheit C oder F w hlen Dazu die Taste so lange gedr ckt halten bis die gew nschte Einheit auf dem Display angezeigt wird 9 Die Temperatur und Garzeit entweder manuell einstellen oder eines der 8 Pr...

Page 12: ...ein Signal ert nt Soll das Ger t vorher gestoppt werden den Ein Ausschalter dr cken Um das Ger t ganz auszuschalten den Ein Ausschalter gedr ckt halten bis die Anzeigen auf dem Bedienfeld erloschen s...

Page 13: ...Bedarf mit einem feuchten Tuch und etwas Sp lmittel reinigen 2 Alle brigen benutzten Teile mit Sp lmittel und warmem Wasser oder in der Ge schirrsp lmaschine sp len Bei hartn ckigen Verschmutzungen e...

Page 14: ...e kontaktieren Die Sicherung im elektrischen Verteiler Sicherungskasten wird ausgel st Zu viele Ger te am selben Stromkreis angeschlossen Anzahl der Ger te im Strom kreis reduzieren Die Lebensmittel s...

Page 15: ...Anweisungen des Kapitels Reinigung befolgen Das Ger t wird zum ersten Mal verwendet Eine Geruchsentwicklung tritt bei der ersten Benutzung neuer Ger te h u g auf Der Geruch sollte verschwinden nachdem...

Page 16: ...ch und Ge gel durchgegart ist Schaschlik russische Art Ruhezeit ca 1 Tag XWDWHQ 1 kg Schweinenacken oder Lamm eisch 1 gro e Zwiebel TL Zucker 1 EL Essig 1 EL l 2 EL passierte Tomate n 2 Lorbeerbl tter...

Page 17: ...schmackhafte Curry oder Paprika Pommes frites Je nachdem wie dick die Kartoffeln geschnitten werden kann man zwischen Kartoffelspalten und Pommes frites variieren Je dicker die Kartoffelst cke desto l...

Page 18: ...Kokosnuss Garnelen XWDWHQ 12 Garnelen gesch lt und entdarmt F r die Panade Tasse Mehl Tasse Kokosnuss ocken Tasse Paniermehl oder Semmelbr sel 1 2 Eiwei XEHUHLWXQJ 1 Die Kokosnuss ocken und das Panier...

Page 19: ...tur und Garzeit ggf entsprechend an passen Panierte H hnchenbruststreifen XWDWHQ 2 H hnchenbrust lets 1 2 Eiwei Tasse Mehl zum Panieren Tasse Paniermehl oder Semmelbr sel TL Salz TL Pfeffer XEHUHLWXQJ...

Page 20: ...ffangschale ganz unten in das Ger t schieben 7 Das H hnchen auf dem Drehspie befestigen 8 Den Drehspie im Ger t anbringen 9 Das Programm Drehgrillen starten 10 Sollte das H hnchen nach Ablauf des Prog...

Page 21: ...auf der Garzeit berpr fen ob die Apfeltaschen goldbraun sind und sie ggf vor Ablauf der die Garzeit herausnehmen Wenn die Apfeltaschen zu hell erscheinen die Garzeit verl ngern Grundrezept f r 12 Muf...

Page 22: ...Pfeffer vermischen 3 In einem kleinen Topf die Butter zerlassen und die Zwiebeln darin anbraten 4 Den Zucker hinzugeben etwas karamellisieren lassen und mit dem Zitronensaftge misch abl schen 5 Aufko...

Page 23: ...DE 24 02095_ 02363_ 04180_ 04184_ 04189_de en fr nl_A5_V2 indb 24 12 10 2018 14 43 33...

Page 24: ...__________________________________ 38 Dear Customer We are delighted that you have chosen our hot air fryer Before using the device for the rst time please read the operating instructions care fully a...

Page 25: ...space 17 Holder for the shaft and the rotating basket left 18 Heating element 19 Control panel 20 Air outlet openings 21 Air inlet slots Control Panel 22 Display alternating display of temperature an...

Page 26: ...ies This device may be used by children aged 8 and over and by people with reduced physical sensory or mental abilities or a lack of experience and or knowledge if they are supervised or have received...

Page 27: ...operated with an external timer or a separate remote control system Note the cleaning instructions in the Cleaning chapter DANGER Risk of Electric Shock Use and store the device only in closed rooms D...

Page 28: ...mains plug Remove the mains plug if a fault occurs during operation or before a thunderstorm Always check the device for damage before putting it into operation The device should only be used when it...

Page 29: ...ng Assemble the rack for skewers and insert into the device PLEASE NOTE The shaft 4 contains two small round notches They mark the outermost position of the locking screws These must not be attached a...

Page 30: ...without any hindrance 1 Slide one of the rotating spit forks onto the shaft and lock it with the locking screw The shaft contains a small round notch for the tip of the locking screw In the case of s...

Page 31: ...et Removal Tool The hot rotating basket rotating spit or the hot rack containing skewers is taken out of the cooking space using the removal tool 5 1 Place the ends of the removal tool under the shaft...

Page 32: ...Ensure that there is suf cient clear space at all sides especially at the air outlet openings 2 Completely unwind the mains cable and plug the mains plug into a plug socket 3 Open the door 15 If the...

Page 33: ...you would for manual setting and use the control dial to set a value 10 Press the On Off switch to switch on the device Successively illuminating operating lamps 23 indicate that the device is operat...

Page 34: ...frozen products you should follow the times and temperatures speci ed by the manufacturer Before the speci ed cooking time elaps es check whether the food is already cooked through because the cookin...

Page 35: ...witch on The mains plug is not inserted correctly in the plug socket Push the mains plug into the plug socket as far as it will go The plug socket is defective Try another plug socket No mains voltage...

Page 36: ...g time too long Reduce the temperature or cooking time Chips made from fresh potatoes are not crispy The potatoes contain too much water Cut the potatoes into narrower pieces Dab the potato pieces dry...

Page 37: ...n style Resting time approx 1 day QJUHGLHQWV 1 kg Pork neck or lamb 1 Large onion tsp Sugar 1 tbsp Vinegar 1 tbsp Oil 2 tbsp Strained tomato es 2 Bay leaves To taste Salt black pepper cayenne pepper 3...

Page 38: ...curry or paprika avoured chips There are no limits to your imagination Depending on how thick you cut your potatoes you can vary between potato wedges and thick or thin chips The thicker the potatoes...

Page 39: ...conut Prawns QJUHGLHQWV 12 Prawns peeled and cleaned For the breadcrumb coating cup Flour cup Coconut akes cup Breadcrumbs 1 2 Egg white 3UHSDUDWLRQ 1 Add the coconut akes and the breadcrumbs in a rat...

Page 40: ...nd cooking time accordingly if necessary Chicken Breast Strips in Breadcrumbs QJUHGLHQWV 2 Chicken breast llets 1 2 Egg white cup Flour for breadcrumbs cup Breadcrumbs tsp Salt tsp Pepper 3UHSDUDWLRQ...

Page 41: ...llecting tray onto the bottom rail in the device 7 Fix the chicken on the rotating spit 8 Attach the rotating spit in the device 9 Start the Rotary grilling programme 10 If the chicken is not yet gold...

Page 42: ...rying programme and set the cooking time to 6 hours 5 Check from time to time whether the banana slices are dry They will feel slightly leathery when they are done Basic Recipe for 12 Muf ns QJUHGLHQW...

Page 43: ...d fry off the onions in it 4 Add the sugar allow it to caramelise a little and deglaze with the lemon juice mixture 5 Bring to the boil and pour over the cutlets 6 Stir together the tomato ketchup wit...

Page 44: ...ns d avoir choisi notre friteuse chaleur tournante Pri re de lire attentivement le pr sent mode d emploi avant la premi re utilisation de l appareil et de le conserver pr cieusement pour toute consult...

Page 45: ...pport pour l axe et le panier rotatif gauche 18 l ment chauffant 19 Panneau de commande 20 Ouvertures d vacuation de l air 21 Fentes d a ration Panneau de commande 22 cran en fonctionnement af che alt...

Page 46: ...des ca ract ristiques techniques dont est dot cet appareil Tout manquement aux consignes de s curit et aux instructions donn es peut provoquer une d charge lectrique un incen die et ou des blessures C...

Page 47: ...jours tre d branch du secteur lorsqu il n est pas sous surveillance avant d tre transport assembl d mont et nettoy Ne proc dez aucune modi cation sur l appareil De m me ne remplacez pas le cordon de r...

Page 48: ...des animaux Risque de suffocation Assurez vous de toujours tenir le cordon d alimentation hors de port e des jeunes enfants et des animaux Il existe un risque de strangulation A n que personne ne risq...

Page 49: ...inction de toute prise en charge et fait perdre tout droit la garantie N utilisez pas l appareil en cas de dysfonctionnement s il est tomb par terre ou dans l eau Avant toute remise en service faites...

Page 50: ...c brochettes garni d aliments via le trou rond dans la roue gauche du support voir illustration B2 5 Pressez l g rement l autre extr mit le clip du pic brochettes en l ins rant dans l encoche oppos e...

Page 51: ...ofond ment dans le support Apr s l utilisation retirez le tournebroche chaud de l espace de cuisson l aide de l ex tracteur 5 voir section Extracteur Pour retirer les fourches du tournebroche et r cup...

Page 52: ...l appareil mais contactez le service apr s vente 2 Enlevez de l appareil les ventuels lms protecteurs adh sifs et protections de trans port N tez jamais la plaque signal tique de l appareil ni les ven...

Page 53: ...Mettez celui ci dans l appareil voir paragraphe Accessoires 6 Fermez le volet 7 Appuyez sur l interrupteur marche arr t 10 Les indicateurs du panneau de com mande 19 s allument 8 S lectionnez l unit d...

Page 54: ...pour pics brochettes appuyez sur la touche 26 a n de d marrer la fonction rotative Une nouvelle pression sur la touche permet d arr ter nouveau la fonction rotative Avant d tre pleinement familiaris...

Page 55: ...e temps de cuisson peut s av rer un peu plus court que dans un four traditionnel Nettoyage NOTER Avant le nettoyage d branchez la che de la prise et laissez l appareil et les acces soires refroidir Ri...

Page 56: ...le probl me pour constater si vous pouvez y rem dier vous m me Si vous ne parvenez pas r soudre le probl me selon les indications ci apr s veuillez vous adresser au service apr s vente N essayez pas...

Page 57: ...rotatif ou la grille pour four sont trop remplis R duisez la quantit d aliments Les aliments sont empil s R partissez les aliments et m langez de temps en temps Les aliments sont br l s La temp ratur...

Page 58: ...Brochettes fa on russe Temps de repos env 1 jour QJUpGLHQWV 1 kg d chine de porc ou de viande d agneau 1 gros oignon cuill re caf de sucre 1 cuill re soupe de vinaigre 1 cuill re soupe d huile 2 cuil...

Page 59: ...libre cours son imagination Selon l paisseur des morceaux de pomme de terre coup s on peut varier entre quarts de pomme de terre et frites nes ou grosses Plus les pommes de terre sont coup es grossi r...

Page 60: ...son Crevettes la noix de coco QJUpGLHQWV 12 crevettes d cortiqu es et vid es Pour la panure tasse de farine tasse de ocons de noix de coco tasse de panure ou de chapelure 1 2 blancs d uf 3UpSDUDWLRQ 1...

Page 61: ...a temp rature de cuisson le cas ch ant Blancs de poulet pan s QJUpGLHQWV 2 blancs de poulet 1 2 blancs d uf tasse de farine pour la panure tasse de panure ou de chapelure cuill re caf de sel cuill re...

Page 62: ...la graisse sur le rail inf rieur de l appareil 7 Fixer le poulet sur le tournebroche 8 Mettre le tournebroche en place dans l appareil 9 D marrer le programme Tournebroche 10 Si une fois le programme...

Page 63: ...le sucre vanill Ajouter le beurre coup en ocons Battre nergiquement jusqu ce que les ocons de beurre disparaissent compl tement 2 Ajouter le lait en alternance avec la farine et la levure chimique 3 V...

Page 64: ...er le jus de citron le vinaigre le sel et le poivre 3 Faire fondre le beurre dans une petite marmite et y faire revenir les oignons 4 Ajouter le sucre laisser un peu caram liser et d glacer avec le m...

Page 65: ...r voor de as en de draaimand links 18 Verwarmingselement 19 Bedieningspaneel 20 Openingen voor luchtafvoer 21 Sleuven voor luchtinlaat Bedieningspaneel 22 Display tijdens de werking afwisselende weerg...

Page 66: ..._ 80 Geachte klant Wij danken u dat u hebt gekozen voor de aankoop van onze heteluchtfriteuse Lees v r het eerste gebruik van het apparaat de gebruikershandleiding zorgvuldig door en bewaar deze om ha...

Page 67: ...gheidsinstructies en aanwijzingen kan een elektrische schok brand en of letsel tot gevolg hebben Dit apparaat kan worden gebruikt door kinderen vanaf 8 jaar en ook door personen met beperkte lichameli...

Page 68: ...anderingen uit aan het apparaat Ook het net snoer niet zelf vervangen Wanneer het apparaat het netsnoer of de toebehoren van het apparaat beschadigd zijn moeten deze door de fabrikant klantenservice o...

Page 69: ...kan struikelen over het aangesloten netsnoer Het netsnoer mag niet naar beneden hangen vanaf de plaats waar het apparaat is geplaatst om te voorkomen dat het apparaat naar beneden wordt getrokken Wee...

Page 70: ...en Afbeeldingen zie uitklappagina achter Vetopvangschaal bakplaat De vetopvangschaal 8 moet altijd zijn geplaatst zodat omlaag druppelend vet kruimels of overige resten van levensmiddelen hierin worde...

Page 71: ...iggende inkerving in het rechter framewiel schuiven en laten vastklikken zie afbeelding B2 6 De overige shaslickspiesen op deze manier in het frame aanbrengen zie afbeelding B2 BELANGRIJK Als niet all...

Page 72: ...pit met het verwijdergereedschap 5 uit de gaarruimte nemen zie sectie Verwijdergereedschap Voor het verwijderen van de draaispitvorken en af nemen van de gegrilde levensmiddelen altijd keukenhandschoe...

Page 73: ...araat moet plaatsvinden zonder levensmidde len omdat eventuele coatingresten een geur en rookontwikkeling zouden kunnen veroorzaken Laat het apparaat ca 15 minuten lang zonder inhoud in de hoogste tem...

Page 74: ...d C of F kiezen Daartoe de knop zo lang ingedrukt houden tot de gewenste eenheid op het display wordt weergegeven 9 De temperatuur en gaartijd ofwel handmatig instellen of een van de 8 programma s kie...

Page 75: ...al Moet het apparaat eerder worden gestopt de aan uitknop indrukken Om het apparaat geheel uit te schakelen de aan uitknop ingedrukt hou den tot de weergaven op het bedieningspaneel zijn uitgegaan 13...

Page 76: ...ij behoefte reinigen met een vochtige doek en een beetje afwasmiddel 2 Alle overige gebruikte onderdelen met afwasmiddel en warm water of in de vaat wasser reinigen Bij hardnekkige vervuilingen raden...

Page 77: ...de stroomkring aangesloten Aantal van de apparaten in de stroomkring verminderen De levensmiddelen zijn niet gelijkmatig gegaard Er zijn verschillende levens middelen met verschillende gaartijden teg...

Page 78: ...adat het apparaat meerdere keren werd gebruikt Afvoeren Verwerk het verpakkingsmateriaal milieuvriendelijk en breng dit naar een recy clepunt Het apparaat valt onder de Europese richtlijn 2012 19 EU v...

Page 79: ...voordat ze worden geserveerd Sjasliek op Russische wijze Rusttijd ca 1 dag QJUHGLsQWHQ 1 kg varkensnek of lamsvlees 1 grote ui tl suiker 1 el azijn 1 el olie 2 el gepasseerde toma a t en 2 laurierbla...

Page 80: ...loop Afhankelijk van hoe dik u uw aardappels snijdt kunt u vari ren tussen aardap pelpartjes en dikke of dunne friet Hoe dikker de aardappelen zijn gesneden hoe langer de gaartijd is Vastkokende aarda...

Page 81: ...garnalen QJUHGLsQWHQ 12 garnalen gepeld en zonder darm Voor het korstje kopje bloem kopje kokosvlokken kopje paneermeel of broodkruim 1 2 eiwitten HUHLGLQJ 1 De kokosvlokken en het paneermeel bijv het...

Page 82: ...peratuur en gaartijd eventueel over eenkomstig aan Gepaneerde kip letreepjes QJUHGLsQWHQ 2 kip lets 1 2 eiwitten kopje bloem om te paneren kopje paneermeel of broodkruim tl zout tl peper HUHLGLQJ 1 Ei...

Page 83: ...het apparaat schuiven 7 De kip op het draaispit bevestigen 8 Het draaispit in het apparaat aanbrengen 9 Het programma Draaigrillen starten 10 Mocht de kip na a oop van het programma nog niet goudbrui...

Page 84: ...loppen tot er geen klontjes boter meer te zien zijn 2 De melk afwisselend met de bloem en het bakpoeder erdoor roeren 3 De massa telkens ca voor de helft in de muf nvormpjes vullen 4 De muf nvormpjes...

Page 85: ...lten en de uien daarin fruiten 4 De suiker erbij doen een beetje laten karamelliseren en afblussen met het citroen sapmengsel 5 Aan de kook laten komen en over de karbonaden gieten 6 De tomatenketchup...

Reviews: