background image

12 


REGOLAZIONE PEDALI 

“L” è il pedale sinistro, “R” è il pedale destro; avvitare e serrare entrambi saldamente nella posizione corretta.


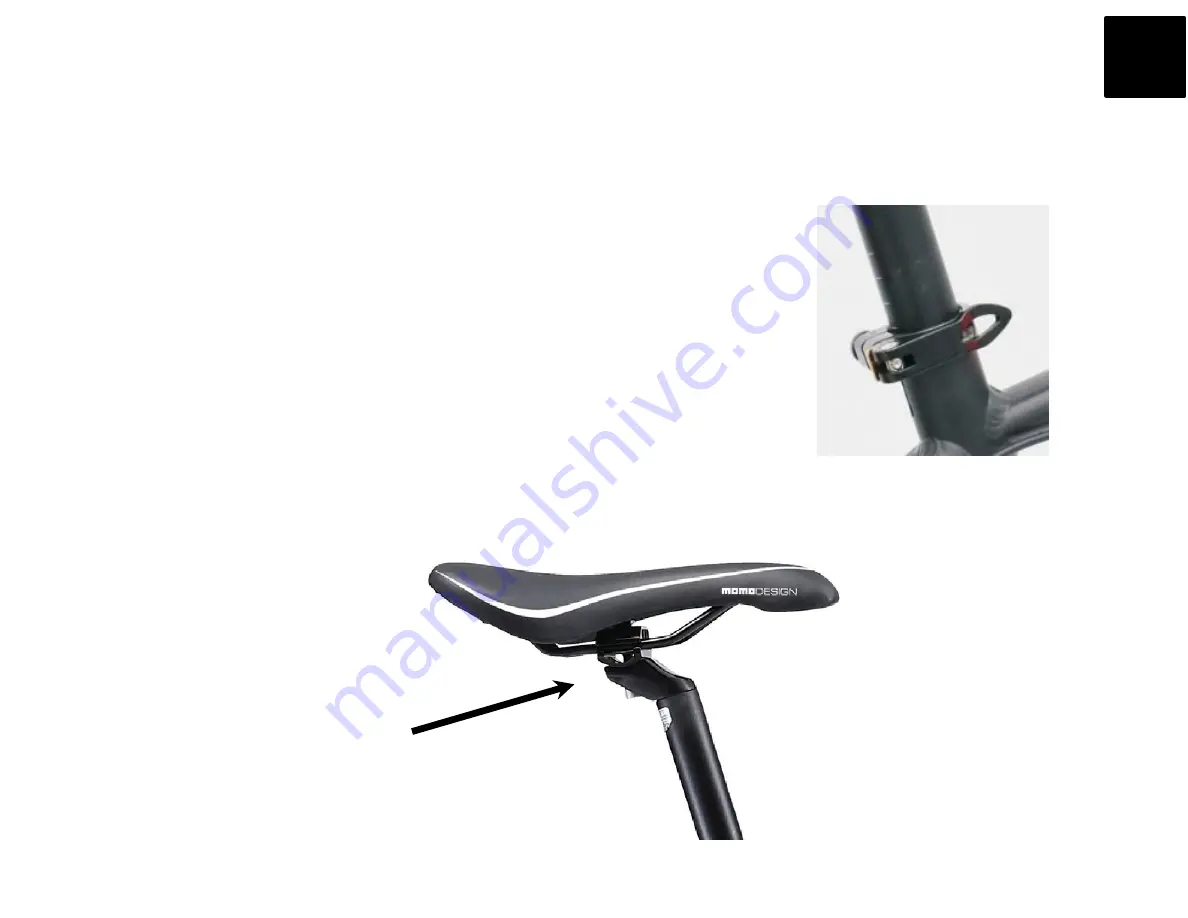
REGOLAZIONE DEL SELLINO 

Fare attenzione alla distanza tra la seduta ed il pedale nella posizione più bassa. 

L’altezza del sellino è corretta quando il ginocchio è leggermente piegato nel momento in cui il piede si 

trova nel punto più basso della circonferenza tracciata dal pedale.  
1. Regolare il sellino rilasciando la leva di serraggio rapido. 
2. Regolando il dado della leva di serraggio rapido, è possible impostare la forza di serraggio. 
3. Fare attenzione alla profondità del tubo del sellino (e alle linee guide di sicurezza su di esso). 
4. Chiudere la leva di serraggio rapido.


Consultare il proprio Rivenditore per qualsiasi assistenza. 
 

E’ possibile anche regolare l’arretramento della sella. 


Utilizzare una chiave per svitare il dado sotto il sellino.  
Dopo che il sellino è stato regolato, riavvitare e serrare saldamente il dado. 
Per evitare disturbi di postura, il sellino dovrebbe essere regolato anche in posizione orizzontale. 


IT


Summary of Contents for MD-E26MTBF CAPRI26FAT

Page 1: ...1 ...

Page 2: ...2 CAPRI 26FAT MD E26MTBF W 26 ELECTRIC FAT BIKE USER MANUAL ORIGINAL INSTRUCTIONS PAGE 3 IT PAGE 25 EN ...

Page 3: ... gravi Il Distributore ed il Venditore non sono responsabili di alcun danno ad oggetti e o persone causate da un utilizzo improprio del prodotto Questo prodotto non è un giocattolo Non adatto a bambini di meno di 12 anni Questo prodotto non è concepito per l utilizzo da parte di persone inclusi i bambini con ridotte capacità fisiche sensoriali o mentali o con mancanza di esperienza e conoscenza de...

Page 4: ...08 cm circa Specifiche tecniche principali della batteria Tipo Batteria al litio Capacità 8 8Ah Voltaggio 36V Parametri tecnici della centralina Valore di protezione sottotensione 30 5 2V Valore di protezione sovracorrente 15 2A Principali parametri tecnici del motore Tipo Magnete permanente ad alta efficienza Brushless Potenza 250W Tensione 36V Tensione di ingresso 100 240V CA 50 60Hz Periodo di ...

Page 5: ...n tutte le sue parti Prima di guidare la bicicletta bisogna assicurarsi che il livello della batteria sia carico Attenersi al manuale per non incorrere in problemi tecnici Controllare lo stato dei pneumatici Utilizzare il prodotto solo se in buone condizioni IT ...

Page 6: ...sicurezza Rivolgersi al proprio rivenditore per qualsiasi problema relativo alla qualità Rispettare il codice stradale Ridurre la velocità in caso di pioggia o neve Usare i freni a debita distanza per salvaguardare la propria sicurezza La bicicletta non risente di pioggia o neve ma l acqua profonda potrebbe danneggiare il motore e i sistemi di controllo Nel caso asciugare la bicicletta dopo l uso ...

Page 7: ...dia AVS 12 Distanza km o miglia Contachilometri parziale DST Contachilometri totale ODO Voltaggio VOL 13 Allarme freno 14 Indicatore luce frontale non disponibile in questo modello Spegnimento accensione display tenere premuto il tasto on off per accendere o spegnere il display ed il sistema elettrico della bicicletta Il display si spegnerà automaticamente dopo 5 minuti di inutilizzo della bicicle...

Page 8: ...nsione Dalla visualizzazione numero 1 premendo leggermente il tasto on off si passerà alla seconda visualizzazione del display dopo 5 secondi in modalità pedalata il display tornerà automaticamente alla schermata principale numero 1 IT ...

Page 9: ...disattiva la velocità moderata di marcia di 6km h A veicolo fermo e con il display già acceso mantenere premuto il tasto giù per attivare la modalità di velocità moderata di 6Km h Il simbolo della funzione spingibici lampeggerà sul display La bicicletta si muoverà in avanti Questa funzione spingibici può essere utilizzata solo quando si vuole spingere la bici a mano senza far fatica su salite ripi...

Page 10: ...lina I codici di errore appaiono sul display lampeggiando Una volta che il problema è risolto il display tornerà alla schermata principale Nota A causa delle continue migliorie apportate ai nostri prodotti il contenuto delle istruzioni potrebbe differire dal prodotto stesso IT ...

Page 11: ...11 SENSORE DI VELOCITA Diagramma installazione sensore asse centrale e guarnitura meccanica nel mezzo Sensore di velocità coppia Sensore stent Disco segnale sensore IT ...

Page 12: ...llino rilasciando la leva di serraggio rapido 2 Regolando il dado della leva di serraggio rapido è possible impostare la forza di serraggio 3 Fare attenzione alla profondità del tubo del sellino e alle linee guide di sicurezza su di esso 4 Chiudere la leva di serraggio rapido Consultare il proprio Rivenditore per qualsiasi assistenza E possibile anche regolare l arretramento della sella Utilizzare...

Page 13: ...avete la sensazione che il freno non agisca correttamente è possibile regolare la tensione del cavo agendo sulla vite a barilotto A nella foto sottostante Ruotare la vite in senso antiorario per allentare il cavo ruotare invece la vite in senso orario per tirare il cavo Consultare il proprio Rivenditore per qualsiasi assistenza PRESSIONE PNEUMATICI La pressione dei pneumatici incide sulla distanza...

Page 14: ... filo nella sua sede 4 La vite H è il registro che regola il finecorsa inferiore Permette di allineare le pulegge del deragliatore al pignone più piccolo evitando che la catena fuoriesca sul telaio 5 La vite L è il registro che regola il finecorsa superiore Agendo su questa vite si allineano le pulegge del deragliatore al pignone più grande evitando che la catena cada tra i raggi IT ...

Page 15: ...reste conoscere sulla potenza della pedalata La partenza della bicicletta è differente dalle biciclette normali quando il sistema elettrico è funzionante Si pedalerà molto più facilmente L importante è non fermare la pedalata Accertarsi di famigliarizzare con il funzionamento della bicicletta prima di addentrarsi in un ambiente affollato Quando il sistema elettrico non è attivo la bicicletta oppor...

Page 16: ...rante la ricarica 2 Assicurarsi che la porta di ingresso sia completamente asciutta prima di inserire il cavo dell alimentatore Aprire il tappo della porta di ingresso 3 Una volta inserito il cavo del carica batteria nell apposita porta d ingresso della bicicletta collegare la spina alla rete elettrica domestica È importante collegare prima il terminale alla batteria e poi il terminale alla rete e...

Page 17: ...completamente carica per non ridurne il ciclo vitale Se non utilizzata per lungo tempo conservare la bicicletta con la batteria carica a metà È vietato disperdere le batterie Non gettare le batterie nei rifiuti domestici Non gettare le batterie nel fuoco Utilizzare solo la batteria originale Evitare che il caricabatteria entri in contatto con liquidi e metalli e non sottoporlo a urti e cadute Non ...

Page 18: ... batterie contengono sostanze pericolose all interno Non lasciare che bambini o animali tocchino la batteria Utilizzare solo le batterie già utilizzate contenute nel mezzo Rivolgersi al Rivenditore per la sostituzione RIMOZIONE BATTERIA Se necessario è possibile rimuovere la batteria dalla bicicletta Accertarsi che la bicicletta sia spenta il display deve essere spento ed il tasto vicino alla port...

Page 19: ...orizzato o da un Tecnico autorizzato Qualsiasi modifica potrebbe inficiare negativamente sul funzionamento del veicolo danneggiarlo o provocare altri danni collaterali GUIDARE LA BICICLETTA Per garantire la massima sicurezza alla guida effettuare le seguenti ispezioni prima di procedere all uso della bicicletta Pressione pneumatici Serraggio delle viti anteriori e posteriori Batteria sufficienteme...

Page 20: ...to utilizzo della bicicletta l utilizzatore deve essere alto tra 150 e 190 cm 6 Mantenere sempre una distanza di sicurezza da cose e persone per evitare collisioni 7 Non accelerare e non arrestare il veicolo in modo improvviso o brusco Movimenti improvvisi potrebbero causare la perdita del controllo della bicicletta 8 Ricordare che il peso del conducente deve essere al di sotto della soglia massim...

Page 21: ...velocità Potenza motore 250W brushless Autonomia per carica 50 km variabile in base al terreno alla pendenza alla velocità allo stile di guida Alimentazione AC 100 240V 50 60Hz Batteria Ricaricabile al litio da 8800mAh Voltaggio di carica della batteria 36V Capacità batteria 8 8Ah Tempo di carica 6 7 ore Peso netto 24 8 kg circa Ruote 26 pollici ASSISTENZA Rivolgersi al proprio Rivenditore per qua...

Page 22: ...e batterie un corretto smaltimento permette di evitare conseguenze negative per l ambiente e la salute Ai sensi del Decreto Legislativo n 49 del 14 Marzo 2014 Attuazione della Direttiva 2012 19 UE sui rifiuti di apparecchiature elettriche ed elettroniche RAEE Il simbolo del cassonetto barrato riportato sull apparecchiatura indica che il prodotto alla fine della propria vita utile deve essere racco...

Page 23: ...bilità per l utilizzo improprio del prodotto L Azienda si riserva il diritto di effettuare modifiche nella tecnologia nelle attrezzature e nel manuale d uso senza preavviso MADE IN TAIWAN Importato e Distribuito da Consumer Electronics Spa Piazza G F Ferré 10 20025 Legnano MI www consumerelectronicsspa com IT ...

Page 24: ...24 ...

Page 25: ...his appliance is not a toy Children shall not play with the appliance Keep the battery out of the reach of small children Adult supervision is required for minors This appliance can be used by children aged from 12 years old and above and by persons with reduced physical sensory or mental capabilities or lack of experience and knowledge if they have been given supervision or instructions concernin...

Page 26: ...ont and the rear wheel 108 cm approx Battery main technical parameters Type Lithium battery Capacity 8 8Ah Voltage 36V Controller main technical parameters Under voltage protection value 30 5 2V Over current protection value 15 2A Motor main technical parameters Type High efficiency permanent magnet Brushless Watt 250W Voltage 36V Charge Input voltage AC100 240V 50 60Hz Charge time 6 7 hours Brake...

Page 27: ... the Distributor are not responsible of damages to objects and or people caused by the incorrect use of the bike Please check whether the tires are damaged If anything abnormal please provide for maintenance Please use the product if in good condition only Before riding the scooter the battery must be fully charged or almost fully charged Follow the instructions on this user manual to avoid techni...

Page 28: ...ty If have any quality problem contact the Dealer in time Please observe the transportation laws Reduce the speed when snow and raining Keep a long distance when using brakes to ensure your safety The bike does not fear the snow and the rain but the deep water could damage the motor or the control parts In case it happens carefully dry the water after use Use 36V power Do not touch the two stage o...

Page 29: ...Distance km or MPH Trip distance DST Total distance ODO Battery voltage VOL 13 Brake alert 14 Frontlight indicator not available with this model Power on off hold the on off button to turn on or turn off the display and the motor power supply of the bike The display and the motor power supply will automatically shut down and turn off when the bike is not used for consecutive 5 minutes Note the bat...

Page 30: ...30 Display look at start From display look number 1 shortly press the on off button to get display look number 2 in the riding condition the display will return to look number 1 after 5 seconds EN ...

Page 31: ...hen the bike is stopped and the display is turned on hold the DOWN key to activate the speed function of 6Km h This function is activated when the relative symbol flashes on the display The bike will move forward This function is useful when user must push the bike by hand on a climb or on uneven terrain If pushing faster than 6km h the function automatically deactivates Be careful when this funct...

Page 32: ... the display Once the fault is removed the display will exit from the fault code display interface and return to main screen look Note Because of the continous upgrading of the Manufacturer the content of the manual could differ from the real product but it will not affect your normal use EN ...

Page 33: ...33 SPEED SENSOR imitation torque type Sensor installation drawing central axis and crank set between EN ...

Page 34: ... your knee joint can bend slightly when your foot is placed on the pedal at the bottom If any questions please consult your bicycle dealer You can adjust the seat height by loosening the seat holder pipe clamp see photo Contact your retailer or the after sale service in case of need You can also adjust the seat forward or backward For this purpose use an open end wrench to unscrew the nut on the c...

Page 35: ... disc Contact your retailer or the after sale service in case of need TIRE PRESSURE The tire pressure will affect the driving mileage and riding comfort It is suggested that you check the tire pressure regularly and fully inflate the tires in time Contact your retailer or the after sale service in case of need ADJUST THE REAR DERAILLEUR 1 Adjust the tension of the chain with A point 2 Manually adj...

Page 36: ...ke 6 The function of L is adjusting the chain moving to the left when limiting of the low gear That means limiting the range to the left of derailleur left and right side are according to the forward direction of the bike EN ...

Page 37: ...e more easily Please do not stop riding Be sure to be familiar with this performance before riding in a crowded environment When the electric power system stops working the bicycle will produce a little extra resistance So you can always use it as an ordinary bicycle even with no lithium battery The speed limit is 25 km h with pedalling power which means that the pedalling power will gradually wea...

Page 38: ...void any short circuit 1 Turn off the display and turn the button nearby the charging port on 0 Do not use the bike during the charge of the battery 2 Ensure the charging port is dry 3 Open the cover and insert the charger into the bike charging port Then the other end of the charger must be connected to the mains to activate the charger 4 The indicator light on the charger will be red this grants...

Page 39: ...ot used for long time Correctly dispose and recycle the batteries according to local recycling and environmental regulation Never treat the batteries as common domestic waste to prevent explosion and pollution Never throw the batteries into fire Only use the supplied battery Only professionals can disassemble and maintain the battery Please refer to your Retailer Keep liquids and metals away from ...

Page 40: ...t from the battery Do not let children or animals touch the battery Only use the supplied battery Please refer to your Retailer for replacement BATTERY REMOVAL If required battery can be removed from the bike First be sure the bike is turned off the display must be off and the button nearby the charging port must be on 0 position Insert the key in the lock see photo and turn it to unlock the batte...

Page 41: ... be in perfect status for use ABOUT RIDING In order to ensure a safe ride please check the following before riding the bike Tire pressure is normal Front and rear screws are properly tightened Battery electricity is sufficient The brake system is adjusted Handlebars and saddle are adjusted How to start the bike Bike can be powered pressing on off button on the display Be sure that the button nearb...

Page 42: ... The scooter might not be under control anymore 10 Do not drive the bike on grounds with snow or ice The control of the bike will be reduced MAINTENANCE OF THE BIKE First make sure the charging cable is not connected Second the bike must be power off and stopped Now you can wipe the bike with a soft damp cloth that will not damage the surface of the bike Use neutral detergent and gently wipe the p...

Page 43: ... Carefully read all instructions before using the electric bike This product is warranted to be free from defects in materials workmanship and functionality aesthetic parts are excluded for a period of 2 years starting from the date of purchase in case of receipt for a period of 1 year starting from the date of purchase in case of invoice This warranty shall not apply to any products that have bee...

Page 44: ...ir working life To prevent possible harm to the environment of human health from uncontrolled waste disposal please separated these items from other types of waste and recycle them responsibly to promote the sustainable reuse of material resources Household users should contact either the retailer where they purchased this product or their local government office for details of where and how they ...

Reviews: