background image

TC9855HFAN Rev. AB 12/07

©2007 Paxar Americas, Inc. a subsidiary of Avery Dennison Corp. All rights reserved.

Monarch

®

9855® HF

Printer

{F,1,A,R,E,600,400,"9800FMT"

T,1,15,V

,190,100,1,1,2,2,B,L,0,0

C,220,135,0,1,1,1,B,L,0,0,"Ship

From:"

B,2,12,F

,250,130,1,2,75,5,L,0

X,3,1000,0,0

}

{B,1,N,1

1,"Dayton,

Ohio"

2,"12345678901"

3,

}

¦

¦

¦

¦

"313233343536373839303132"

23456

78901

Ship Fr

om:

Dayton,

Ohio

23456

78901

Ship Fr

om:

Dayton,

Ohio

23456

78901

Ship Fr

om:

Dayton,

Ohio

Summary of Contents for 9855

Page 1: ...55 HF Printer F 1 A R E 600 400 9800FMT T 1 15 V 190 100 1 1 2 2 B L 0 0 C 220 135 0 1 1 1 B L 0 0 Ship From B 2 12 F 250 130 1 2 75 5 L 0 X 3 1000 0 0 B 1 N 1 1 Dayton Ohio 2 12345678901 3 313233343536373839303132 23456 78901 Ship From Dayton Ohio 23456 78901 Ship From Dayton Ohio 23456 78901 Ship From Dayton Ohio ...

Page 2: ...l environment This equipment generates uses and can radiate radio frequency energy and if not installed and used in accordance with the instruction manual may cause harmful interference to radio communications Operation of this equipment in a residential area is likely to cause harmful interference in which case the user will be required to correct the interference at his own expense CANADIAN D O ...

Page 3: ...es 2 1 Using the RFID Setup Menu 2 1 Getting the Tag Type 2 3 Reading the UID Memory 2 4 Reading the User Memory 2 5 Setting the Write Attempts 2 6 Setting the Attenuation 2 7 Clearing Data 2 8 Printing a Configuration Label 2 9 Setting the Protocol 2 10 SETTING UP THE PRINTER 3 1 Setting the Print and Supply Positions 3 1 Using the Setup Supply Menu 3 1 Setting the Error Action 3 2 Version Inform...

Page 4: ...D DATA FIELD 4 1 Applying Options to the RFID Data Field 4 3 Using Option 30 Pad Data 4 4 Using Option 63 Lock Tag 4 5 About HF RFID Tags 4 5 Using Option 64 Program the AFI DSFID and EAS Fields 4 6 TROUBLESHOOTING 5 1 RFID Errors 5 2 INDEX i ...

Page 5: ...cluding ISO15693 and I CODE UID protocols The printer operates at 13 56 MHz Note Information in this document supercedes information in previous versions Check our Web site www paxar com for the latest release and documentation information Using This Manual Following is a summary of the contents of this manual Chapter Contents 1 Getting Started Information you should know before using the printer ...

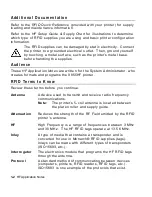
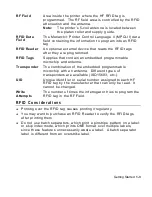
Page 6: ...9855HF printer RFID Terms to Know Review these terms before you continue Antenna A device used to transmit and receive radio frequency communications Note The printer s 5 coil antenna is located between the platen roller and supply guide Attenuation Reduces the strength of the RF Field emitted by the RFID printer s antenna HF High Frequency is a range of frequencies between 3 MHz and 30 MHz The HF...

Page 7: ...he combination of the embedded programmable microchip with an antenna Different types of transponders are available ISO15693 etc UID Unique identifier or serial number assigned to each HF RFID tag by the manufacturer that can only be read It cannot be changed Write Attempts The number of times the interrogator tries to program the RFID tag in the RF Field RFID Considerations Printing over the RFID...

Page 8: ...1 4 HF Application Notes ...

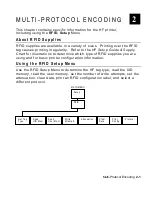
Page 9: ...p Guide Supply Chart for illustrations to determine which type of RFID supplies you are using and for basic printer configuration information Using the RFID Setup Menu Use the RFID Setup Menu to determine the HF tag type read the UID memory read the user memory set the number of write attempts set the attenuation clear data print an RFID configuration label and select a different protocol MAIN MEN...

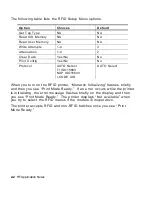
Page 10: ...ct TI ISO15693 NXP ISO15693 I CODE UID AUTO Select When you turn on the RFID printer Monarch Initializing flashes briefly and then you see Print Mode Ready If an error occurs while the printer is initializing the error message flashes briefly on the display and then you see Print Mode Ready The printer displays Not available when you try to select the RFID menus if the module is inoperative The pr...

Page 11: ...cated behind the platen roller 3 Press Enter Pause The tag type appears on the display TI ISO15693 Blks 8 Byts 4 If the tag cannot be found No Tag Found appears briefly on the display Try moving the tag slightly forward or backward in the supply path over the coil antenna and try again 4 Press Enter Pause Save Protocol Yes 5 Select Yes or No to save the protocol and press Enter Pause If you select...

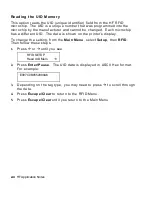
Page 12: ...ent UID The data is shown on the printer s display To change the setting from the Main Menu select Setup then RFID Then follow these steps 1 Press or until you see RFID SETUP Read UID Mem 2 Press Enter Pause The UID data is displayed in ASCII Hex format For example E007C0B9552980A6 3 Depending on the tag type you may need to press to scroll through the data 4 Press Escape Clear to return to the RF...

Page 13: ...se Depending on the tag type you may see Block To Read 0 7 0 3 Press or to select the memory block to read and press Enter Pause Note Feed Cut acts as a toggle switch to change the value by 10 or 1 The user memory data is displayed in ASCII Hex format For example 31323334353637383 4 Depending on the tag type press to scroll through the data or press Escape Clear to select another block to read 5 P...

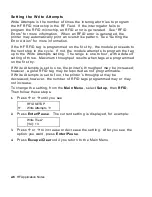
Page 14: ...mpts setting The range is one to four with a default setting of three Maximum throughput results when tags are programmed on the first try If Write Attempts is set to one the printer s throughput may be increased however a good RFID tag may be reported as not programmable If Write Attempts is set to four the printer s throughput may be decreased however the number of RFID tags programmed may or ma...

Page 15: ...ttle power you may not be able to program the RFID tags in the RF Field Caution Use extreme caution when decreasing the attenuation because the RFID tags may become non functional To change the setting from the Main Menu select Setup then RFID Then follow these steps 1 Press or until you see RFID SETUP Attenuation 2 Press Enter Pause The current setting is displayed for example RFID Attenuation 1 ...

Page 16: ...els printed you may want to clear this data daily or after each batch To change the setting from the Main Menu select Setup then RFID Then follow these steps 1 Press or until you see RFID SETUP Clear Data 2 Press Enter Pause Are You Sure No 3 Press or to see the other option After you display the option you want press Enter Pause If you select Yes all data collected since the last time it was clea...

Page 17: ...gramming since last cleared Depending on your application and volume of labels printed you may want to print this configuration label daily or after each batch To change the setting from the Main Menu select Setup then RFID Then follow these steps 1 Press or until you see RFID SETUP Print Config 2 Press Enter Pause The configuration label prints You can also display the firmware version using the ...

Page 18: ...C 15693 3 Specification NXP ISO15693 Uses the NXP Philips microchip that follows the International Standard ISO IEC 15693 3 Specification I CODE UID Uses the NXP Philips microchip that follows the I CODE UID Specification To manually select a protocol from the Main Menu select Setup then RFID Then follow these steps 1 Press or until you see RFID SETUP Protocol 2 Press Enter Pause The current setti...

Page 19: ...ition when using RFID supplies greater than a two inch feed length Doing so may move the HF RFID tag out of the RF Field s readable and programmable range If necessary you can modify the Print Position however make sure you do not move the tag out of the readable and programmable range Using the Setup Supply Menu MAIN MENU 3 Dispense Position Knife Control Backfeed Distance Separators Skip Index E...

Page 20: ...o Yes Long No Not recommended Skip Index No Yes No Not recommended Knife Control 20 to 20 0 Any Error Action Normal Overstrike Continue 1x to 5x Note If using overstrike do not use peel mode Normal Conditional Depends on the supply s feed length See Setting the Print and Supply Positions for more information Setting the Error Action The recovery action from an error condition is in the Setup Suppl...

Page 21: ...causing the error is displayed The error must be cleared before operation can continue An operator must press Escape Clear to clear the error and continue printing No overstrike pattern is printed Overstrike Continue 1x Overstrike Continue 2x Overstrike Continue 3x Overstrike Continue 4x Overstrike Continue 5x The printer prints an overstrike pattern on one two three four or five consecutive label...

Page 22: ...Y Error Action 2 Press Enter Pause The current setting is displayed for example ERROR ACTION Ostrk Cont 1x 3 Press or see the other options After you display the option you want press Enter Pause 4 Press Escape Clear until you see the Main Menu Note Depending on the selected Error Action you may or may not see a label with the overstrike pattern ...

Page 23: ...error occurs an overstrike pattern is printed on the label without any data If a non RFID error verifier error occurs the data prints on the label with the overstrike pattern RFID Overstrike Non RFID Overstrike printed from a verifier error ...

Page 24: ...ll the options Printer Knife 1284 Port RFID Hardware or RFID Firmware After you display the option you want press Enter Pause A screen similar to this one is displayed Model M9855 A2 6F Your version information for firmware may appear different from the one shown You can also display the firmware version by printing an RFID Configuration Label See Chapter 2 Multi Protocol Encoding for more informa...

Page 25: ...the manufacturer s transponder specification for more information For example refer to TI s Tag it HF I Standard Transponder Inlays Reference Guide for more information about the TI ISO15693 transponder X4 data_type Data type Options 0 ASCII Hex default ASCII representation of Hex Use characters A to F and 0 to 9 For example the letter A has a hex value of 41 1 ASCII We recommend using ASCII Hex f...

Page 26: ...Example F 2 A R E 350 150 HFRFID Format header T 1 20 V 30 10 0 50 11 11 B L 0 0 Text field X 19 1000 0 0 RFID data field with up to 1000 characters B 2 N 5 Batch header 1 RFID Text field data 19 123456789012123456789012 RFID field data C 123456789012123456789012 Continuation field for RFID data C 123456789012123456789012 Continuation field for RFID data C 123456789012123456789012 Continuation fie...

Page 27: ...nts Data Type How the Field Increments ASCII Hex 0 to F 0123456789ABCDEF then back to 0 ASCII next position in 0 to 255 range If Option 60 Increment Field contains the character D to decrement it is ignored and the field is instead incremented by one When incrementing the RFID Data Field the only valid value to increment is by one Use caution when incrementing an RFID field if data is coming direc...

Page 28: ...ignated by Option 30 Syntax R 30 L R character R1 R Option Header R2 30 Option 30 R3 L R Indicates type of padding L Pad field on left side R Pad field on right side R4 character Pad character must be within the 0 255 decimal range and enclosed inside quotation marks Note The pad character must be in the same format specified in the RFID Data Field See Defining the RFID Data Field for more informa...

Page 29: ...s are available and the amount of programmable memory varies with the tag types The programmable memory consists of various fields such as User Memory AFI Application Family Identifier DSFID Data Storage Format Identifier EAS Electronic Article Surveillance Depending on your tag type all memory fields may not be available Refer to the manufacturer s transponder specification for details about the ...

Page 30: ...gram enclosed within quotation marks Range 0 255 Use the ASCII character or the tilde followed by the equivalent three character decimal value For example the letter A can be entered as A or 041 Refer to the manufacturer s transponder specification or the International Standard ISO IEC 15693 3 specification for the byte code For EAS use Y R5 lock Lock code Options 0 Unlock 1 Lock Example X 5 16 0 ...

Page 31: ...data programmed into user memory R 64 D D 1 Option 64 programs and locks a D into the DSFID field R 64 A A 1 Option 64 programs and locks an A into the AFI field R 64 E Y 1 Option 64 programs and locks a Y into the EAS field B 45 N 5 Batch header 1 RFID Text field data 19 A1223344 RFID field data This example uses 32 bits 8 ASCII Hex characters which are programmed beginning with block 7 of user m...

Page 32: ...4 8 HF Application Notes ...

Page 33: ...or Press Escape Clear until you see Print Mode Ready Wait several seconds and then try to access the Setup RFID Menu again Printer displays Monarch Initializing This message should flash briefly on the display when you turn on the RFID printer If it does not disappear turn off the printer wait fifteen seconds and then turn on the printer Printer does not read or program the RFID tag Make sure the ...

Page 34: ... Option 64 See Using Option 64 Program the AFI DSFID and EAS Fields for more information 715 Invalid data length data mismatch The data in the RFID Data Field has an incorrect data length or there is a data type mismatch between selected data type and actual data entered See Defining the RFID Data Field for more information on the data length and for selecting the appropriate data type for the dat...

Page 35: ...ID tag is unable to be programmed because it is already locked This is considered a bad RFID tag See Error Action for more information 746 Lock tag fail The RFID tag has not been locked to prevent reprogramming This is considered a bad RFID tag See Error Action for more information 747 Time out failure Any RFID command read program etc has failed to complete in the maximum amount of allowed time 7...

Page 36: ...5 4 HF Application Notes ...

Page 37: ...3 copy option sample 4 3 D data field RFID 4 1 data storage format identifier terms 4 5 data type ASCII 4 1 ASCII Hex 4 1 defaults attenuation 2 1 setup menu 2 1 write attempts 2 1 define RFID data field 4 1 determine type of RFID supply 2 3 DSFID sample 4 7 terms 4 5 E EAS terms 4 5 electronic article surveillance terms 4 5 error printer 5 1 programming tag 5 1 5 2 recovery action 3 2 RFID messag...

Page 38: ...tocol 2 2 2 10 O option 30 pad data 4 3 4 4 4 copy 4 3 60 increment 4 3 63 lock tag 4 5 64 program AFI memory field 4 6 64 program DSFID memory field 4 6 64 program EAS memory field 4 6 overstrike bad label 3 2 3 3 error action 3 2 3 3 overstrike label sample 3 5 overstrike sample label 3 5 P pad data option 4 3 4 4 sample 4 4 print configuration label 2 1 print position setting 3 1 printer error ...

Page 39: ...e label 3 5 pad data 4 4 program memory field 4 7 setting print position 3 1 supply position 3 1 settings attenuation 2 7 write attempts 2 6 setup menu defaults 2 1 supplies RFID 2 1 supply position setting 3 1 T terms AFI 4 5 antenna 1 2 attenuation 1 2 DSFID 4 5 EAS 4 5 HF 1 2 inlay 1 2 interrogator 1 2 protocol 1 2 RF field 1 3 RFID data field 1 3 RFID reader 1 3 RFID tags 1 3 transponder 1 3 U...

Page 40: ...iv HF Application Notes ...

Page 41: ......

Page 42: ......

Reviews: