background image

6

5

4

1

2

3

1

Monark 928 E Pro VO

2

10

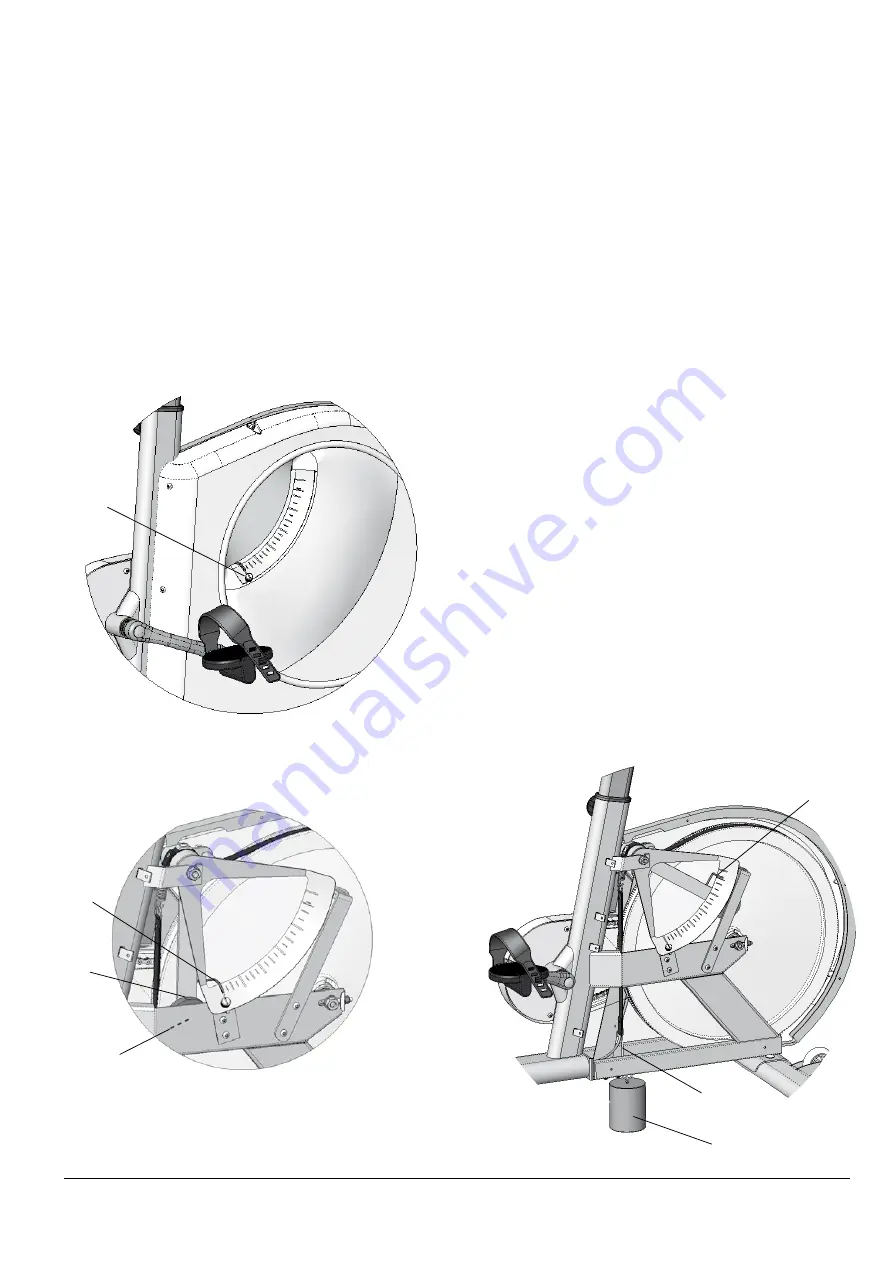
Scale - zero adjustment

Loosen possible tension in the brake belt by turning 
the knob at the handlebar counter clockwise as far as 
possible. Check that the moving pointer is aligned with 
the 0-index on the scale. If adjustment is needed, first 
loosen the locknut(1) and then change the position of 
the scale board, so that it will have its 0-index in line 
with the moving pointer. Tighten the locknut after the 
adjustment. 

Fig: Scale adjustment

Calibration

Although all Ergometers are calibrated at the factory 
the  user  may  wish  to  verify  this  by  performing  a 
mechanical scale calibration. If so please do according 
to the following.

Loosen  possible  tension  in  the  brake  belt  by 
turning  the  tension  devise  (knob)  at  the  handlebar 
counter clockwise as far as possible. Check that the 
scale  0-index  is  in  line  with  the  pointer(1).  See  fig: 
Calibration
. If adjustment is needed adjust according 
”Scale -zero adjustment”.

A known weight(4), preferably 4 kg (Art. No: 9000-
211), is attached at(5). See fig: Calibration. The pointer 
shall  at  correct  calibration  point  at  the  calibration 
index(6) slightly above 225 watts.

If  there  is  a  deviation,  adjust  the  pointer  to  correct 
position  by  the  adjustment  weight  inside  the 
pendulum(2). To do this the left cover has to be removed. 
To  adjust  the  position  of  the  adjustment  weight 
the  locking  screw  in  the  centre  of  the  pendulum(3) 
must  be  loosened.  If  the  pointer  shows  too  low  the 
internal weight must be moved upwards somewhat. If 
the pointer shows too high the adjustment weight is 
moved down a little. This procedure is repeated until 
pointer is in the correct position.

Check the scale calibration once a year or if you feel 
there is a need for it.

Fig: Calibration

1) Pointer at 0-index

2) Adjustment weight

3) Locking screw

4) Calibration weight

5) Hook for calibration weight

6) Pointer at 225 watts

Summary of Contents for 928 E Pro VO2

Page 1: ...Manual 928 E Pro VO2...

Page 2: ......

Page 3: ...t 10 Calibration 10 Troubleshooting guide 11 Service 12 Warning 12 Warranty 12 Service check maintenance 12 Batteries 13 Crank bearing 13 Flywheel bearing 13 Transport 13 Replacement of brake belt 13...

Page 4: ...ng proof of precision reliability strength and service These are the reasons why we are now the world leader in cycle ergometers and the market leader in Scandinavia in transport cycles We manufacture...

Page 5: ...ted at the factory This means that you can begin to use the ergometer directly after assembly However if the user wish to verify the scale calibration please read the instruction for Calibration in th...

Page 6: ...big scale on the left side of the bike At 60 RPM the workload level is from 0 250 watts Power measurement The cycle is designed to measure the power on the flywheel because tests protocols are made f...

Page 7: ...laced just below the chest muscle If the computer can not find any signal this function for measuring is automatically turned off after 30 seconds When this occur the heart symbol is turned off and ti...

Page 8: ...hing Adjust by or if needed Press MODE and Kg is flashing Adjust to lb if preferred If weight is set in kg just press MODE again and increase or decrease with or to correct figure Personal settings ar...

Page 9: ...sing and at the same time Normal mode Manual mode Work load Watt Work load Watt HR Hi HR SEX KG Lb HR Lo AGE WEIGHT M M M MM MM Flash 6 sec Adjust with or Men 25W step women 12 5W Step Adjust with or...

Page 10: ...index is in line with the pointer 1 See fig Calibration If adjustment is needed adjust according Scale zero adjustment A known weight 4 preferably 4 kg Art No 9000 211 is attached at 5 See fig Calibr...

Page 11: ...he weight The pedals are not tight Tighten them or change pedals The crank is loose Check tighten The base bearing is loose Contact your dealer for service Scratching sound is heard when pedalling Che...

Page 12: ...s kept in good condition Service action We recommend isopropyl alcohol to disinfect the surface of the bike Use a damp but not wet cloth to clean the surface you wish to disinfect Clean and lubricate...

Page 13: ...rd from the bike When assembling a new brake cord first enter one end into the hole in the tension center tie a knot and let the knot fall into the bigger part of the hole Lock the end of the cord wit...

Page 14: ...necessary To adjust the chain the hub nuts 2 should be loosened Loosening or tightening the nuts on the chain adjusters 1 will then move the hub and axle forward or backward Adjust according to above...

Page 15: ...aptor and place the spacer and axle nut outside See fig Special remover Replace sprocket adaptor and assemble the new parts in reverse order according to the above NOTE Do not tighten the axle nut com...

Page 16: ...00 18 Axle 27 1 9328 300 Tension cable complete 9 1 9300 17 Bush 23 mm 28 1 9328 1 Frame 10 1 5799 Nut 29 1 8966 176 Support casing for BB bracket 11 1 5881 Washer 30 1 9371 16 Magnet 12 1 9328 420 Le...

Page 17: ...ew M8x46 25 1 9328 160 Digital meter complete 8 1 5864 Washer 26 1 9100 280 Lever complete 9 1 5844 Locking nut 27 1 9127 37 Spacer 13 mm 10 1 9328 130 Saddle post 28 1 5864 Washer 11 1 9328 132 Locki...

Page 18: ...Monark 928 E Pro VO2 18 Notes...

Page 19: ...Monark 928 E Pro VO2 19 Notes...

Page 20: ...KROONS V G 1 SE 780 50 VANSBRO SWEDEN WWW MONARKEXERCISE SE TEL 46 0 281 59 49 40 FAX 46 0 281 719 81 Version 1010 Art No 7950 322...

Reviews: