background image

Batteries

If the meter is battery-operated, the batteries are in a 
separate package at delivery. If the storing time has 
been long the battery power can be too low to make 
the  computer  act  correctly.  Batteries  must  then  be 
changed.

Flywheel bearing

The flywheel bearing is long-term greased and requires 
no  supplementary  lubrication.  If  a  problem  arises, 
please contact your Monark dealer.

Crank bearing

The crank bearing is greased and normally requires 
no  supplementary  lubrication.  If  a  problem  arises, 
please contact your Monark dealer.

Transportation

During transport the brake cord should be tightened 
to prevent it from falling off the flywheel.

Replacement of brake belt

To replace the brake belt remove covers if necessary. 
Make sure that the belt is loose. 

Alt. 1: To loosen the brake belt on pendulum bikes 
with engine, connect power to the unit and raise the 
pendulum  to  4  kp.  Hold  it  there  until  brake  belt  is 
loose. Please note how the belt is assembled. Remove 
it  from  the  bike.  Attach  the  new  brake  belt  and 
assemble the bike in reverse order.

Alt. 2: To loosen the brake cord on cycles with a weight 
basket set the basket to its upper position. Loosen the 
lock  washer  that  is  holding  the  cord  and  remove  it 
from the tension center. Loosen or cut off the knot on 
the other end of the cord and then remove the whole 
cord  from  the  bike.  When  assembling  a  new  brake 
cord, first enter one end into the hole in the tension 
center,  and  tie  a  knot  and  let  the  knot  fall  into  the 
bigger part of the hole. Lock the end of the cord with 
the lock washer.

Brake belt contact surface

Deposits of dirt on the brake belt and on the contact 
surface may cause the unit to operate unevenly and will 
also wear down the brake belt. The contact surface of 
the flywheel should be smoothed with fine sandpaper 
and any dust removed with a clean dry cloth.

Remove  any  potential  covers  and  all  workload  on 
the brake belt and then remove it. Grind with a fine 
sand paper. Grinding is easier to perform if a second 
individual cautiously and carefully pedals the cycle.

Irregularities  on  the  brake  belt  contact  surface  are 
removed by means of a fine sand paper or an abrasive 
cloth. Otherwise unnecessary wear on the brake belt 
may occur and the unit can become noisy.

Always keep the brake belt contact surface clean and 
dry.  No  lubricant  should  be  used.  We  recommend 
replacing  the  brake  belt  when  cleaning  the  contact 
surface. In regard to assembly and adjustment of the 
brake belt, see ”Replacement of brake belt”.

Alt. 3: To loosen the brake belt on the bike remove 
all  tension.  Please  note  how  the  belt  is  assembled. 
Remove it from the bike. Attach the new brake belt 
and assemble the bike in reverse order.

NOTE!
When  replacing  the  brake  belt  it  is  recommended 
to  clean  the  brake  surface.  See  ”Brake  belt  contact 
surface”.

Monark 894 E

 15

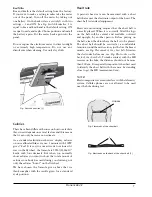
Fig: Brake belt contact surface

Summary of Contents for Ergomedi 894 E

Page 1: ...Manual for 894 E EN...

Page 2: ...the brake cord belt tension 10 Troubleshooting guide 11 Service 14 Warning 14 Warranty 14 Service check and Maintenance 14 Batteries 15 Flywheel bearing 15 Crank bearing 15 Transportation 15 Replacem...

Page 3: ...of precision reliability strength and service Those are the reasons why we are now the world leader in cycle ergometers and the market leader in Scandinavia in transport cycles We manufacture develop...

Page 4: ...Congratulations on your new Ergometer The Monark 894 E is an ergometer for anaerobic tests that also works as a normal traditional weight ergometer It has a brake system where the workload is determi...

Page 5: ...es then not give any work load at all The weight basket is released by pushing the release button 1 on the handlebar See Fig Workload adjustment Power measurement The cycle is designed to measure the...

Page 6: ...ment panel see fig Workload adjustments in section Workload device indicates both that there is power to the unit and that the weight basket is in its upper locked position If the weight basket produc...

Page 7: ...values for Time Distance and Calories can be set to zero by pressing the RESET button for more than two seconds Display Pedal revolution RPM 0 250 rev min HR 50 240 bpm TIME 0 00 99 59 min sec SPEED 0...

Page 8: ...ectrodes on the back of the chest belt 1 Calories There have been different theories on how to calculate this since it depends on several factors and this means that it can only be seen as an estimate...

Page 9: ...sion centre 4 If the basket is too low shorten the belt somewhat If the basket is too high lengthen the cord somewhat Tighten the bracket again and check that the distance between the weight basket an...

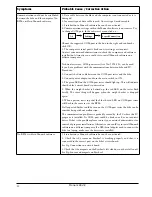
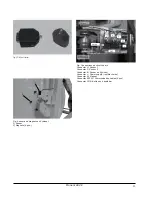
Page 10: ...ff and without damages Check so basket lock sensor and basket drop sensor is working properly and also connected to correct ports on bikes circuit board See Fig Connections on circuit board Problems w...

Page 11: ...ON 3 The green LED on the COM port tester should light up This will indicate that the bike s circuit board is powered on 4 When the weight basket is hoisted up the red LED on the tester flash briefly...

Page 12: ...ets 6 pcs Fig Connections on circuit board Connector U Sensor 1 Connector F Sensor 2 Connector R Sensor on flywheel Connector Power supply red black wire Connector M Magnet Connector RS232 Communicati...

Page 13: ...mportant to tighten the pedals after 5 hours of pedalling 4 times per year Check that the pedal crank is secure to the crank axle 4 times per year Be sure that the pedals are moving smoothly and that...

Page 14: ...e cord from the bike When assembling a new brake cord first enter one end into the hole in the tension center and tie a knot and let the knot fall into the bigger part of the hole Lock the end of the...

Page 15: ...osened Loosening or tightening the nuts on the chain adjusters 1 will then move the hub and axle forward or backward Then tighten the nuts on the hub axle again See Fig Chain adjustments Toreplacethec...

Page 16: ...d spacer on the freewheel side Replace sprocket adaptor and assemble the new parts in reverse order according to the above NOTE Do not tighten the axle nut completely It must be possible to loosen the...

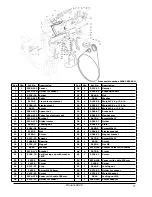
Page 17: ...301 5 Frame 13 2 8523 2 Dust cover 42 1 9300 3 Flywheel 14 2 8523 115 Screw M6S 8 8 M8 x 20 FZB 43 1 9300 24 Wheel suspension compl set 15 1 9300 430 Steel crank set complete 44 1 9000 12 Chain adjust...

Page 18: ...king nut 40 1 9384 34 Plate 13 2 9384 36 Spring 41 1 5680 9 Screw M5x12 14 1 5767 9 Nut 42 1 9384 32 Electro magnet 15 1 9384 3 Screw 43 1 9384 31 Magnet bracket 16 2 9127 37 Spacer 44 3 5673 9 Screw...

Page 19: ...KROONS V G 1 SE 780 50 VANSBRO SWEDEN WWW MONARKEXERCISE SE TEL 46 0 281 59 49 40 FAX 46 0 281 719 81 Version 1312 Art No 7950 312...

Reviews: