background image

8

E

E

9

UK

UK


INTRODUCTION

Thank you for trusting in Mondial. It is the perfect accessory for food lovers. To ensure proper operation 
and maintenance of the product, carefully read the instructions in this manual and keep it in the event 
that you may need in the future. We recommend that you also keep the packaging in case of repairs, 
and dispose of all plastic bags that could become dangerous toys for children. 
The appliance is very easy to use. Just connect it to the electricity supply socket (220-250V).
If you need more information, please contact Mondial.

Advice:
The  use  of  Mondial  appliances  by  children  needs  clear  instructions  of  use  and  constant 
supervision during use of the appliance.
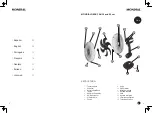
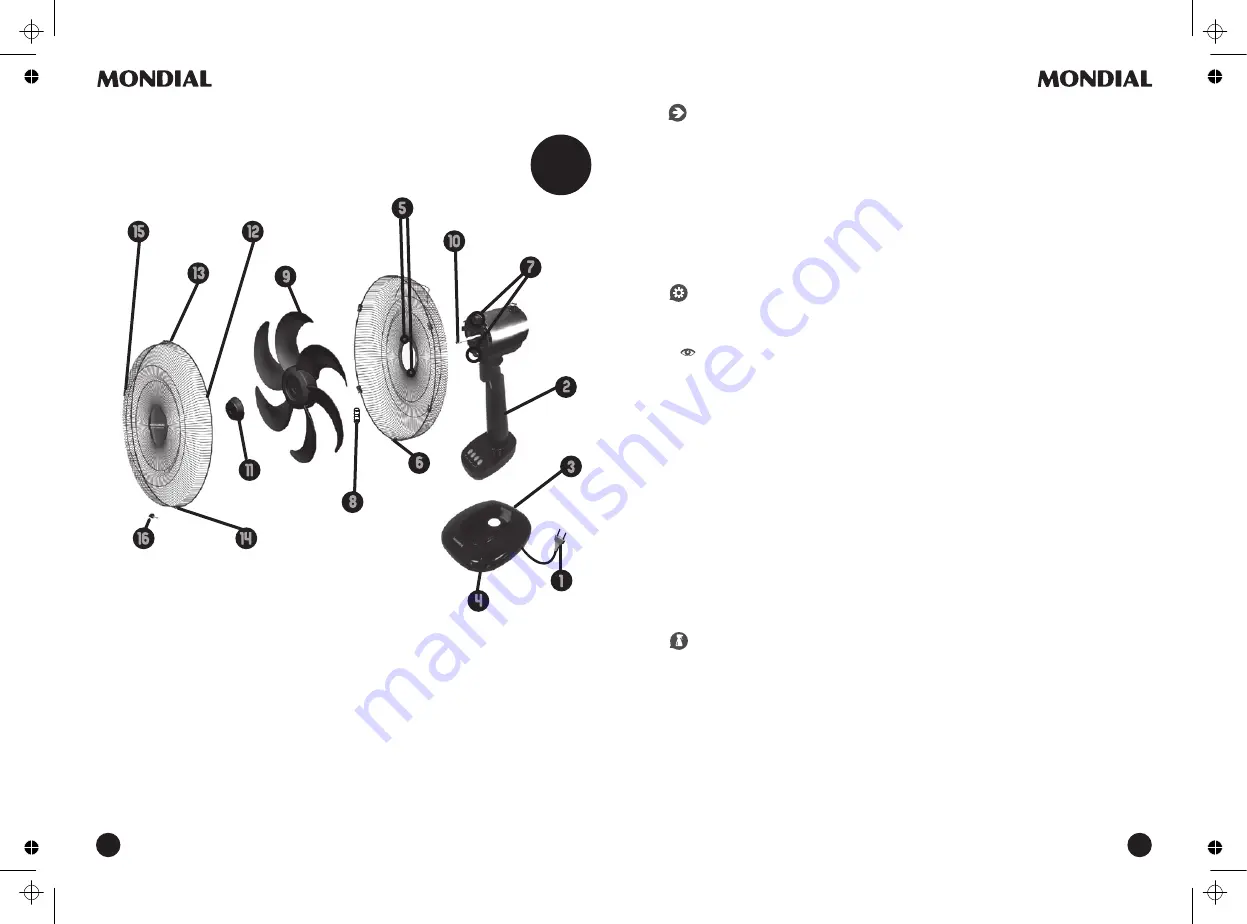
 

OPERATION

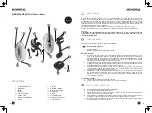
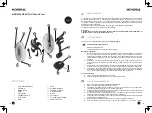
The instrument consists of the following parts, 

see fig.A

:


Before using the appliance:

˃ 

Unpack the appliance.

˃ 

Clean the appliance. See "Cleaning and Care"

Assembly (See fig.A)

1. 

Insert the cable plug (1) coming out of the bottom of the pedestal (2) into the hole of the base 
(3) by pulling it out. Using a fixed and plan location, support the base (3) and fit in the pedestal 
(2) until  it is fixed. Observe the marking  for fitting it accordingly  in the bottom rear of the 
pedestal. Insert one of the nuts (4) and rotate clockwise to lock the two parts.

2. 

Position the vertical holes (5) of rear grid (6) in the guide pins (7) with the carry handle facing 
up. Insert the other nut (8) and rotate clockwise to lock the two parts.

3. 

Fit the fan blades (9) onto the motor shaft (10), aligning the flat face of the shaft with the flat 
face of the fan blades. Insert the fan blades button (11) and turn counterclockwise to lock the 
two parts together.

4. 

Position and place the front grille (12) with the guide (13) facing up, aligning the lower holes 
(14) of the two parts. With the two grilles aligned, tighten the side latches to (15) the grill in 
place.  Insert the fastening bolt (16) into the lower holes until the two parts are locked.

Oscillation control

1. 

Push the oscillaton knob to oscillate

2. 

Pull the oscillation knob to stop.


CLEANING AND CARE

1. 

Remove all items of packaging from the fan.

2. 

Remove the locking nut from the motor shaft.

3. 

Position the rear guard over the motor shaft, ensuring that the notches are correctly aliegned 
and then secure with the looking nut.

4. 

Align the fan blade with the flat part on the motor shaft and secure by tightening the blade cap 
by turning counter-clockwise.

5. 

Attach the front guard centre hook to the middle of the rear guard and secure by pushing the 
guards together until they click position.

6. 

Open the locking clip. The guard bottom nut and screw must also be fitted to ensure secure 
fitting.

7. 

Always disconnect the cord from the electrical outlet when cleaning your fan.

8. 

Light accumulated dust may be removed from the fan with a soft cloth or vacuum cleaner 
using the dusting brush attachment.

9. 

Wipe the exterior surfaces of the fan occasionally with a cloth moistened (not dripping wet) 

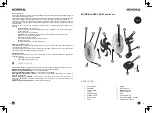
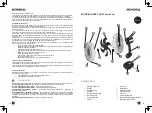
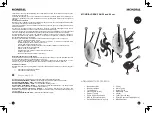
MONDIAL DESK FAN 30 and 40 cm

1. 

Cable Plug

2. 

Pedestal

3. 

Base

4. 

Screw Nut

5. 

Vertical Holes

6. 

Rear Grid

7. 

Guide Pins

8. 

Screw Nut

9. 

Fan Blades

10. 

Motor Shaft

11. 

Fan Blades Button

12. 

Front Grille

13. 

Guide

14. 

Lower Holes

15. 

Side Latches

16. 

Fastening Bolt

STRUCTURE:

FIG. A

Summary of Contents for V-63-6P

Page 1: ...Servicio Técnico Instruction and Technical Service Manual Manual de Instruções e Serviço Técnico Manuel d Instructions et de Service Technique Bedienungshandbuch un Technischer Kundendienst Manuale d Uso ed Assitenza Tecnica Εγχειρίδιο οδηγιών και τεχνική υποστήριξη ...

Page 2: ...28 ελληνικά 33 23 1 Tomacorriente 2 Pedestal 3 Agujero de la Base 4 Tuerca 5 Agujeros Verticales 6 Rejilla Posterior 7 Clavijas Guía 8 Tuerca 9 Aspa 10 Eje del Motor 11 Botón de la Aspa 12 Rejilla Delantera 13 Guía 14 Agujero inferiores 15 Laterales de Fijación 16 Tornillo de Fijación ESTRUCTURA FIG A ...

Page 3: ...rado del ventilador con un paño suave o con una aspiradora usando el cepillo 9 De tiempo en tiempo limpie las superficies exteriores con un paño humedecido no encharcado con una solución de jabón neutro Seque bien el revestimiento con un paño seco antes de hacer funcionar el ventilador 10 Evite el uso de gasolina bencina tíner etc pues pueden damnificar el ventilador 11 Almacene el ventilador en un ...

Page 4: ...nte por favor asegúrese de que pueda volver a utilizarse TÉRMINOSYCONDICIONES DE LAGARANTÍA Garantía Mondial garantiza sus productos por un periodo de 24 meses contra defectos de fabricación o en los materiales a partir de la fecha de la compra Será totalmente gratis para el usuario subsanar cualquier defecto de fabricación que pudiera presentarse No supondrá coste alguno para el usuario los coste...

Page 5: ...aft with the flat face of the fan blades Insert the fan blades button 11 and turn counterclockwise to lock the two parts together 4 Position and place the front grille 12 with the guide 13 facing up aligning the lower holes 14 of the two parts With the two grilles aligned tighten the side latches to 15 the grill in place Insert the fastening bolt 16 into the lower holes until the two parts are lock...

Page 6: ... defective one Conditions and exclusions Mondial is not obligated to repair or replace products which are not accompanied by a valid proof of purchase purchase invoice receipt The full address of the authorized service centers in each country can be obtained at with a mild soap solution Dry the case thoroughly with a soft cloth before operating the fan 10 Avoid the use of gasoline benzene thinner ...

Page 7: ...ion must be performed according to the instruction manual Damage to glass parts of the product Mechanical damage overload The entry of water dust or bugs within the product Accidents fires etc Atmospheric phenomena floods lightning etc Statutory consumer rights This warranty gives you specific legal rights and the consumer may also have other legal rights which vary from country to country The warran...

Page 8: ... Pouca poeira acumulada pode ser removida do ventilador com um pano macio ou com o aspirador usando a escova 5 De tempos em tempos limpe as superfícies exteriores com um pano umedecido não encharcado com uma solução de sabão neutro Seque bem o revestimento com um pano seco antes de operar o ventilador 6 Evite o uso de gasolina benzeno thinner etc pois podem danificar o ventilador 7 Armazene o venti...

Page 9: ...aparelho ainda estando este em bom estado ou podendo ser reparado facilmente por favor certificar se de que possa ser reutilizado TERMOS E CONDIÇÕES DE GARANTIA Garantia AMondial oferece garantia de seus produtos por um período de 24 meses contra defeitos de fabricação em materiais ou a partir da data da compra É totalmente gratuita para o usuário a reparação de qualquer defeito de fabricação que p...

Page 10: ...lacez la base 3 et emboîtez le piédestal 2 jusqu à ce qu il soit fixé Faites attention à la marque d emboîtement sur la partie inférieure arrière du piédestal Insérez l un des écrous 4 et tournez le dans le sens des aiguilles d une montre afin de verrouiller les deux pièces 2 Positionnez les trous verticaux 5 de la grille arrière 6 sur les broches de guidage 7 avec la poignée de transport tournée ve...

Page 11: ...r qu il peut être réutilisé TERMES ET CONDITIONS DE LAGARANTIE Garantía Mondial garantit ses produits pour une période de 24 mois contre tous défauts de fabrication ou de 6 Ouvrez le clip de verrouillage L écrou et la vis de la partie inférieure de la grille doivent également être installés pour garantir un bon emboîtement 7 Débranchez toujours le cordon d alimentation lors du nettoyage de votre v...

Page 12: ...mateur Elle ne couvre pas non plus l utilisation et l usure normale la maintenance ou le remplacement des consommables ni ce qui vient à suivre Pour un usage professionnel ou commercial Dommages causés par une tension différente de celle indiquée sur la plaque signalétique du produit ou à des pics de tension L utilisation de consommables incorrects Calcification la décalcification doit être réalisée...

Page 13: ...it einem weichen Tuch oder mit der Staubsaugerbürste entfernt werden 9 Gelegentlich die externen Oberflächen mit einem feuchten nicht durchnässten Tuch und einer Lösung neutraler Seife säubern Gut abtrocknen bevor der Lüfter wieder benutzt wird 10 Benzin Benzol oder sonstige Lösungsmittel vermeiden da sie den Lüfter beschädigen können 11 Lüfter an einem sauberen und trockenen Platz aufbewahren wenn...

Page 14: ...zeugenSie sich bitte dass das Gerät weiterhinbenütztwerden kann GARANTIE BEGRIFFE UND BEDINGUNGEN Garantie Mondial garantiert ihre Produkte gegen Herstellungs und Materialfehler über einen Zeitraum von 24 Monaten ab Kaufdatum Eventuelle Herstellungsfehler werden in diesem Zeitraum kostenlos repariert Die entstehenden Transportkosten für ein defektes Produkt werden dem Verbraucher nicht belastet Da...

Page 15: ... dei dadi 4 e ruotare in senso orario per bloccare le due parti 2 Posizionare i fori verticali 5 dalla griglia posteriore 6 i perni guida 7 con il manico per il trasporto rivolto verso l alto Inserire l altro dado 8 e ruotare in senso orario per bloccare le due parti 3 Inserire l elica 9 sull albero motore 10 allineando il lato piatto dell albero con la faccia piana dell elica Inserire il pulsante...

Page 16: ...acilmente riparato assicurarsi che esso può essere riutilizzato TERMINI E CONDIZIONI DELLAGARANZIA Garantía Mondial offre garanzia dei propri prodotti per un periodo di 24 mesi contro difetti di fabbricazione o nei materiali dalla data di acquisto Sarà completamente gratuito per l utente la riparazione di eventuali difetti di fabbricazione che possono utilizzando un pennello o con l aspira polvere...

Page 17: ... normale usura manutenzione o sostituzione di parti soggette a usura o i seguenti Per uso professionale o commerciale Danno prodotto da una tensione diversa in relazione al indicato sull etichetta delle caratteristiche del prodotto o aumenti di tensione L uso improprio di materiali di consumo La calcificazione le decalcificazioni vanno eseguiti come indicato nelle istruzioni d uso Danni nelle parti ...

Page 18: ...με ηλεκτρική σκούπα χρησιμοποιώντας το πινέλο 9 Από καιρό σε καιρό σκουπίστε τις εξωτερικές επιφάνειες με ένα ελαφρά βρεγμένο πανί όχι βρεγμένο και με ένα ήπιο διάλυμα σαπουνιού Στεγνώστε την επικάλυψη με ένα στεγνό πανί πριν βάλετε τον ανεμιστήρα σε λειτουργία 10 Αποφύγετε τη χρήση βενζίνης διαλυτικού κ λ π διότι μπορεί να προκληθούν ζημιές στον ανεμιστήρα 11 Αποθηκεύστε τον ανεμιστήρα σε ένα καθ...

Page 19: ...ληροφορίες σχετικά με τα εξουσιοδοτημένα κέντρα επιλεκτικής συλλογής πλησιέστερα του τόπου κατοικίας σας Εάν θέλετε να απορρίψετε τη συσκευή ενώ βρίσκεται σε καλή κατάσταση ή μπορεί εύκολα να επισκευαστεί παρακαλείσθε να σιγουρευτείτε ότι μπορεί να ξαναχρησιμοποιηθεί ΟΡΟΙ ΚΑΙ ΠΡΟΫΠΟΘΕΣΕΙΣ ΤΗΣ ΕΓΓΥΗΣΗΣ Εγγύηση Η Mondial εγγυάται τα προϊόντα της έναντι ελαττωμάτων υλικών ή κατασκευής για μια περίοδο...

Reviews: