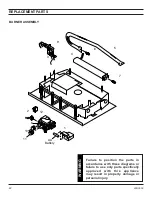
background image

12                                                                                                                                                                                 

46D0550

46D0550                                                                                                                                                                                                    

13

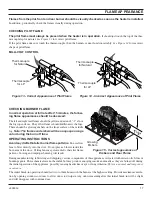
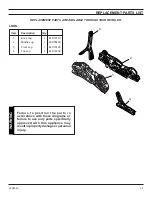
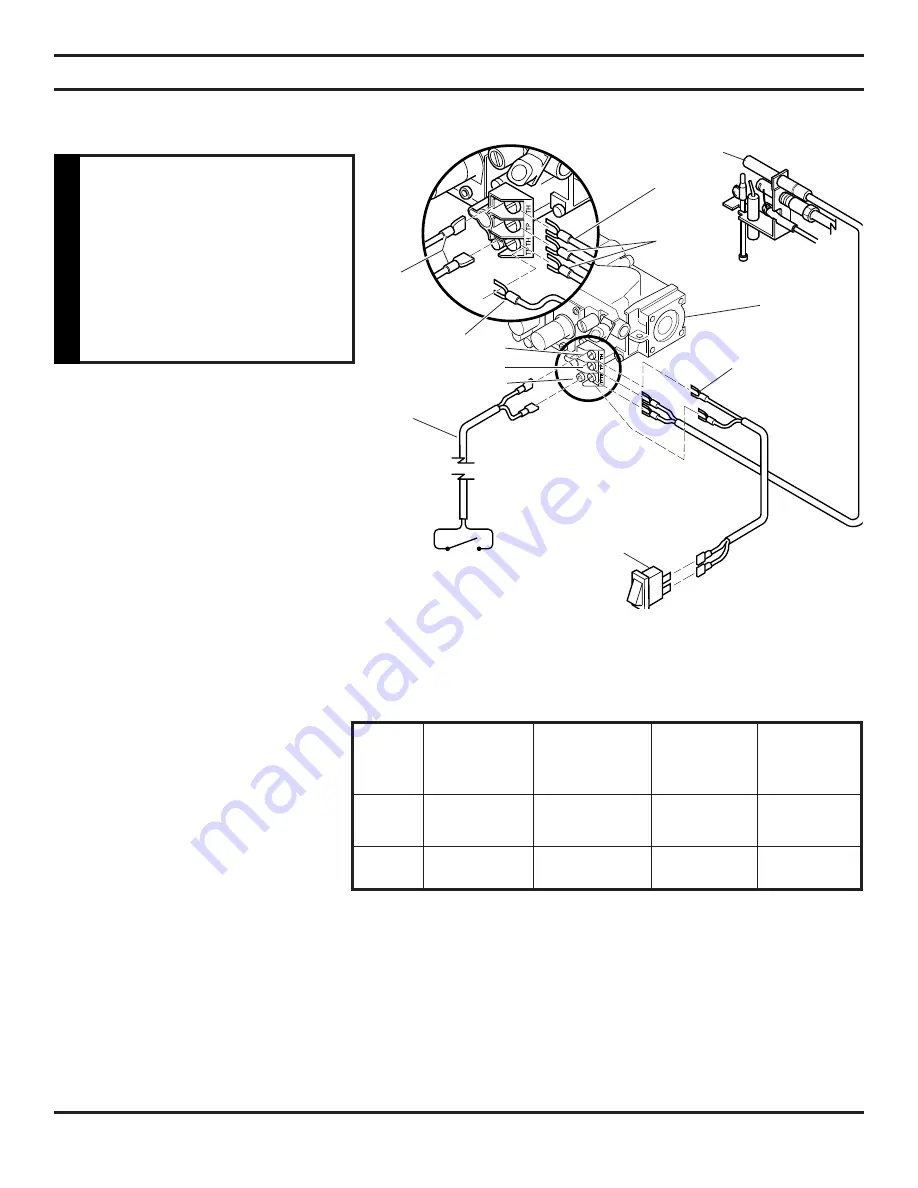
ELECTRICAL WIRING (MILLI-VOLT)

The milli-volt valve is a self-powered combination gas control 

THAT DOES NOT REQUIRE 110 VAC TO OPERATE.

Label all wires prior to 
disconnection when 
servicing controls. Wiring 
errors can cause improper 
and dangerous operation. 
Verify proper operation 
after servicing.

CAUTION 

On/Off
Switch

On/Off
Switch

ODS 

Pilot

Wall

Switch

Optional Wall

Switch, Wall Thermostat,

Thermostat Sensor or

Remote

ODS Pilot

Millivolt 

Valve

Spade Terminal

3
1
2

CONNECTION
  1  =  TP
  2  =  TP, TH
  3  =  TH

Figure 7 - Wiring Diagram

CONNECTING OPTIONAL WALL SWITCH OR THERMOSTAT

   1.  Use 18 awg, two-wire cable, 15 feet maximum length.
   2.  At one end of the cable, connect both wires to the wall switch or thermostat. At the other end, connect one wire to 

TP/TH and one wire to TH, or connect the wall switch/thermostat to the two male (0.25") terminals on the left side of 
the unit. The color of the wires does not matter.
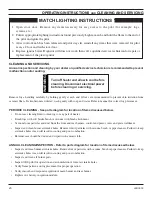
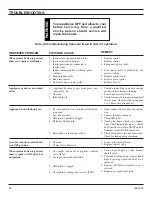
                                                      

CONNECT

  CHECK                TO                      METER            THERMOSTAT          METER
    TEST               TEST                 LEADS TO           CONTACTS           READING
                                                     TERMINALS                                      SHOULD BE

       A              COMPLETE                 2 & 3                  CLOSED             MINIMUM 
                                                        SYSTEM                                              175mv

       B            THERMOPILE               1 & 2                     OPEN                  500mv 
                         OUTPUT                                                                         OR MORE 

A.  COMPLETE MILLIVOLT SYSTEM CHECK 

("A" Reading - Thermostat contacts CLOSED - Control Knob “ON” - Main Burners should turn ON)

       a.  If the reading is more than 175 millivolts and the automatic valve still does not come on - replace the valve.
       b.  If the closed circuit reading ("A" reading) is less than 175 millivolts, determine cause for low reading - proceed as 

follows:

B.  THERMOPILE OUTPUT READING CHECK 

(“B” Reading - Thermostat contacts OPEN - Main burner OFF)

       Check gas pressure to the unit. If gas pressure is within minimum and maximum on data plate, then replace pilot. 500 millivolts 

minimum. If the minimum millivolt reading is not obtainable, replace pilot.

CHECKING SYSTEM OPERATION

The millivolt system and individual compo-
nents may be checked with a millivolt meter 
having  a  0-1000mv  range.  Conduct  each 
check shown in chart by connecting meter 
test leads to terminals as indicated.

Switch 

Summary of Contents for DSSNVMB

Page 1: ... or any other appliance WHAT TO DO IF YOU SMELL GAS Do not try to light any appliance Do not touch any electrical switch do not use any phone in your building Immediately call your gas supplier from a neighbor s phone Follow the gas supplier s instructions If you cannot reach your gas supplier call the fire department Installation and service must be performed by a qualified installer service agen...

Page 2: ...r 12 Electrical Wiring 13 Connecting Optional Wall Switch or Thermostat 13 Checking System Operation 13 Installing Thermostat Sensor 14 Log Placement 16 Installing Logs on Grate 16 Placing the Decorative Rock 16 Flame Appearance 17 Checking Pilot Flame 17 Checking the Burner Flame 17 Operating Instructions 18 For Your Safety Read Before Lighting 18 Milli Volt Control Lighting Instructions 19 To Tu...

Page 3: ...T SAFETY INFORMATION 8 CARBON MONOXIDE POISONING Early signs of carbon monoxide poisoning are similar to the flu with headaches dizziness and or nausea If you have these signs obtain fresh air immediately Have the heater serviced as it may not be operating properly Continued on page 4 Any change to this heater or its controls can be dangerous Improper installation or use of the heater can cause se...

Page 4: ...t setting Provide maximum ventilation by opening windows or doors to allow odors to dissipate Any odors remaining after this initial break in period will be slight and will disappear with continued use 20 Input ratings are shown in BTU per hour and are for elevations up to 2 000 feet For elevations above 2 000 feet input ratings should be reduced 4 percent for each 1 000 feet above sea level Refer...

Page 5: ...46D0550 5 PRODUCT FEATURES Off Pilot On Knob Hi Lo Knob Door Figure 1 Cast Iron Stove Optional Remote Receiver On Off Switch Optional Blower Optional Thermostat Switch ...

Page 6: ...aler from whom you purchased the appliance Do not attempt to install any part of the appliance unless you have all parts in good condition WHAT YOU WILL NEED FOR INSTALLATION You must have the following items available before proceeding with installation External regulator for propane L P G or high pressure natural gas 1 to 2 PSI system Piping which complies with local codes Pipe sealant approved ...

Page 7: ...t and rear burners are in operation to provide realistic glow and yellow flame PILOT ODS The gas log heater is fitted with a specially designed safety pilot ODS assembly which senses the amount of oxygen avail able in the room and shuts the gas log heater off if the oxygen level begins to drop below a satisfactory level The pilot can only be relit when adequate fresh air is available THERMAL GENER...

Page 8: ... 000 BTU per hour 4 8 m3 per kw of the aggregate input rating of all appliances installed in that space Rooms communicating directly with the space in which the appliances are installed through openings not furnished with doors are considered a part of the unconfined space UNUSUALLY TIGHT CONSTRUCTION IS DEFINED AS CONSTRUCTION WHERE a walls and ceilings exposed to the outside atmosphere have a co...

Page 9: ...tion would be based only on the room with the heater BTU Hr 151 2 x 12 x 8 50 Figure 2 Example of a Large Room with 1 2 Wall Divider Counter Steel Stove x 1000 x 1000 52800 BTU Hr x 1000 29760 BTU Hr If the area in which the heater may be operated is smaller than that defined as an unconfined space or if the building is of unusually tight construction provide adequate combustion and ventilation ai...

Page 10: ...t of the heater Follow these instructions carefully to ensure safe installation Failure to follow instructions exactly can create a fire hazard The appliance cannot be installed on carpet tile or other combustible material other than wood flooring the appliance shall be installed on a metal wood or noncombustible material panel extending full width and depth of the appliance WARNING Front View Cor...

Page 11: ...ions that the Pressure Tapping Point May Be Installed Use new black iron or steel pipe Internally tinned copper or copper tubing can be used per National Fuel Code section 2 6 3 providing gas meets hydrogen sulfide limits and where permitted by local codes Gas piping system must be sized to provide minimum inlet pressure Listed on Data Plate at the maximum flow rate BTU Hr Undue pressure loss will...

Page 12: ...and turn captured screw clockwise firmly to re seal Do not over torque Check for gas leaks NOTE Remove control panel to access gas valve Ignitor battery module is located on back of panel Figure 5 Pressure Test Point Location Milli Volt Control Test Port OUT CONNECTING REMOTE RECEIVER 1 Remove cover on control panel to show opening for remote receiver See Figure 6 2 Cut cable to length approximate...

Page 13: ...of the wires does not matter CONNECT CHECK TO METER THERMOSTAT METER TEST TEST LEADS TO CONTACTS READING TERMINALS SHOULD BE A COMPLETE 2 3 CLOSED MINIMUM SYSTEM 175mv B THERMOPILE 1 2 OPEN 500mv OUTPUT OR MORE A COMPLETE MILLIVOLT SYSTEM CHECK A Reading Thermostat contacts CLOSED Control Knob ON Main Burners should turn ON a If the reading is more than 175 millivolts and the automatic valve still...

Page 14: ...t stat sensor behind the faceplate Attach the t stat sensor to the faceplate with 2 screws provided Make sure the thermo bulb wire is on the bottom of the t stat sensor See Figure 9 3 Attach wiring harnesses to back of t stat sensor See Figure 9 Attach the other ends of the har ness to either TP TH and TH on control valve or to existing wiring harness with two 2 0 250 male spade terminals for remo...

Page 15: ...livolt lighting instructions on lighting plate attached to unit or in homeowner s manual 2 With control knob in the ON position make sure the ON OFF switch is in the OFF position See Figure 11 3 The unit is now being controlled by the thermostat sensor The sensor will now cycle the burners on and off You can adjust how often the unit cycles by turning the control knob on the sensor Figure 11 Contr...

Page 16: ...urner 4 Place back end of top center log 4 on recessed area of back log 1 and rest on pin on center log 2 Figure 12 Installing Logs to Grate Before you begin This unit is supplied with four ceramic fiber logs Do not handle these logs with your bare hands Always wear gloves to prevent skin irritation from ceramic fibers After handling the logs wash your hands gently with soap and water to remove an...

Page 17: ...w and extend 1 2 above the log top surfaces The yellow flames should not contact the logs There should be glowing embers on the front surface of the middle log Note The flames and embers will be an opaque orange color during the burn off time OPERATING INSTRUCTIONS Avoid any drafts that alter burner flame patterns Do not allow fans to blow directly into the stove Do not place a blower inside the b...

Page 18: ...e department C Use only your hand to push in or turn the gas control knob Never use tools If the knob will not push in or turn by hand don t try to repair it Call a qualified service technician Force or attempted repair may result in a fire or explosion D Do not use this appliance if any part of it has been under water Immediately call a qualified service tech nician to inspect the appliance and t...

Page 19: ... knob pushed in the battery powered ignition will light the pilot 8 Continue pushing the control knob in for a further 10 seconds to prevent the flame detector from shutting off the gas while the probe is warming up Release the control knob 9 Turn gas control knob counterclockwise to the ON position 10 After the pilot has been lit for one minute the burners can be turned on Turn the ON OFF switch ...

Page 20: ...ontrol and piezo covers and grate weldment Inspect and clean burner air intake holes Remove lint or particles with vacuum brush or pipe cleaners Failure to keep air intake holes clean will result in sooting and poor combustion External case should be dusted and wiped with a moist cloth ANNUAL CLEANING INSPECTION Refer to parts diagram for location of items discussed below Inspect and clean burner ...

Page 21: ...1 44D1011K 2 Middle Log 1 46D0542K 3 Front Log 1 44D1012K 4 Top Log 1 44D1013K REPLACEMENT PARTS LIST Failure to position the parts in accordance with these diagrams or failure to use only parts specifically approved with this appliance may result in property damage or personal injury WARNING LOGS ...

Page 22: ...EMENT PARTS Failure to position the parts in accordance with these diagrams or failure to use only parts specifically approved with this appliance may result in property damage or personal injury WARNING BURNER ASSEMBLY ...

Page 23: ... Description Qty Natural Propane 1 Piezo Ignition Module 1 45D0077 45D0077 2 Piezo Switch 1 45D0078 45D0078 3 Piezo Wire 1 00K0632 00K0632 4 Front Burner 1 44D0020K 44D0020K 5 Rear Burner 1 45D0527K 45D0530K 6 Control Valve 1 14D0467 14D0468 7 Front Burner Injector 1 44D0208 44D0210 8 Rear burner Injector 1 44D0209 44D0211 9 ODS Pilot Assembly 1 14D0473 14D0474 10 On Off Control Knob 1 43D0094 43D...

Page 24: ...Y 1 Replace ignitor 2 Replace ignitor 3 Reconnect ignitor cable 4 Free ignitor cable if pinched by any metal or tubing 5 Replace ignitor cable 6 Replace piezo ignitor 7 Replace battery 1 Ventilate room Stop using odor causing products while heater is running 2 Locate and correct all leaks 3 Ventilate room and turn unit on high until odor is gone Odor should be gone after 2 to 3 hours of continuous...

Page 25: ...due to inlet pressure too high REMEDY 1 Press in control knob fully 2 After ODS pilot lights keep control knob pressed in for 30 seconds 3 Fully open manual shutoff valve 4 Hand tighten thermocouple connection until snug then tighten 1 4 turn more 5 Contact local gas company This prob lem could be caused by either low gas pressure or a dirty or partially clogged ODS pilot 6 Replace pilot 7 Replace...

Page 26: ...26 46D0550 NOTES ...

Page 27: ...46D0550 27 NOTES ...

Page 28: ...e installation instructions The Limited Lifetime Warranty will also be void if the appliance is not operated and maintained according to the operating instructions supplied with the appliance and does not extend to 1 firebox burner assembly damage by accident neglect misuse abuse alterations negligence of others including the installation thereof by unquali fied installers 2 the costs of removal r...

Reviews: