background image

32D1999 

17

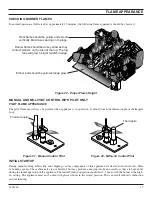
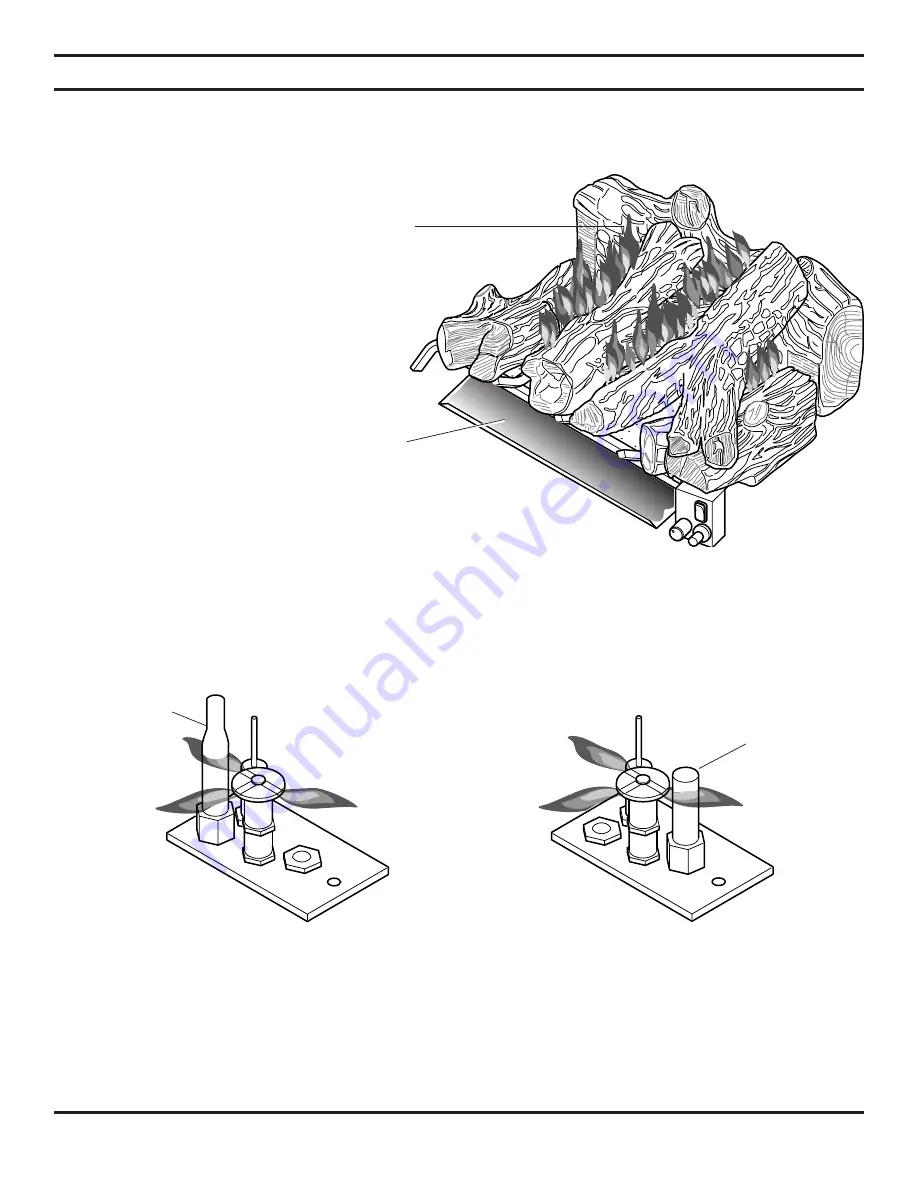
Rear flame should be yellow and extend 
vertically. Maximize spacing on top logs.

Burner flame should become yellow as they 

contact embers on the face of the log. The log 

face will glow a bright reddish orange.

Ember bed should be yellow/orange glow.

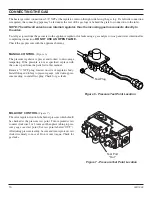
Thermopile

Thermocouple

Figure 21 - Manual Control Pilot

Figure 22 - Milli-volt Control Pilot

FLAME APPEARANCE

CHECKING BURNER FLAMES

In normal operation at full rate after appoximately 15 minutes, the following flame appearance should be observed.

MANUAL AND MILLIVOLT CONTROL WITH PILOT ONLY

PILOT FLAME APPEARANCE

The pilot flame must always be present when appliance is in operation. It should touch the thermocouple or thermopile 
body.

INITIAL STARTUP

During manufacturing, fabricating and shipping, various components of this appliance are treated with certain oils, films 
or bonding agents. These chemicals are not harmful, but may produce annoying smoke and smells as they are burned off 
during the initial operation of the appliance. The initial break-in operation should last 2-3 hours with the burner at the high-
est setting. The appliance must not be used with glassed doors in the closed position. This can result reduced combustion 
and overheating.

Figure 20 - Proper Flame Height 

Summary of Contents for VDY24/18

Page 1: ...y result causing property damage personal injury or loss of life Do not store or use gasoline or other flammable vapors and liquids in the vicinity of this or any other appliance WHAT TO DO IF YOU SMELL GAS Do not try to light any appliance Do not touch any electrical switch do not use any phone in your building Immediately call your gas supplier from a neighbor s phone Follow the gas supplier s in...

Page 2: ...ring Millivolt 11 Log Placement 12 Fireplace Draft Test 16 Flame Appearance 17 TABLE OF CONTENTS Operating Instructions 18 For Your Safety Read Before Lighting 18 Manual Control Lighting Instructions 18 Milli Volt Control Lighting Instructions 19 Safety Instructions for Manual Control without Pilot 20 Optional Remote Receiver 21 Cleaning and Servicing 22 Illustrated Parts List 23 Troubleshooting 2...

Page 3: ...in these instructions for future reference IMPORTANT Read these instructions carefully before installing or trying to operate this gas log set IMPORTANT SAFETY INFORMATION 9 Keep room area clear and free from combustible materials gasoline and other flammable vapors and liquids 10 Children and adults should be alerted to the hazard of high surface temperature and should stay away to avoid burns or ...

Page 4: ...mediately inform the dealer from whom you purchased the appliance Do not attempt to install any part of the appliance unless you have all parts in good condition ITEMS REQUIRED FOR INSTALLATION Ensure that the following items are available before proceeding with installation External regulator for propane L P G only Manual shutoff valve Piping which complies with local codes Pipe wrench Tee joint ...

Page 5: ...position to light maintain a standing pilot ON Valve position to light maintain the gas burner Manual control without pilot has two 2 positions OFF All gas to the gas logs is shut off at the valve ON Valve position to light maintain the gas burner Milli Volt control with pilot has three 3 positions OFF All gas to the gas logs is shut off at the valve IGN Valve position to light maintain a standing...

Page 6: ...t opening or a permanent stop installed Damper Stop Damper Figure 2 Damper Stop Installation MANUAL SERIES W PILOT AND W O PILOT MILLIVOLT SERIES W PILOT PRODUCT FEATURES SPECIFICATIONS Figure 1 Minimum Hearth Dimensions Minimum Opening Area of Chimney Damper for Venting The fireplace and gas logs function as a system If the fireplace is spilling into the room check with a match or smoke stick Repos...

Page 7: ...ractory brick may be used to line the floor of the fireplace in order to raise the height of the gas log set in relation to a restrictive barrier If the unit is raised THE MINIMUM HEIGHT DIMENSION LISTED IN THE HOMEOWNER S MANUAL MUST NOT BE EXCEEDED NOTE If the log set is equipped with a remote receiver a restrictive barrier may reduce the battery life by increasing the ambient temperature inside t...

Page 8: ...he grate correctly mark the hole positions on the fireplace firebox floor Drill two 2 5 32 diameter holes approximately 11 2 deep 3 Anchor the grate to the fireplace firebox floor using the screws provided Refer to Figure 4 Proper installation of the grate is essential to prevent any movement of the gas logs and controls during operation Right Side Mounting Hole You must secure the gas log heater to the...

Page 9: ...ons that the Pressure Tapping Point May be Installed NOTICE A qualified gas appliance installer must connect the appliance to the gas supply Consult all local codes before installation NOTICE Use new black iron pipe steel pipe copper tubing or internally tinned copper tubing Copper or internally tinned copper tubing can only be used according to the National Fuel Gas Code section 2 6 3 providing g...

Page 10: ...gauge over test point Use test point labeled OUT After taking pressure reading be sure and turn captured screw clockwise firmly to re seal Do not over torque Check for gas leaks Test Port Out Figure 7 Pressure Test Point Location CONNECTING THE GAS The heater gas inlet connection is 3 8 NPT at the regulator inlet on the right side facing the gas log If a left side connection is required the connect...

Page 11: ...icated A COMPLETE MILLIVOLT SYSTEM CHECK A READING THERMOSTAT CONTACTS CLOSED CONTROL KNOB ON MAIN BURNER SHOULD BE COME ON a If the reading is more than 100 millivolts and the automatic valve still does not come on replace the control b If the closed circuit reading A reading is less than 100 millivolts determine cause for low reading proceed as follows B THERMOPILE OUTPUT READING CHECK B READING...

Page 12: ...s and in contact with the grate See Figure 10 2 Install the right log 2 on top of the control cover Slide the log back until touching the rear log 1 Visually check to verify the log is resting on the grate and control cover See Figure 10 3 Install the left log 3 with its bottom groove resting on the right side of the grate bar Slide the log back until touching the rear log 1 Visually check to veri...

Page 13: ...ually check to verify the log is resting on the rear log 1 and left log 3 See Figure 11 Figure 11 VDY24 18D2 30 Log Placement 4 1 3 4 DUZY 3R VDY24 18D3R VDY30D3R LOG INSTALLATION SEQUENCE 1 Line up pins on bottom of Rear Log 1 with pins on grate bar and place on grate See Figure 13 2 Place Front Left Log 2 on left front of grate bar lining up cutout in bottom of log with grate bar See Figure 12 3...

Page 14: ...ining up two 2 pins on grate with holes in bottom of log See Figure 14 3 Place Left Top Log 3 on left end of Bottom Front and Back Logs See Figure 15 4 Place Center Crossover Log 4 across middle of Bottom Front and Back Logs See Figure 16 Figure 13 Placing Front Log 2 Bottom Front Log 2 Figure 14 Placing Back Log 1 Back Log 1 Figure 15 Placing Left Top Log 3 Top Left Log 3 Figure 16 Placing Center...

Page 15: ...ION SEQUENCE continued 5 Place Left Top Crossover Log 5 up against Left Top Log See Figure 17 6 Rest Right Top Log 6 on Center Crossover Log and front of grate See Figure 18 FOR VDY30D4R INSTALL ONLY 7 Place Small Front Log 7 between Center Crossover Log and Top Left Log See Figure 19 Figure 19 Placing Small Front Log 7 30 Only Small Front Log 7 30 Only ...

Page 16: ...inspect the logs per the cleaning and servicing section of the manual FIREPLACE DRAFT TEST FIREPLACE DRAFT TEST METHOD To determine if your fireplace is drafting properly turn the log set on After the log set has been burning for about 10 minutes place a match or smoke stick along the top and sides of the fireplace opening If the flame or smoke is not pulled into the fireplace then the fireplace is not...

Page 17: ...VOLT CONTROL WITH PILOT ONLY PILOT FLAME APPEARANCE The pilot flame must always be present when appliance is in operation It should touch the thermocouple or thermopile body INITIAL STARTUP During manufacturing fabricating and shipping various components of this appliance are treated with certain oils films or bonding agents These chemicals are not harmful but may produce annoying smoke and smells a...

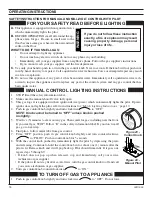
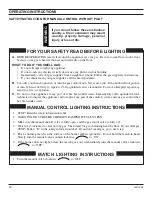
Page 18: ...urn gas control knob counterclockwise to ON OPERATING INSTRUCTIONS SAFTEY INSTRUCTION FOR MANUAL AND MILLI VOLT CONTROL WITH PILOT Figure 23 Control Knob Figure 24 Manual Pilot FOR YOUR SAFETY READ BEFORE LIGHTING If you do not follow these instruction exactly a fire or explosion may result causing property damage personal injury or loss of life WARNING MANUAL CONTROL LIGHTING INSTRUCTIONS 1 Push i...

Page 19: ...ob in for a further 60 seconds to prevent the flame detector from shutting off the gas while the probe is warming up Release the control knob 9 Turn gas control knob counterclockwise to the ON position 10 After the pilot has been lit for one minute the burners can be turned on Turn the ON OFF switch to ON position 11 If the gas logs will not operate follow the instructions To Turn Off Gas To Applia...

Page 20: ...tely call a qualified service technician to inspect the appliance and to replace any part of the control system and any gas control that has been under water 1 STOP Read the safety information label 2 WARNING BE SURE THE CHIMNEY DAMPER IF FULLY OPEN 3 Make sure the manual shutoff valve is fully open and the gas contol valve is fully off 4 Wait five 5 minutes to clear out any gas Then smell for gas i...

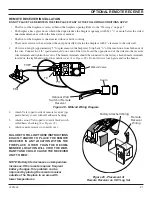
Page 21: ...IVER INSTALLATION DO NOT PLACE THE REMOTE IN THE FIREPLACE IF ANY OF THE FOLLOWING CONDITIONS APPLY The floor of the fireplace is recessed below the fireplace opening Refer to the Warnings on page 7 The fireplace has a glass doors which when open reduce the fireplace opening width by 11 2 or more below the stated minimum dimensions within the homeowner s manual The floor of the fireplace is sheet metal w...

Page 22: ... holes clean will result in sooting and poor combustion If embers rockwool have turned a rust color and become brittle remove old embers rockwool from log set Replace with new rockwool Rockwool can be purchased from your local dealer See log placement section for placement of embers ANNUAL CLEANING INSPECTION REFER TO PARTS DIAGRAM FOR LOCATION OF ITEMS DISCUSSED BELOW Inspect and clean all burner...

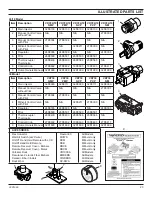
Page 23: ...D0090 32D0111 32D0090 32D0111 32D0090 2 Manual Control Valve without Pilot N A N A N A N A 27D0303 3 Manual Control Valve with Pilot 27D0304 27D0304 N A N A N A 4 Millivolt Control Valve with Pilot N A N A 32D0211 27D3300 N A 5 Regulator 24D0305 24D0306 N A N A 24D0305 6 Pilot 26D0500 26D0501 26D0500 26D0501 7 Thermocouple Thermopile 28D0400 28D0400 26D0566 26D0566 N A 8 Control Knob 27D0602 27D06...

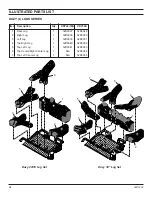
Page 24: ...1 Rear Log 1 32D0037 32D0049 2 Right Log 1 32D0038 32D0050 3 Left Log 1 32D0039 32D0051 4 Top Right Log 1 32D0040 32D0052 5 Top Left Log 1 32D0041 32D0053 6 Top Center Right Center Log 1 N A 32D0054 7 Top Left Center Log 1 N A 32D0055 Duzy 24 18 Log Set 4 5 1 3 2 Duzy 30 Log Set 7 4 5 1 2 3 6 ...

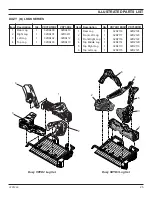
Page 25: ...412 4 Top Log 1 32D0403 32D0413 4 3 1 2 Duzy VDYD2 Log Set ILLUSTRATED PARTS LIST Duzy VDYD3 Log Set Item Description Qty VDY24 18D3R VDY30D3R 1 Rear Log 1 32D2118 32D2124 2 Front Left Log 1 32D2117 32D2123 3 Front Right Log 1 32D2116 32D2122 4 Top Middle Log 1 32D2114 32D2120 5 Top Right Log 1 32D2113 32D2119 6 Top Left Log 1 32D2115 32D2121 6 4 5 3 2 1 ...

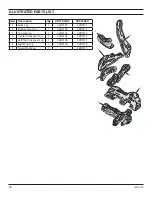
Page 26: ...ty VDY24 18D4 VDY30D4R 1 Back Log 1 32D3101 32D3111 2 Bottom Front Log 1 32D3102 32D3112 3 Top Left Log 1 32D3103 32D3113 4 Center Crossover Log 1 32D3104 32D3114 5 Left Top Crossover Log 1 32D3105 32D3115 6 Right Top Log 1 32D3106 32D3116 7 Small Front Log 1 32D3117 ...

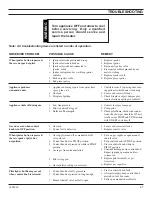
Page 27: ...t 1 Control knob not fully pressed in 2 Control knob not pressed in long enough 3 Manual shutoff valve not fully open REMEDY 1 Replace ignitor 2 Replace ignitor 3 Reconnect ignitor cable 4 Free ignitor cable if pinched by any metal or tubing 5 Replace ignitor cable 6 Replace piezo ignitor 1 Ventilate room Stop using odor caus ing products while heater is running 2 Locate and correct all leaks 3 Ch...

Page 28: ...ut down due to inlet pres sure too high 4 Hand tighten until snug then tighten 1 4 turn more 5 Contact local gas company 6 Replace thermocouple 7 Replace control valve 1 Clean burner or replace burner orifice 2 Replace burner orifice 3 Contact qualified service person 1 Contact local gas company 2 Clean burner or replace burner orifice 1 Clean burner or replace burner orifice 2 Replace burner 3 Replace...

Page 29: ...32D1999 29 NOTES ...

Page 30: ...30 32D1999 NOTES ...

Page 31: ...32D1999 31 NOTES ...

Page 32: ...ation instructions The Limited Lifetime Warranty will also be void if the appliance is not operated and maintained according to the operating instructions supplied with the appliance and does not extend to 1 fire box burner assembly damage by accident neglect misuse abuse alteration negligence of others including the installation thereof by unqualified installers 2 the costs of removal reinstallatio...

Reviews: