SR3 Type 1 Technical Manual
TSP005.doc Issue 5.0 – Jan 2005
Money Controls 2005. All rights reserved.
Page 18 of 50
11. Teach and Run™ Option
The SR3 can have the option to enable
Teach & Run™
on all 12 coins.
This option is selected at the time of order. The specific coin channel to be programmed is
selected using switch 1 (MSB) to switch 4 (LSB) on the 6 way DIL switch.
11.1 Programming Steps
To programme a coin / token please follow these 6 Steps:
1. Switch off the power to the SR3.
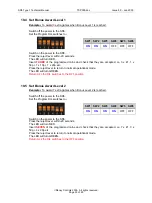
2. Set the 6 way DIL switch to the relevant coin to be programmed. (See
below)
3. Switch on the power to the SR3.
4. Press the reject lever.
The LED will turn RED.
5. Start entering the coins
1
or tokens
1
you wish to teach until the LED flashes GREEN,
typically after around 10 insertions
2
.
6. Press the reject lever and the LED will turn RED then GREEN.
The coin channel is now programmed
3
.
To programme further coin channels, repeat from step 1.
Once you have finished programming return all switches to the OFF position.
The first coin inserted after
Teach & Run™
may reject. Subsequent coins should accept.
Notes:
1
If a large sample of coins/tokens are used, then the coin channel sensor windows will
be more accurate and a higher acceptance of true coins/tokens should be seen. If only
a single coin/token is used, coin channel sensor windows will be programmed which
may not truly reflect the coin/token population
.
2
If significantly more than 10 coins have been inserted and the LED is still not changing
to GREEN, this could be caused by three possible reasons.
a) The coins/tokens being used are actually 2 different types although they look
the same e.g. 1p old and 1p new.
b) The coins/tokens being used are poorly manufactured/minted to such an extent
that the
Teach & Run™
is unable to correlate the readings taken.
c) The SR3 has a fault.
3
Even though a coin/token has been programmed make sure that the coin channel or
bank has actually been enabled (see sections
and
Teach & Run™
does NOT automatically enable the taught coin/token.


