background image

Summary of Contents for PoE-X High Temperature Sensor

Page 1: ...PoE X High Temperature Sensor User Guide ...

Page 2: ...ER OF OPERATIONS 2 SET UP STEPS 2 IV REGISTRATION 4 REGISTERING A PoE X HIGH TEMPERATURE SENSOR 4 V SETTING UP THE PoE X HIGH TEMPERATURE SENSOR 5 THE LIGHTING SEQUENCE 5 MOUNTING THE SENSOR 5 VI SENSOR OVERVIEW 6 MENU SYSTEM 6 INTERFACE SETTINGS 8 VII ACTIONS OVERVIEW 11 VIII USING THE LOCAL INTERFACE 14 THE STATUS TAB 16 THE SETTINGS TAB 17 SUPPORT 23 WARRANTY INFORMATION 23 SAFETY RECOMMENDATIO...

Page 3: ...alerts reports and maps can be customized in the iMonnit online sensor management interface PoE X SENSOR FEATURES Power over Ethernet ready injector hardware required Embedded LEDs for transmission online condition indicators 50 000 sensor message memory non volatile Modbus TCP SNTP v1 interface capabilities No PC required managed through apps and smart devices Remote update capable w automatic up...

Page 4: ...user interface or an Application Programming Interface API safeguarded by 256 bit Transport Layer Security TLS 1 2 encryption TLS is a blanket of protection to encrypt all data exchanged between iMonnit and you The same encryption is available to you whether you are a Basic or Premiere user of iMonnit You can rest assured that your data is safe with iMonnit III ORDER OF OPERATIONS It is important ...

Page 5: ...cated on the label on the bottom of your device 3 Adding your device See Figure 2 You will need to enter the Device ID and the Security Code from your PoE X Sensor in the corresponding text boxes Use the camera on your smartphone to scan the QR code on your device If you do not have a camera on your phone or the system is not accepting the QR code you may enter the Device ID and Security Code manu...

Page 6: ... all operational connections As the sensor attempts to connect the Sensor Status LED will be off waiting for the Ethernet connection to complete After the Ethernet setup is complete the Sensor Status Light will briefly blink red before turning green and then going off completely If the Ethernet Status LED is orange there is a failure in your Ethernet connection Check your connection Operational st...

Page 7: ...king Green Communicating to server Blinking Red Failed to communicate with server MOUNTING THE SENSOR Monnit sensors feature mounting flanges and can be attached to most surfaces using the included mounting screws or double sided tape See Figure 6 Figure 5 Figure 6 Mounting flanges ...

Page 8: ...indicates the sensor has met or exceeded a user defined threshold or triggered event Gray indicates that no sensor readings are being recorded rendering the sensor inactive Yellow indicates that the sensor reading is out of date possibly due to a missed heartbeat check in Details View The Details View will be the first page you see upon selecting which sensor you would like to modify See Figure 7 ...

Page 9: ...ata as it is stored from the sensor Sensor State Binary field represented as an integer containing information about the state or the sensor when the message was transmitted See Sensor State explained below Alert Sent Boolean indicating if this reading triggered a notification to be sent from the system Sensor State The integer presented here is generated from a single byte of stored data A byte c...

Page 10: ...essments per Heartbeat is how many times between heartbeats a sensor will check its measurements against its thresholds to determine whether it will enter an Aware State E Below is the minimum reading the sensor should record before entering an Aware State F Above is the maximum reading the sensor should record before entering an Aware State G The Aware State Buffer prevents the sensor from bounci...

Page 11: ... the sensor on the next sensor heartbeat check in Once a change has been made and saved you will not be able to edit that sensor s configuration again until it has downloaded the new setting SNMP Interface SNMP Simple Network Management Protocol is an Internet application protocol that manages and monitors network device functionality Monnit uses SNMP version 1 These settings can both be configure...

Page 12: ...sted servers such as the ones maintained by your ISP Incorrect time can affect the delivery of sensor traffic See Figure 10 If the Monnit Server is active it will be utilized for time synchronization in ordinary operation So SNTP will be used as a backup If you disable the default server interface you must configure the SNTP Interface HTTP Interface The HTTP Interface allows you to set how long yo...

Page 13: ...sor reading identifies that immediate attention is needed Types of actions include sensor readings device inactivity and scheduled data Any one of these can be set to send a notification or trigger an action in the system Choose Actions in the main navigation menu A list of previously created actions will display on the screen From here you have the ability to filter refresh and add new actions to...

Page 14: ...ose High Temperature in the drop down menu Next you will be asked to input the trigger settings You have the option of setting this trigger to detect greater than or less than a humidity percentage level Press the Save button PAGE 12 Sensor Reading Set actions based on activity or reading Device Inactivity Actions when the device doesn t communicate for an extended period of time Advanced Actions ...

Page 15: ... A Input the subject for the notification See Figure 17 B Customize the message body for the notification See Figure 17 C Recipient list identifies who will receive the notification See Figure 18 Select the icon next to a user to specify how they will be notified Choose if you want notifications sent immediately when triggered or if you want a delay before sending and press Set A green icon indica...

Page 16: ...n These can be adjusted later by returning to this page Press the Check mark button to complete the process Select System Action from the Add Action list See Figure 19 PAGE 14 Acknowledge Automatically signals that you have been notified of an action When an action has been triggered alerts will continue processing until the action returns to a value that no longer triggers an action Full Reset Re...

Page 17: ... will begin to blink red When the button is released the device will perform a factory reset Use a PC on the local network to access your router s configuration page first see your router documentation Use your router s web interface to determine the IP address it assigns your device Use your web browser to connect to your sensor using the assigned IP address You should be redirected to the Status...

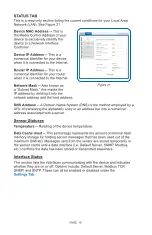
Page 18: ...ystem DNS is the method employed by a URL of translating the alphabetic entry in an address bar into a numerical address associated with a server Sensor Statuses Temperature Reading of the device temperature Data Cache Used This percentage represents the amount of internal flash memory storage for holding sensor messages that has been used out of the maximum 896 kb Messages sent from the sensor ar...

Page 19: ...l address and returns the IP address for the server containing the information you re looking for Under Default Server Settings choose the radio button to enable or disable the Default Server Enter the name of your Default Server Name IP in the text box Lastly input the Server Port number Finish by choosing the Save Changes button The Settings View Page The Settings View Page is where you can adju...

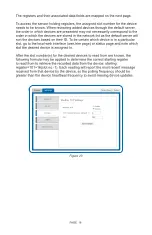
Page 20: ...D To be certain which device is in a particular slot go to the local web interface wsn htm page or status page and note which slot the desired device is assigned to After the slot number s for the desired devices to read from are known the following formula may be applied to determine the correct starting register to read from to retrieve the recorded data from the device starting register 101 16 ...

Page 21: ...a Field 1 40109 108 Data 2 Sensor Data Field 2 40110 109 Data 3 Sensor Data Field 3 40111 110 Data 4 Sensor Data Field 4 40112 111 Data 5 Sensor Data Field 5 40113 112 Data 6 Sensor Data Field 6 40114 113 Data 7 Sensor Data Field 7 40115 114 Data 8 Sensor Data Field 8 40116 115 Sensor ID_High The first 16 bits of a 32 bit serial ID number 40117 116 Sensor ID_Low The last 16 bits of a 32 bit serial...

Page 22: ...e can be adjusted on the offline local interface You can continue to use SNMP without the server interface active The data will not be sent to a server but you can continue to poll for the data as it is received See Figure 24 PAGE 20 Figure 24 ...

Page 23: ...where the trap alert state is sent when active MIB II System Configuration Strings The HTTP Interface should be enabled to keep your local interface session open HTTP Service Timeout This is a security setting for allowing this web interface to be active The default is 5 minutes Setting the field to 0 will turn off the local interface ending your session See Figure 25 Your Data Management Settings...

Page 24: ...t time Epoch between Default Server and SNTP This is the difference in seconds between the standard SNTP Epoch start date 01 01 1900 and Monnit s Epoch start date 01 01 2012 System Reset Period The time in hours it takes for the system to reset Secondary Time Source Failover Period The time in seconds that the device will continue to attempt to poll the Primary System Time Source unsuccessfully fo...

Page 25: ... sufficient information regarding such non conformance so as to permit Monnit to create such bug fix or software patch If any hardware component of any Product fails to conform to the warranty in this Section Monnit shall at its option refund the purchase price less any discounts or repair or replace nonconforming Products with conforming Products or Products having substantially identical form fi...

Page 26: ...tely preceding paragraph or to refund the documented purchase price for non conforming Products to Customer Monnit s warranty obligations shall run solely to Customer and Monnit shall have no obligation to customers of Customer or other users of the Products Limitation of Warranty and Remedies THE WARRANTY SET FORTH HEREIN IS THE ONLY WARRANTY APPLICABLE TO PRODUCTS PURCHASED BY CUSTOMER ALL OTHER...

Page 27: ...mpering will compromise the warranty validity We recommend following the instructions of this user guide for correct setup and use of the product Please handle the product with care avoiding any dropping and contact with the internal circuit board as electrostatic discharges may damage the product itself The European Community provides some Directives for the electronic equipment introduced on the...

Reviews: