background image

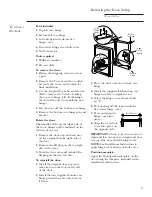
Removing
full extension
drawers

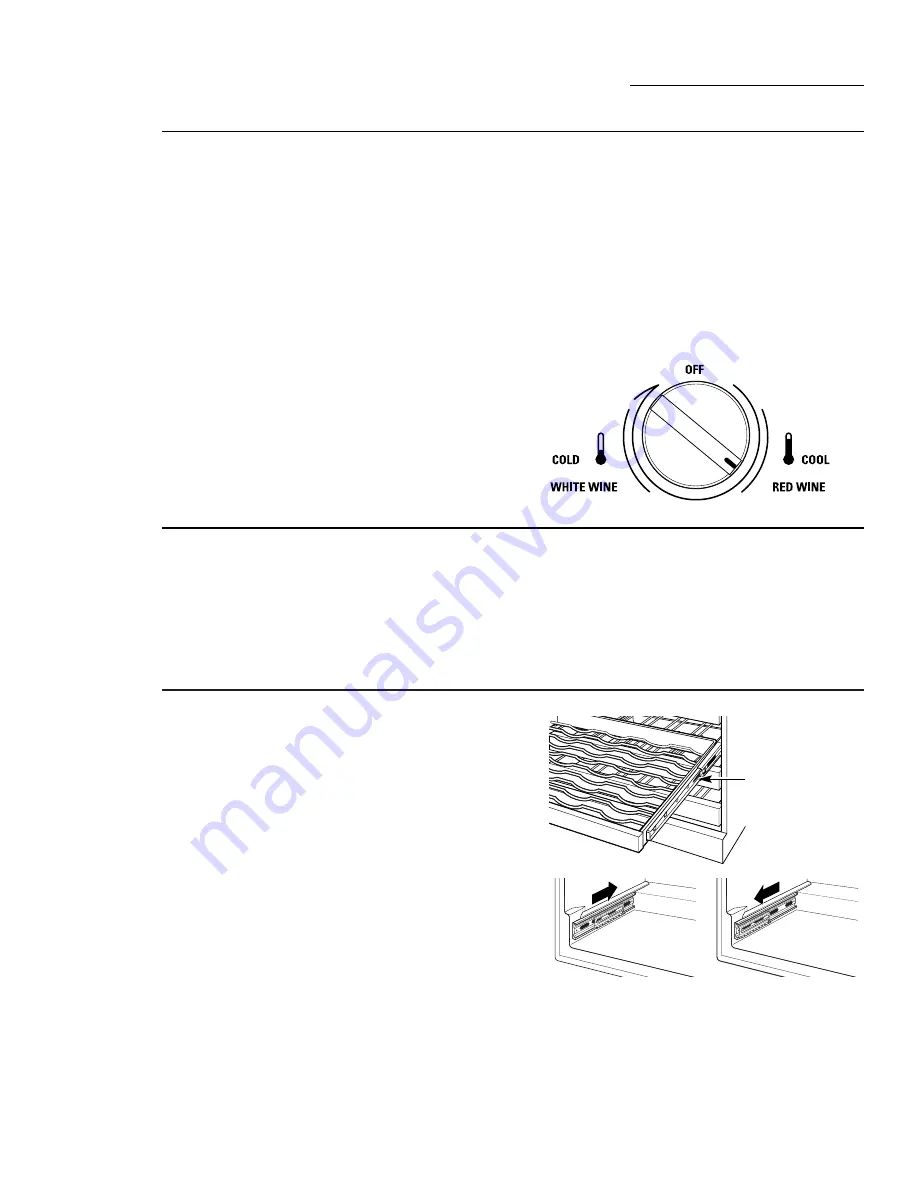
All of the full extension drawers pull out 
so bottles can be conveniently added or
removed.

Any of the full extension drawers can be
removed to store larger bottles.

To remove: 

1. 

Pull the full extension drawer out to the
STOP position.

2. 

Push the tab on right drawer guide
down while pulling the tab on left guide
up, and pull the drawer out.

To replace:

1. 

Push the drawer slide arm back into 
the unit.

2. 

Pull the small slide sub assembly
completely forward.

3. 

Insert the sides of the drawer back into
the guides.

4. 

Push until the tabs lock into place.

6

Tab (push tab down on
right drawer guide, pull
tab up on left drawer
guide)

Controls and Features

Wine Chiller

Temperature
control

Do not install the wine chiller where 
the ambient temperature will go below
55°F (13°C) or above 90°F (32°C).

The RED WINE setting will provide a
storage temperature of approximately 
55ºF (13ºC), which is optimum for the
storage for red wine. 

The WHITE WINE setting will provide 
a storage temperature of approximately
7ºC, which is optimum for white wine.

As with any refrigeration product, there is 
a slight temperature variance at different
locations within the cabinet.

Temperatures at the bottom of the cabinet
will be cooler than temperatures at the top
of the cabinet.

Position your wine inventory accordingly
(i.e. white wines in the cooler zones and
red in the warmer zones).

To set the control,

turn it to the RED

WINE setting. Once the bottles are loaded,
allow at least 24 hours before making any
adjustments to the initial setting.

Interior light
and switch

The interior light makes it easy to view 
your wine labels and enhances the display 
of your collection. 

When the switch is in the OFF position, 
the light comes on only when the door is
opened. When the switch is in the ON

position, the light remains on continuously
for your maximum viewing pleasure. 
For best viewing do not store a bottle on
the top shelf directly under the light.
Remember to turn off the light when it 
is no longer needed.

NOTE: 

Make sure the tabs on the full

extension drawer guides are fully engaged
before loading any bottles. Pull the drawers
out all the way to the STOP position and
push back in several times to make sure
locking tabs are properly engaged.

To replace, push drawer slide
arm back into unit

Pull small slide sub assembly
completely forward

Summary of Contents for ZDWG240

Page 1: ...Owner s Manual Wine Chiller ZDWG240 ...

Page 2: ...sumer Information 2 3 Controls and Features 6 Model and Serial Numbers 2 Operating Instructions 7 Problem Solver Back Cover Reversing the Door Swing 11 Safety Instructions 4 5 Before using your wine chiller Read this manual carefully It is intended to help you operate and maintain your new wine chiller properly Keep it handy for answers to your questions Write down the model serial numbers You wil...

Page 3: ...act the Installer or Dealer immediately This Wine Chiller must be properly leveled to ensure correct door alignment and door closure Contact the Installer if the unit is not level The unit should be centered in the opening The front face of the door should be 25 mm forward of adjacent cabinetry Contact the installer if clearance is not correct Test the door swing Carefully open and close the door ...

Page 4: ... be unplugged in order to avoid contact with a live wire filament A burned out light bulb may break when being replaced NOTE Setting the refrigerator temperature controls to OFF does not remove power to the light circuit This appliance has a refrigerating system filled with R600a isobutane refrigerant so bear in mind Leave servicing to an authorized expert Be careful not to obstruct any air vents ...

Page 5: ...f electric plugs and cables should be done by a qualified technician or service agent In some countries the refitting of electric plugs and cables is only permitted when the work is completed by a qualified technician If the power supply cord becomes damaged it must be replaced by a qualified service agent in order to avoid a safety hazard Never unplug your refrigerator by pulling on the power cor...

Page 6: ...y refrigeration product there is a slight temperature variance at different locations within the cabinet Temperatures at the bottom of the cabinet will be cooler than temperatures at the top of the cabinet Position your wine inventory accordingly i e white wines in the cooler zones and red in the warmer zones To set the control turn it to the RED WINE setting Once the bottles are loaded allow at l...

Page 7: ... plan to use for everyday drinking and entertaining on the front half of the full extension drawers where labels are completely visible Place wines for aging or longer term storage in the rear Do not allow children to climb stand or hang on the wine chiller full extension drawers They could seriously injure themselves and possibly cause damage to the wine chiller Wood drawer fronts The full extens...

Page 8: ...ns and neutralizes odors Thoroughly rinse and wipe dry Other parts of the wine chiller center unit including the door gaskets and full extension drawers can be cleaned the same way Drain hole The exterior surfaces can be washed with mild soap and water Rinse thoroughly with clear water Never use abrasive scouring powders Cabinet Use a glass cleaner or mild soap and water and a soft cloth to clean ...

Page 9: ...h a 15 watt appliance bulb If the power fails open the door as infrequently as possible to maintain the temperature A gradual rise in temperature should not have any adverse effect on the wine If it is extremely hot you may want to move the wine to the coolest location you can find until power is restored Do not store or use gasoline or other flammable vapors and liquids in the vicinity of this or...

Page 10: ...e out Allow 360 mm minimum clearance on the hinge side for a full 110 door swing The door swing is reversible on all models If desired change the door swing before installation Choose the location These products may be closed in on the top and three sides as long as the front is unobstructed for air circulation and proper access to the door Do not install these products where the temperature will ...

Page 11: ...e door 2 Remove the fill plug on the top right side of the door 3 Turn the door over and reinstall the fill plug on the new left side To reinstall the door 1 Install the original door stop and cam riser onto the bottom left side of the door 2 Install the new supplied bottom case hinge pin and bracket onto bottom left side 3 Place the door onto the bottom case hinge 4 Install the supplied left hand...

Page 12: ...rature control not set cold enough TOO WARM See Temperature Control Allow 24 hours for temperature to change Warm weather or frequent door openings Door left open for long time Package may be holding door open APPLIANCE Interior needs cleaning See Care and Cleaning HAS ODOR Keep open box of baking soda in appliance replace every 3 months DOOR NOT Door gasket is sticking or folding over Apply petro...

Reviews: