Installation
24" Outdoor Cooking Center
Step 6
Adjusting
the Burners
8
Adjustments should not be required, unless
vibration during transit or variations in local
gas supply make minor adjustments necessary.
Adjustments must be made by a qualified
technician at the time of installation. Extreme
care should be used if adjustments are made
after installation.
• Turn gas supply on.
• Push and turn the burner control knobs to
the “LITE” position. Up to 20 seconds may be
required to to purge air from the lines.
• Flames should be blue and stable with no
yellow tips, excessive noise or lifting from the
burner. If any of these conditions exist turn
control to off and check air shutter and
burner ports for debris or spider webs.
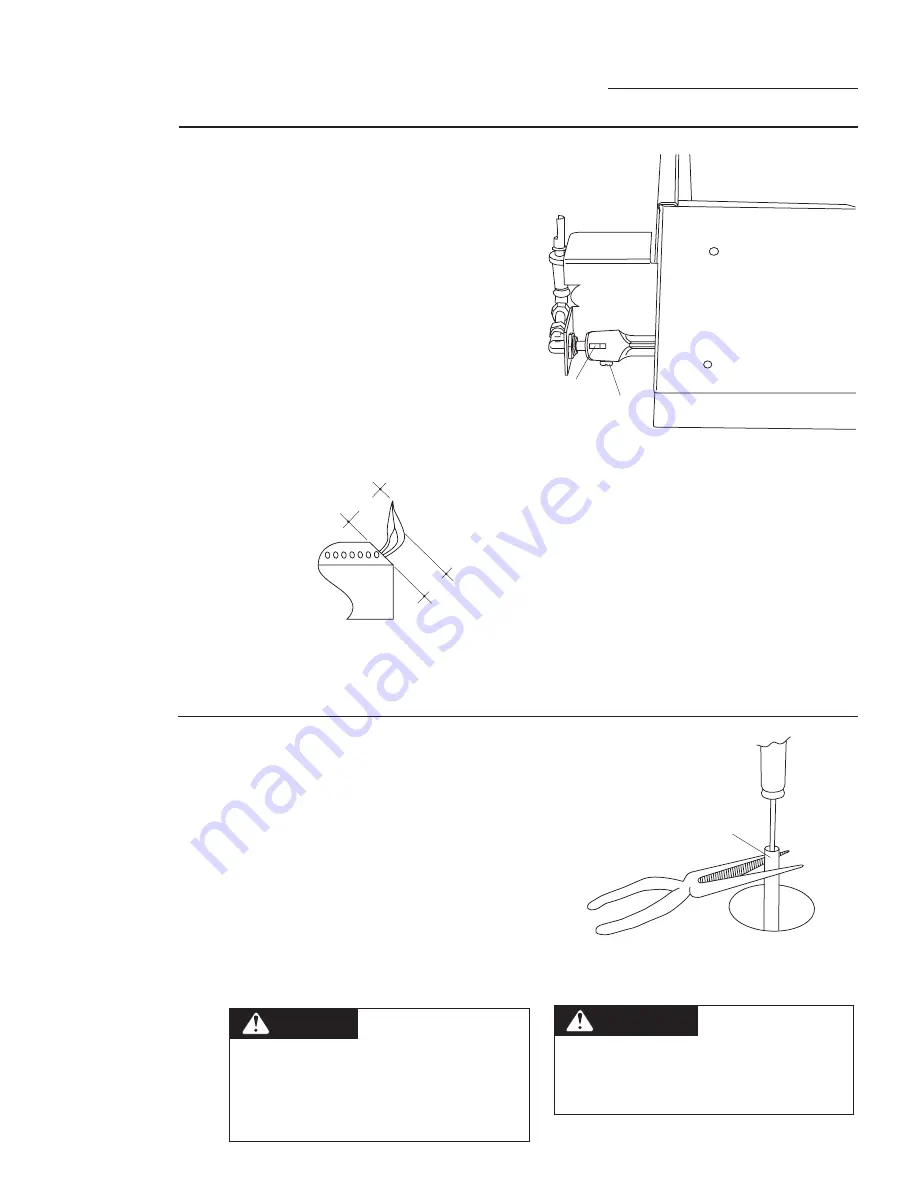
• Locate and loosen the lock screw on the
face of the air shutter with a screwdriver.
• Turn burner to the “LITE” position.
• If the flame is yellow, indicating insufficient
air, open the air shutter to allow more air to
the burner.
• If the flame is noisy and tends to lift away
from the burner, there is too much air. Turn
the air shutter to reduce the opening.
• Once adjusted, turn the burner off and
reverse steps to re-install the valve panel
cover.
Low setting Adjustment:
Minor adjustments may be required due to
fluctuations in local gas pressure. Adjustments
to increase or decrease gas flow may be
necessary.
• Turn burner knob to “LITE” position.
• Turn the control knob to the lowest setting,
all the way counter-clockwise.
• Remove the knob by pulling straight out.
• Insert a thin-blade flat screwdriver into the
valve shaft and hold. (3/32" blade width
recommended.)
• Grip the shaft with pliers and turn counter-
clockwise to lower the flame, or clockwise to
increase the flame.
1-1/2"
3/8"
Valve Stem
WARNING
Always check the low
flame size for stability. A burner flame
which is too small may go out or be extin-
guished easily. This can cause unburned
gas to escape and cause a hazardous
condition.
TO ADJUST:
• The valve panel cover must be removed to
access the the air shutter. Follow the
instructions in Step 4, Test for Leaks.
Air Shutter
Lock Screw
Grill Box
• When the desired setting
is made, replace the
knob and turn burner
off.
ATTENTION
Il faut toujours
vérifier la stabilité de la flamme au ralenti.
Une flamme trop petite peut s’éteindre
facilement. Ceci cause l’émission de gaz
non brûlé, ce qui est dangereux.


