background image

For proper ignition, make sure the small holes in
the burner rings are kept open. A sewing needle
or wire twist-tie works well to unclog them.

The slits in the burner heads of your cooktop 
must be kept clean at all times for an even,
unhampered flame.

You should clean the surface burners routinely,
especially after bad spillovers, which could clog
these openings.

To remove burned-on food, soak the burner 
heads and rings in a solution of mild liquid
detergent and hot water for 20-30 minutes. 
For more stubborn stains, use a toothbrush.

Clean the burner bases in place on the
cooktop.

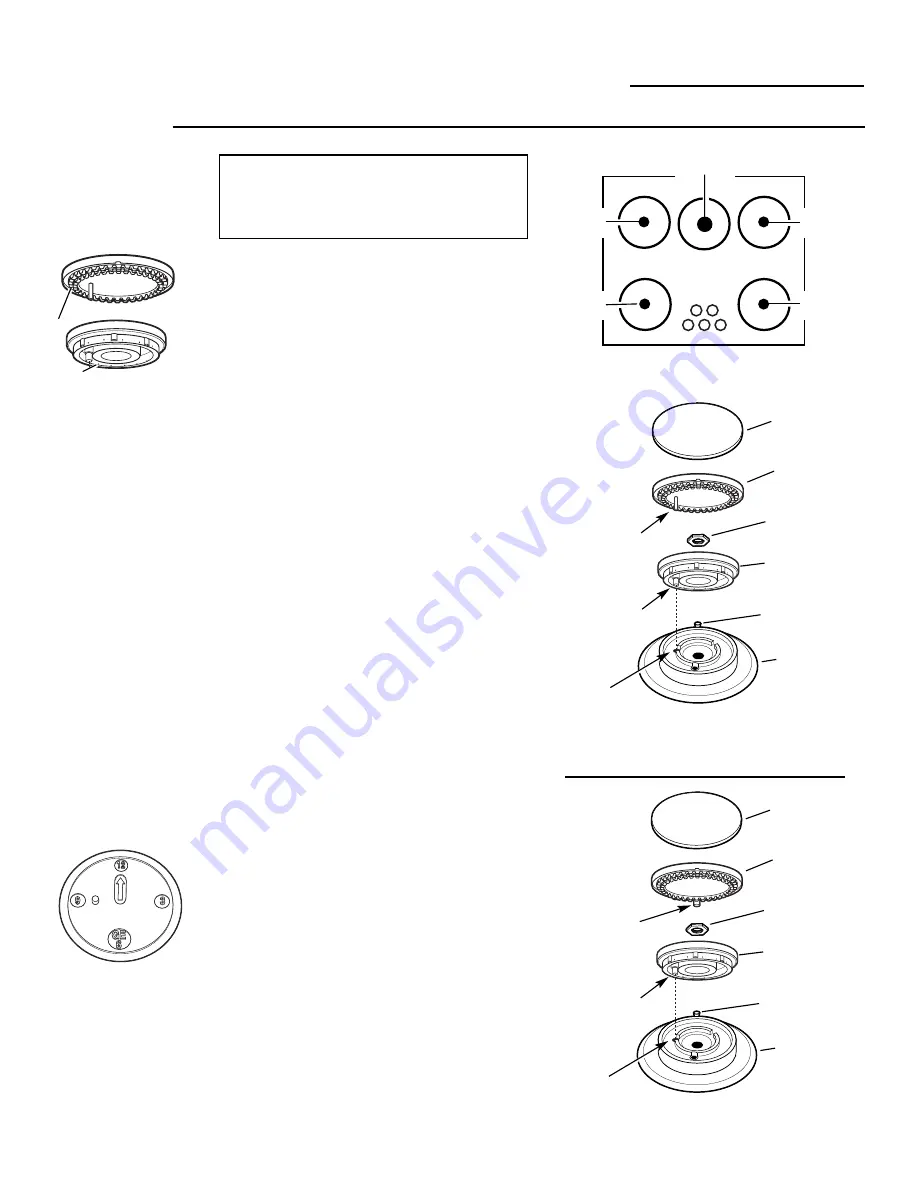
To remove the burner parts:

1. Lift off the burner cap and burner head.

2. Remove the burner ring locking nut using 

a 1

1

16

socket wrench, crescent wrench or

channel-lock pliers.

3. Lift off the burner ring. 

Do not remove 

the burner bases.

Before putting the burner parts back, shake out
excess water and then dry them thoroughly by
setting them in a warm oven for 30 minutes.

Replace the burner parts. Make sure that the
rings, heads and caps are replaced in the
correct location. There are four medium sets
and one large set of rings, heads and caps.

To replace the burner parts:

Make sure all parts are for the correct burner, 
are in the correct location and are firmly seated.

1. Align the locator pin on the burner ring 

into the labeled hole in the burner base. 
Seat in place and push toward the electrode 
to set gap properly.

2. Replace the burner ring locking nut and 

hand-tighten. Using the wrench or pliers, 
turn the nut 1/4 turn to secure it in place.

3. Align the locator pin in the burner head into

the hole in the burner ring. Seat in place.

4. Replace the burner caps.

NOTE: Before removing the burner parts,
remember their size and location. Replace
them in the same location after cleaning for
proper burner operation.

Use a sewing needle, 
twist-tie and/or toothbrush 
to unclog the small holes 
and slits in the burner heads
and burner rings.

Burner 
sub-assemblies

High

Output

High

Output

High

Output

High

Output

Front of Cooktop

Maximum

Output

Burner Head
(Brass)

Burner Base

Holes

Slits

Burner Cap

Locator Pin

NOTE:

Locator pin fits 

into burner base pin slot.

Electrode

Pin 
Slot

14

Care and Cleaning

Gas Cooktop

Locator Pin

Burner Ring
(Aluminum)

Burner Ring
Locking Nut

High Output Burners

Burner Head
(Brass)

Burner Base

Burner Cap

Locator Pin

NOTE:

Locator pin fits 

into burner base pin slot.

Electrode

Pin 
Slot

Locator Pin

Burner Ring
(Aluminum)

Burner Ring
Locking Nut

Maximum Output Center Burner

To aid reassembly, each
brass Burner Head is
marked with a clock face.
Replace the Burner Head
with the arrow pointing
to the rear of the cooktop
(12 o’clock position).

Summary of Contents for ZGU375LS

Page 1: ...GE Monogram Owner s Manual monogram com 36 Stainless Steel Gas Cooktop For Models ZGU375LS ZGU375NS ...

Page 2: ...ces 13 Consumer Services Before You Call for Service 16 Important Phone Numbers 17 Model and Serial Number 4 Product Registration 19 20 Safety Instructions 2 3 5 8 Warranty 18 Using Your Cooktop Cookware 12 Dual Flame Burners 11 Electric Ignition 10 Features 9 Flame Size 10 LP Gas 9 Optional Griddle Accessory 9 Wok Cooking 12 Do not store or use gasoline or other flammable vapors and liquids in th...

Page 3: ...e Appelez immédiatement votre fournisseur de gaz à partir du téléphone d un voisin Suivez les instructions du fournisseur de gaz Si vous ne pouvez pas contacter votre fournisseur de gaz appelez les pompiers L installation et l entretien doivent être effectués par un installateur qualifié une agence d entretien ou le fournisseur du gaz AVERTISSEMENT Si les informations de ce manuel ne sont pas suiv...

Page 4: ...ur cooktop If you received a damaged cooktop Immediately contact the dealer or builder that sold you the cooktop Save time money Before you request service check the Before you call for service section in the back of this manual It lists causes of minor operating problems that you can correct yourself If you need service To obtain service see the Consumer Services page in the back of this manual W...

Page 5: ...y recommended in this manual All other servicing should be referred to a qualified technician Do not leave children alone or unattended where a cooktop is hot or in operation They could be seriously burned CAUTION Items of interest to children should not be stored in cabinets above a cooktop children climbing on the cooktop to reach items could be seriously injured Clean the cooktop with caution I...

Page 6: ...y tipped Select cookware having flat bottoms large enough to properly contain food and avoid boilovers and spillovers and large enough to cover burner grate This will both save cleaning time and prevent hazardous accumulations of food since heavy spattering or spillovers left on cooktop can ignite Use pans with handles that can be easily grasped and remain cool Keep all plastics away from burners ...

Page 7: ...nal de l électricité N utilisez pas de rallonge de câble avec cet appareil Assurez vous que tous les matériaux d emballage sont retirés de la cuisinière avant de la mettre en marche pour empêcher les dommages d incendie et de fumée au cas où le matériau d emballage s enflammerait Assurez vous que la cuisinière est ajustée correctement par un technicien de service ou un installateur qualifié en fon...

Page 8: ...li de graisse celle ci peut déborder lorsque les aliments sont ajoutés Observez avec soin les aliments frits sur flammes hautes Si un mélange d huile et de matières grasses va être utilisé pour la friture mélangez avant le chauffage ou à mesure que les matières grasses fondent lentement Réchauffez toujours lentement les matières grasses et observez leur réchauffement Utilisez un thermomètre de fri...

Page 9: ...Indicator Lamps One On Each Control Knob 10 5 Interlocking Grates 10 15 6 Wok Ring Accessory Supplied On Some Models 12 1 5 1 4 3 1 Cooktop model ZGU375NS is shipped from the factory set to operate only with Natural Gas If you wish to use Liquefied Petroleum Gas you must have cooktop model ZGU375LS LP Gas A dual griddle is available that can be placed over the two right or left burners on your coo...

Page 10: ...five igniters make clicking sounds and spark even when only a single burner is being turned on Do not touch any of the burners when the igniters are clicking The burners on this cooktop relight automatically if the flame goes out This helps prevent the inconvenience of having to manually relight a burner Occasionally the burners may spark if excess wind or draft blows the flame away from the burne...

Page 11: ...l use only the lower flames Use simmer SIM to melt chocolate hold delicate sauces or for other foods requiring low simmer heat When holding some foods at serving temperature such as mashed potatoes it may be best to use the LO flame setting for a few minutes before turning the knob to simmer SIM Primary Cooking Settings from LO to HI will use both rows of flames Use LO to HI for all purpose cookin...

Page 12: ...el This metal alone has poor heating properties and is usually combined with copper aluminum or other metals for improved heat distribution Combination metal skillets generally work satisfactorily if they are used at medium heat as the manufacturer recommends Wok cooking Use woks with a support ring provided on some models on the center burner only Make sure that the support ring is securely locke...

Page 13: ...Replace the knobs after cleaning NOTE The knob stem is D shaped Replace the flat side of the knob onto the flat side of the stem Turn all controls OFF before removing the burner parts The burner grates burner caps and burner ring sub assemblies can be lifted off making them easy to clean CAUTION DO NOT OPERATE THE BURNER WITHOUT ALL BURNER PARTS IN PLACE Electrode Do not use a steel wool pad it wi...

Page 14: ...t location and are firmly seated 1 Align the locator pin on the burner ring into the labeled hole in the burner base Seat in place and push toward the electrode to set gap properly 2 Replace the burner ring locking nut and hand tighten Using the wrench or pliers turn the nut 1 4 turn to secure it in place 3 Align the locator pin in the burner head into the hole in the burner ring Seat in place 4 R...

Page 15: ...e the two side grates with their locking rails toward the center Replace the center grate so that a continuous arc is formed with the center ribs of all three grates Make sure the rails on the center grate are locked over the rails on the side grates and that all grates are stable and level Rubber Grate Feet For stability your cooktop has two rubber feet on each leg of the burner grates If any of ...

Page 16: ...ED FLAMES If burner flames look like A call for service Normal burner flames should look like B or C depending on the type of gas BURNER FLAMES If cooktop is connected to LP gas contact the person who installed VERY LARGE your cooktop or made the conversion OR YELLOW BURNER CONTROL When the knob is at the OFF position it must be pushed in before KNOB WILL NOT it can be turned and it can only be tu...

Page 17: ...800 626 2224 You can have the secure feeling that GE Consumer Service will still be there after your warranty expires Purchase a GE contract while your warranty is still in effect and you ll receive a substantial discount With a multiple year contract you re assured of future service at today s prices Parts and Accessories 800 626 2002 Individuals qualified to service their own appliances can have...

Page 18: ...during warranty period or beyond call 800 444 1845 Some states do not allow the exclusion or limitation of incidental or consequential damages so the above limitation or exclusion may not apply to you This warranty gives you specific legal rights and you may also have other rights which vary from state to state To know what your legal rights are in your state consult your local or state consumer a...

Page 19: ...General Electric Company Warranty Registration Department P O Box 32150 Louisville KY 40232 2150 Place 1st Class Letter Stamp Here GE Appliances Consumer Product Ownership Registration Important Mail Today ...

Page 20: ...uire service The service number in the USA 800 444 1845 In Canada 1 888 880 3030 3 Read your Owner s Manual carefully It will help you operate your new appliance properly Important To ensure that your product is registered mail the separate product registration card If the separate product registration card is missing fold and mail the form below No envelope is needed Consumer Product Ownership Re...

Reviews: