


6
31-2000730 Rev. 0
Installation Instructions
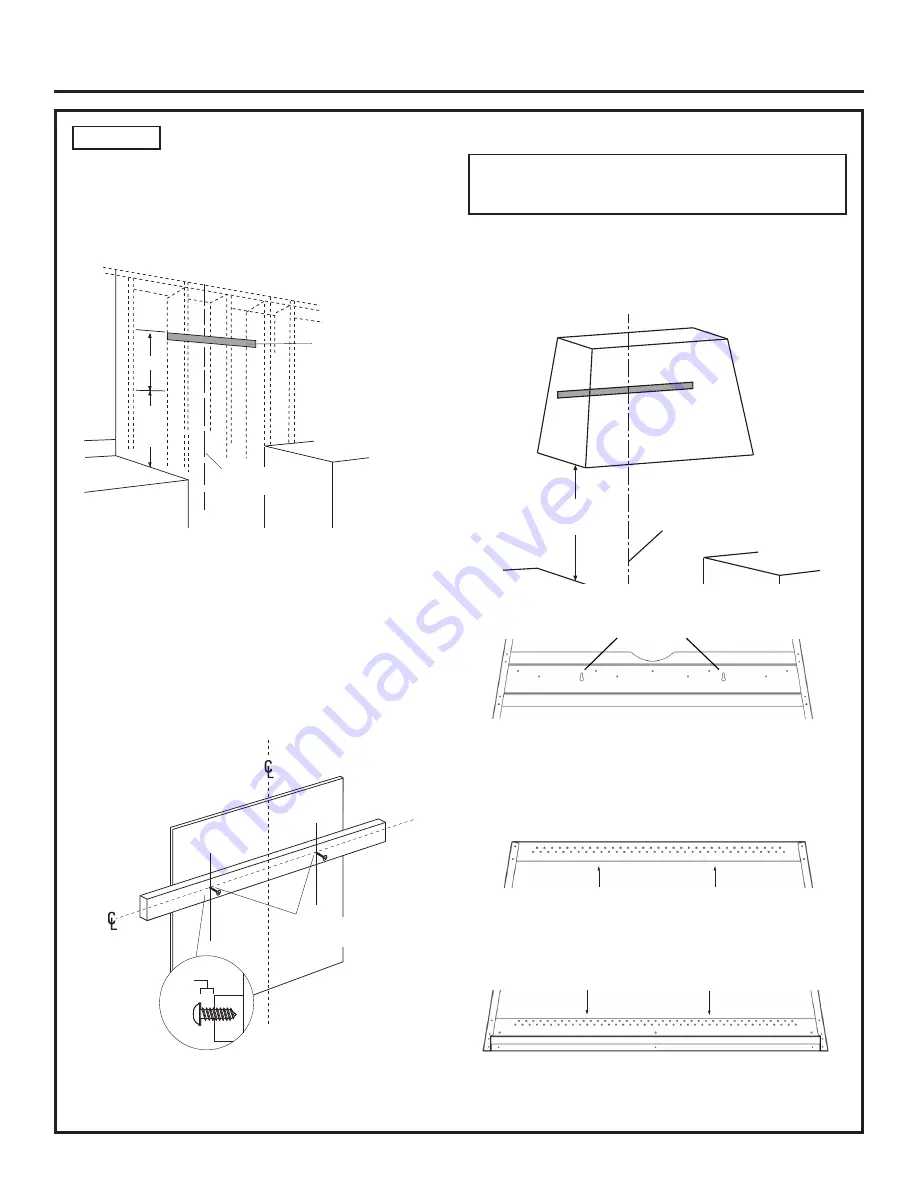
STEP 2
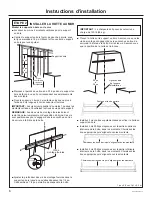
INSTALL HOOD TO WALL
Mount Wood Support to Wall
■ Locate at least 2 vertical studs at the wood support.
■ Center the supplied wood support, left to right and
below the 16” marked line. Use the center hole in the
wood support as guidance.
■ Mark and drill two 3/16” holes through wood support to
match stud locations.
■ Secure the wood support to 2 or more vertical studs,
using 2 long, square drive screws.
IMPORTANT:
Screws must penetrate at least 1” into
vertical studs. Countersink screws in support.
NOTE:
The two supplied mounting screws must remain
in their original shipping location. These screws are
positioned to engage the keyhole slots in the back of the
hood.
■ Adjust depth of supplied mounting screws in the wood
support until they protrude 1/4” forward. This 1/4” gap
will provide clearance to hang the hood.
IMPORTANT:
Framing must be capable of
supporting up to 150 lbs.
■ Place the hood over the wood support. Be sure the
mounting screws engage the keyhole slots in the
back of the hood. Tighten the screws. Confirm hood
position is correct.
■ Install additional 2 short screws to secure the hood to
the wood support.
■ Install 2 medium Phillips screws at top inside of the
hood into studs. Chose the appropriate holes that line
up with studs.
■ Install 2 medium Phillips screws at bottom inside of
hood into studs. Choose the appropriate holes that
line up with studs.
30”
to
36”
16”
Wood Support
Centerline of
Installation
Space
Mounting Screws
as Shipped
1/4”
Gap
Centerline of
Installation
Space
30”
to
36”
Keyhole Slots
choose screw holes that line up with studs
choose screw holes that line up with studs
choose screw holes that line up with studs
choose screw holes that line up with studs
1” = 2.5 cm; 1’ = 0.3 m


