background image

ADDITIONAL SEQUENCER FEATURES

68

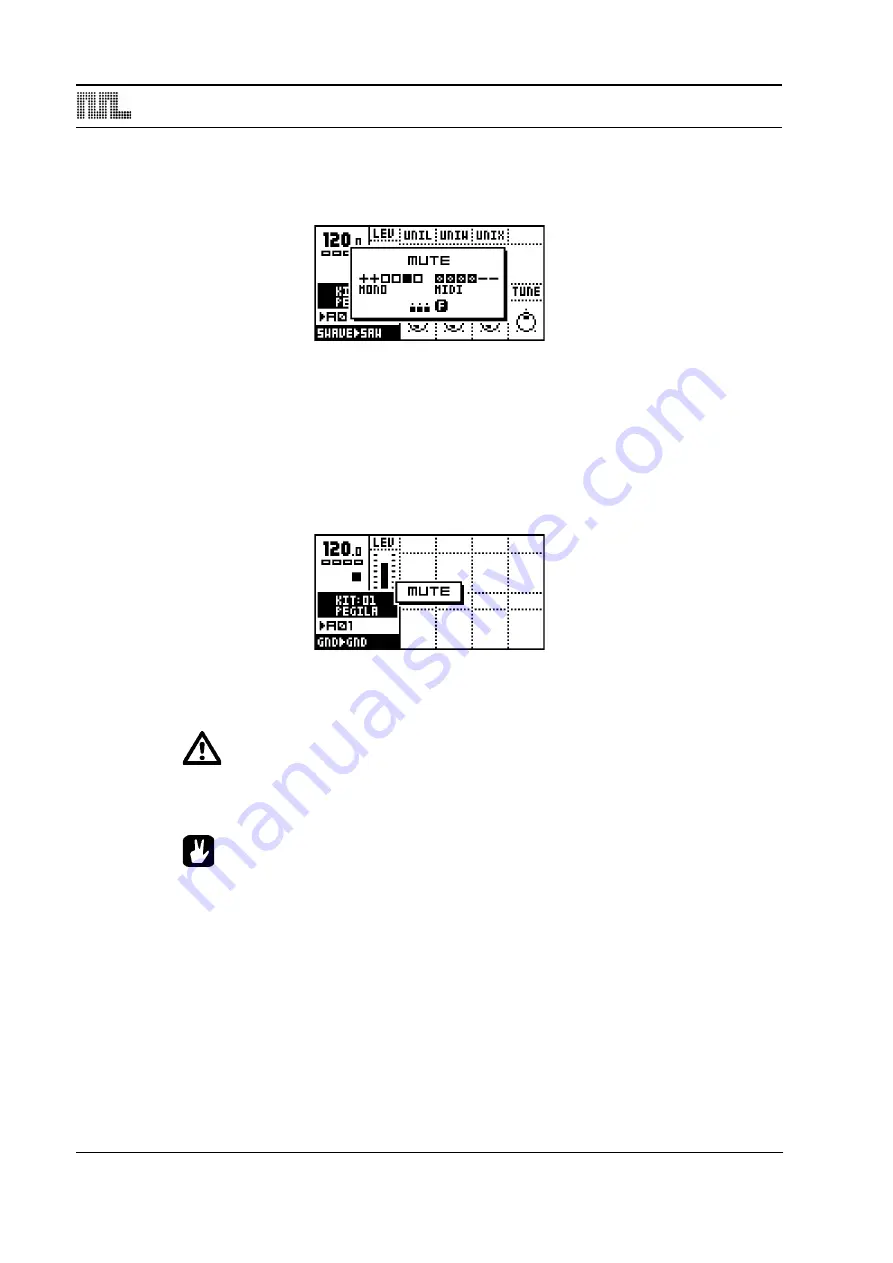
In addition to the <TRIG> LED’s, the Mute-state is indicated in the MUTE window. Boxes 
means that the track is un-muted, and a dash means it is muted. The <TRACK> LED’s will 
also be updated.

If you press the 

[TRIG]

 keys while holding 

[FUNCTION]

 the mute change is held until 

[FUNCTION]

 is released. A track that is currently muted but will be un-muted when 

[FUNC-

TION]

 is released is displayed as a “+” sign. A track that is currently not muted but will be 

muted when 

[FUNCTION]

 is released is displayed as an “X” sign.

MINIMISING THE MUTE WINDOW

While working in MUTE mode, the MUTE window hide large parts of the main interface 
screen. This can be disturbing if you want to work with mutes at the same time as access-
ing the sound parameters. 

To avoid this problem, the MUTE window transforms to a small centered window when a


DATA ENTRY

 knob is accessed while in MUTE mode. To return to the big MUTE window, 

press the 

[ENTER/YES] 

button.

The mute works on note level. That means that sounds already trigged will con-
tinue sound, but further trigs will be masked. This allows sounds to fade out in a 
natural way.

The track mutes are true global parameters, just like tempo. A muted track 
remains muted, even when the pattern is changed or song mode is entered or 
exited.

Mute settings are remembered between reboots.

Summary of Contents for SFX-6

Page 1: ......

Page 2: ... interference to radio or television reception which can be determined by turning the equipment off and on the user is encouraged to try to correct the interference by one or more of the following measures Reorient or relocate the receiving antenna Increase the separation between the equipment and receiver Connect the equipment into an outlet on a circuit different from that to which the receiver ...

Page 3: ... EXPLORING A PATTERN 1 12 DIFFERENT TYPES OF RECORDING 1 12 OVERVIEW OF GRID RECORDING MODE 1 12 OVERVIEW OF LIVE RECORDING MODE 1 13 PARAMETER LOCKS 1 13 MONOMACHINE OVERVIEW 1 15 CHOOSE YOUR WAY OF WORKING 1 15 SIX INDIVIDUAL TRACKS 1 15 SIX TRACK SEQUENCING 1 15 MIDI SEQUENCING 1 15 POLY MODE 1 15 MULTI TRIG MODE 1 15 MULTI MAP MODE 1 15 MONOMACHINE SYNTHESIS ARRANGEMENT 1 17 MONOMACHINE KITS 1...

Page 4: ...NV 1 43 THE PATTERN SEQUENCER 1 45 BASIC PATTERN OPERATION 1 45 PATTERN SELECTION 1 45 PATTERN CHAINING 1 46 SCALE SETUP 1 46 COMPOSING A PATTERN 1 47 RECORDING PREPARATIONS 1 47 GRID RECORDING 1 47 LIVE RECORDING 1 49 STEP RECORDING 1 50 NOTE COPY 1 50 CLEAR NOTE PARAMETER LOCKS 1 50 TRACK PAGE COPY 1 51 CLEAR TRACK PAGE 1 51 TRACK COPY 1 52 CLEAR TRACK 1 53 PATTERN COPY 1 53 CLEAR PATTERN 1 54 S...

Page 5: ...TH THE INTERNAL SEQUENCER 1 71 THE SONG MODE 1 73 LOAD SONG 1 73 SAVE SONG 1 74 SONG PLAY 1 75 SONG TRANSPORT 1 75 SONG EDITING 1 76 SONG EDIT TRANSPORT 1 77 SONG LOOPS 1 78 SONG JUMP 1 78 SONG HALT 1 78 SONG TRACK TRANSPOSE 1 79 SONG EXTRA 1 79 MONOMACHINE ROUTING 1 81 THE MONOMACHINE MIXER 1 81 THE FX MACHINES 1 81 USING THE AUDIO INPUTS 1 82 NEIGHBOUR ROUTING 1 83 MIX BUS ROUTING 1 84 ROUTING M...

Page 6: ...D UPGRADE 1 111 TECHNICAL INFORMATION 1 113 SPECIFICATIONS 1 113 DIFFERENCES BETWEEN THE MKI AND MKII MODELS 1 114 DESIGN 1 114 POWER SUPPLY 1 114 SNR RATIO AND OUTPUTS 1 114 USER WAVEFORMS 1 114 CREDITS 1 115 PRODUCT DESIGN AND DEVELOPMENT 1 115 INDUSTRIAL DESIGN 1 115 ADDITIONAL DESIGN 1 115 USER S MANUAL 1 115 FACTORY DEFAULT SOUND DESIGN 1 115 FACTORY WAVEFORMS 1 115 CONTACT INFORMATION 1 116 ...

Page 7: ...NES A 10 GROUND GND A 10 SINE WAVE SIN A 10 NOISE NOIS A 10 FX MACHINES A 12 THRU A 12 REVERB A 12 CHORUS A 13 DYNAMIX A 13 DYNAMIX TUTORIAL A 14 RING MODULATOR A 14 PHASER A 14 FLANGER A 14 APPENDIX B MIDI CONTROL REFERENCE MONOMACHINE MIDI SPECIFICATION B 1 NOTE ON NOTE OFF MESSAGES B 1 CONTROL CHANGE MESSAGES B 2 NRPN MAPPING B 5 OTHER MIDI MESSAGES B 6 APPENDIX C SYSEX REFERENCE INDEX ...

Page 8: ...6 of 6 ...

Page 9: ...ng knobs and but tons through the user interface These conventions are listed below Keys buttons are written in upper case with bold style and they are enclosed in brackets For instance the key function on the main panel is written FUNCTION Menu names certain modes and operations are written in upper case The SYNTHESIS menu is an example of that Setting alternatives are written in bulleted form Me...

Page 10: ...encer The Monomachine offers ground breaking sound synthesis machines divided into five Monosynths together with dedicated track effects The sound synthesis tracks are controlled with the world s most advanced pattern based sequencer inspired by the concept found in grid programmed drum machines KEEP IN MIND The Monomachine is a very multifaceted synthesizer Depending on how you choose to use it c...

Page 11: ... transferred to the Battery Backed Memory of the Monoma chine From here you can edit the patterns kits songs and globals of the Snapshot In the case of MKII models the Digibank associated with the Snapshot is transferred to the DSP Monomachine SFX 6 SFX 60 SFX 60 MKII SFX 60 MKII USER S MANUAL for operating system version 1 32 This manual rev H is copyright 2001 2012 Elektron Music Machines MAV AB...

Page 12: ...TA PAGE keys simultaneously to open the MULTI ENV window 6 TRACK keys 1 6 These keys are used for selecting which track is in focus of editing The secondary function is to mute or activate the track The TRACK LED s are located to the left of the TRACK keys These indicate which tracks are active or muted and also which track is in the editing focus The LED colours indicate the following Green Activ...

Page 13: ...lect the pattern A01 H16 indicated by the label of the BANK key and the BANK GROUP LED s The secondary functions are to edit the track settings for the arpeggiator and the transpose swing and slide functions 16 REC PLAY STOP keys The REC key is used for toggling GRID RECORDING mode on off PLAY Initiates playback of a pattern or song Pressing PLAY a second time pauses playback Press PLAY while hold...

Page 14: ...state of the MULTI TRIG mode is being indicated by the MULTI TRIG LED above The secondary function of this key is to toggle the MULTI MAP mode MULTI MAP mode is indicated by the MULTI TRIG LED flashing Read more about these modes of operation in the sec tion MULTI TRIG on page 41 4 OCTAVE keys Control which octaves the keyboard is playing and which notes are represented on the KEYBOARD LED s 5 KEY...

Page 15: ...ong inlet IEC320 C8 Using the wrong type of adapter may result in damage to your unit Damage caused by the use of incorrect power supply is not covered by warranty If you are unsure about your power supply please con tact Elektron support Note that the MKI models require a different power supply compared to the MKII models Please see DIFFERENCES BETWEEN THE MKI AND MKII MODELS on page 114 for deta...

Page 16: ...us additional space needed to accommodate for cables plugged into the unit at the back RACK MOUNT KIT ASSEMBLY Make sure that you use a Philips screwdriver of the right size and in good condition Use the included M3x6mm size screws to secure the rack mount consoles on each side of the Monomachine Make sure that all screws are fastened for secure operation of the unit CONNECTING THE UNIT Follow the...

Page 17: ...play to avoid scratches or damage Also avoid applying any pressure to the display itself When transporting the Monomachine try to use the box in which it was originally shipped with the padding supplied or equivalent packaging Make sure that you place the unit on a stable surface before use If you mount the unit in a rack be sure to tighten all four screws in the rack mount holes The memory used f...

Page 18: ...age 5 The playback recording status shown by the standard record play pause and stop symbols and 6 Name and number of the current kit 7 The index of the current pattern ranging from A01 to H16 8 Specification of the Mono synth and machine of the track in focus LAYER EDIT AND WINDOWS When a function which puts a window on top of the main interface screen is opened the function of certain buttons an...

Page 19: ... for more information on the MIDI channel assignment of the Monomachine SELECTING AND PLAYING A PATTERN 1 Verify that the PATTERN LED is lit and the SONG LED is not If this isn t the case press the PATTERN SONG 2 Check the BANK GROUP LED to see if bank group A D or E H is active If needed press BANK GROUP key to toggle the active bank group For this demonstration use group A D 3 To select pattern ...

Page 20: ...e selection or track effect settings If you don t hear anything try selecting another track 6 Use the DATA PAGE keys to navigate between the DATA pages The DATA PAGE LED s will indicate the current selection Select the SYNTHESIS page 7 Now turn any of the DATA ENTRY knobs to tweak the machine synthesis parameters on the selected track You can change any parameters without fear of losing presets or...

Page 21: ...d hold RECORD and then PLAY You can now play notes on the track you want to record using either the TRIG or a keyboard All played notes will be quantised to the closest trig step If a note is played on a position where there already was a note programmed the new note will replace the note on that step To erase notes in LIVE RECORDING mode hold EXIT NO while the notes you want to remove are heard T...

Page 22: ...at track with the TRACK button and repeat the steps above To remove a single lock in GRID RECORDING mode press and hold the TRIG key and click the knob connected to the parameter you wish to remove You will see that the inverted square around the parameter is removed To remove all parameter locks for a trig hold the TRIG key and press CLEAR The locks are also cleared when the note is removed ...

Page 23: ...al sound generating machines and sound and effects settings Using the Monomachine this way offers you access to six inde pendent tracks of monophonic synthesis All tracks can also be externally controlled by their assigned MIDI channels if preferred SIX TRACK SEQUENCING The six tracks can be controlled by the Monomachine sequencer In addition to the tradi tional pitch and note on off commands it a...

Page 24: ...MONOMACHINE OVERVIEW 16 FIGURE 1 Monomachine sound synthesis overview ...

Page 25: ...amily do not generate sounds but offer effects for other tracks Description of Mono synths and their parameters are covered in Appendix A Each of the six tracks can have any machine assigned to it The assignment of machines and their parameter settings are collected in kits Editing the kits is discussed in section KIT EDITING on page 22 All six tracks have their dedicated effect modules The track ...

Page 26: ...confusing at first Hopefully after some time of use you will appreciate the flexibility and ease of use of the Monomachine implementation THE LINK BETWEEN KITS AND PATTERNS Each pattern with data is associated with a certain kit which will be recalled when the pat tern is played This way you know playing a certain pattern always gives the same result and that the parameter locks make sense Be care...

Page 27: ...sociated with any pattern are distinguished by a little star after the kit name The kit currently loaded is indicated by an inverted selection box The focus when moved away from the kit currently loaded is a hollow square box LOADING AN EMPTY KIT To get a clean kit open the KIT LOAD window as described above and load a position where no kit was previously saved The empty positions are indicated wi...

Page 28: ...e 5 Pressing the FUNCTION key gives access to the high score selection method in which you see all characters at the same time Keep the FUNCTION key held while navigating using the ARROW keys Release the FUNCTION key when you have located the letter of your choice 6 When the kit name is complete press ENTER YES to save it 7 If you want to exit without saving the kit press EXIT NO UNDO KIT There is...

Page 29: ...1 When you are in either the KIT SAVE or KIT LOAD menus select the kit you want to copy hold down the FUNCTION key and press the RECORD button A message say ing COPY KIT appears 2 Use the UP and DOWN keys to scroll to the slot you want to copy the kit to 3 To paste the kit into the slot hold FUNCTION and press the STOP button The mes sage PASTE KIT appears If you want to undo the action press the ...

Page 30: ...for changing the machine for the active track and for specifying audio bus routing For FX machines you also select the audio input routing for the machine Read more about FX machines and routing in section MONOMACHINE ROUTING on page 81 The TRACK LED s indicate which track you are editing and it is also displayed in the name bar at the top of the window To change the track in focus use the TRACK k...

Page 31: ...ocus to the inverted box COPY MACHINE You can copy one machine and its settings from one track to another It is also possible to copy the current machine and its settings to another kit 1 In the EDIT KIT menu press and hold FUNCTION and then press RECORD A mes sage saying COPY MACHINE appears 2 The settings are placed in the machine copy buffer Now you can either change track using the TRACK keys ...

Page 32: ...message saying CLEAR MACHINE appears 2 A track that you have used the clear machine function on will be displayed like this The clear machine operation can be undone by performing the operation one more time A message UNDO MACHINE will be shown in the display SETTING THE MIX BUS The Mix bus settings are used for routing the track to the three individual mix busses It is also used for routing audio...

Page 33: ...wse through the seven available DATA pages The DATA PAGE LED s will indicate the current focus and the visual parameters will be updated depending on the focus Turn the DATA ENTRY knobs The corresponding visual parameter on the LCD screen should be updated accordingly Press and turn the DATA ENTRY knobs for accelerated editing Just press it to see the numerical value of the parameter If you want t...

Page 34: ...track The level is designed as a master level control that can not be parameter locked or assigned as a destination for the LFO s If you want to change the volume of a track use the track volume parameter on the AMPLIFICATION page See section TRACK VOLUME on page 28 for more information on this parameter AMPLIFICATION PAGE In the Amplification page you find the controls for the amplifier envelope ...

Page 35: ...using the sequencer as it allows you to skip setting NOTE OFF events in normal use If you want to simulate ADSR behaviour you can use the ramp and exp shapes of the LFO s with the VOL as destination parameter DISTORTION Used for adding distortion to a track DIST distortion controls the signal overload distortion The distortion is applied as an inte grated part of the filter and controls part of th...

Page 36: ... decreased signal quality with increased noise Therefore we allow you to adjust the distortion to allow for the headroom your sound needs FIGURE 2 Simplified visualisation of headroom and distortion TRACK VOLUME This volume control is separate from the LEV overall gain control Track volume can be parameter locked and controlled by the LFO system VOL volume controls the volume of the track ...

Page 37: ...effect of a slow pitch glide to the next note PORT portamento specifies the time it takes for the pitch to slide between any two notes See also section TRIG TRACK SETTINGS on page 40 for information on the Trig Porta mento setting in the KIT TRIG menu Use the parameter lock feature in the sequencer to control the portamento speed individually for separate notes See also section TRIG TRACK SETTINGS...

Page 38: ...ut off parameter of a high pass filter WDTH filter width controls the filter gap width that is the distance between the high pass and low pass cut off frequencies When the BASE is set to its minimum value the WDTH parameter functions as the cut off parameter of a low pass filter HPQ high pass filter Q controls how much the volume is boosted around the high pass cut off frequency LPQ low pass filte...

Page 39: ...K and DEC To make a familiar synth bass low pass filter bump each time the note is trigged set the WDTH to around 64 and turn up the WOFS to around 32 Then turn the LPQ up until you get the amount of Low Pass filter Q you prefer FILTER TRACKING The filter normally tracks the pitch of the note played The high pass filter starts cutting two octaves under the base pitch when the BASE parameter is set...

Page 40: ...you notice signal overload when you boost the signal you might need to increase your headroom by decreasing the DIST parameter on the Amplification page Please see section DISTORTION on page 27 for more information SAMPLE RATE REDUCTION The sample rate reduction effect resamples the signal at a lower sample rate introducing aliasing effects which gives a digital lo fi effect SRR sample rate reduct...

Page 41: ...and positive values for ping pong delay DTIM delay time controls the delay time of the delay loop The actual delay time is relative to the current tempo and it is measured in 256th notes For instance for a one beat delay four 16th notes delay time should be set to 64 When changing the DTIM parameter or changing the tempo you will hear the contents in the delay loop speed up or down to adjust to th...

Page 42: ...nd DWID parameters you can make the delay echoes sound sequentially different as the sound goes round the delay loop Good for dub inspired delays Watch your tweeters and ears Feedback values below 64 will cause the sound in the delay loop to diminish over time but values above 64 will cause the sound to grow until maximum audio level is reached and then distort DELAY FILTER DBAS FILTER BASE DWID F...

Page 43: ...er from the DATA page chosen by the PAGE that is modulated All seven DATA pages plus the MIDI sequencer are accessible by the LFO s There s also a special pitch page PTCH If the DEST is PTCH 8 destinations are available offering various ranges to allow for both subtle vibrato and full range frequency sweeps TRIG trig mode is an important parameter for getting the most out of the LFO s The trig mod...

Page 44: ...32 64 or 127 For example setting the MULT to 2x and SPD to 64 gives a cycle time of sixteen 16th notes one full page INTL interlace is a function taken straight from the Sidstation Interlace is the process of alternating the LFO waveform with zero The speed of the zero alternating cycles is con trolled by the INTL parameter The interlace is switched off when set to zero DPTH depth is the amount of...

Page 45: ...g an LFO control a parameter of another one In the Monomachine you can sequence LFO trig separately from other trigs Check page 58 for more information on the trig tracks Interlace can be particularly interesting to use with trigged ramps with pitch as destination for creating glittery rain style effects For arcade game sounds use a saw LFO with a DPTH of 127 a MULT of 64x and modulate PTCH set to...

Page 46: ...settings made here are applied per track Select which track you want to edit the assign for with the TRACK keys All tabs have two rows with three parameters in each in common PAGE page selects between the seven DATA pages plus the special pitch destination just as on the LFO s DEST destination parameter allows to select one of the eight parameters in the DATA page chosen by the PAGE parameter ADD ...

Page 47: ...e right direction and inverted for the left The JOY U D tab has the same function as the JOY R L just described but controls the assign for the up and down directions of the joystick Information for the Monomachine tabletop versions and for controlling the SFX 6 externally The Joystick is mapped to Pitch bend for left and right directions Modulation Wheel CTRL CHANGE 1 for upward direction and Bre...

Page 48: ...f the low pass filter if set to OFF TRIG TRACK SETTINGS The trig track settings is a group of parameters which affect the way certain aspects of the sound in the track are trigged 1 You find the TRIG window in the KIT menu Press the KIT key and navigate to the TRIG icon using the ARROW keys 2 Press ENTER YES to enter the TRIG TRACK menu In the TRIG TRACK window you will find five parameters Naviga...

Page 49: ... TRIG mode on the SFX 6 or the Multi Trig MIDI channel see MULTI TRIG on page 90 for more information you can make advanced monophonic arrangements All tracks can unite their efforts in creating one dynamic sound and the sequencer can be part of the arrangement 1 Press the KIT key and navigate to the MULTI trig icon using the ARROW keys 2 Press ENTER YES to enter the MULTI TRIG window Navigate bet...

Page 50: ...con trol which tracks will be devoted to the upper and the lower part of the keyboard and where the split point is located on the keyboard The TRACK parameter controls which will be the first track to be controlled by the upper part of the keyboard All tracks above this one will be controlled by the upper part and the rest by the lower The KEY parameter controls which key is the first to control t...

Page 51: ...or the tracks that then are activated in parallel from the Multi Trig channel MULTI ENV The multi envelope is an additional envelope applied to all the tracks in the MULTI TRIG modes excluding the SPLIT mode You reach it by pressing both the DATA PAGE keys simultaneously The multi envelope is a standard ADSR envelope that is applied on top of the track enve lopes allowing all the tracks to be trea...

Page 52: ...slide between two different notes Sound played on the individual tracks while the multi trig is active will be under the influence of the multi envelope so the sound level might be lower than usual If you prefer to let the effect of the Multi Env be inaudible apply settings of ATK 0 DEC 127 SUS 127 and REL 127 ...

Page 53: ... SFX 6 only 3 For external control we recommend using the MIDI auto track channel see AUTO TRACK CH on page 90 On the tabletop versions you can use an external MIDI key board on this channel when we refer to the keyboard PATTERN SELECTION The Monomachine offers 8 banks with 16 patterns in each The banks are named by the index A B C D E F G H The BANK GROUP key selects between pattern bank groups A...

Page 54: ...ximum of four pages All tracks share the same scale length and are always played in sync In GRID RECORDING The SCALE key is used to cycle between the active pages and the TRACK PAGE LED s indicate which one is currently being edited When not in GRID RECORDING mode the LED s for the available pages for the track are lit with a steady light The LED for the page currently playing is flashing Press th...

Page 55: ...take you through the details how to create a pattern in GRID RECORD ING LIVE RECORDING and STEP RECORDING mode RECORDING PREPARATIONS Follow the steps below before continuing with any pattern composing 1 Close all windows that might be open using the EXIT NO key 2 For SFX 6 Check that the MULTI TRIG LED is unlit Press the MULTI TRIG key to switch it off if needed 3 Check that one and only one of t...

Page 56: ...thods for adjusting the pitch of a trig You can either press a key on the keyboard while holding the TRIG key to set the pitch indicated by the keyboard key You can also use the ARROW keys to adjust the pitch programmed while holding the TRIG key Holding FUNCTION while pressing the RIGHT or LEFT key adjusts the pitch one full octave up or down 7 You can set NOTE OFF trigs by pressing the TRIG key ...

Page 57: ...RN COPY on page 53 LIVE RECORDING The second method of recording notes in the sequencer is by recording them live while playing You can record both from the keyboard and the TRIG keys 1 Begin with following the instruction in section RECORDING PREPARATIONS on page 47 2 To start recording in LIVE RECORDING mode hold RECORD while pressing PLAY This starts the sequencer recording and the record LED w...

Page 58: ... NOTE OFF press ENTER YES to clear a note Use the step recording method as an experimental way of creating patterns Inter esting results can be had NOTE COPY It is possible to copy a note trig complete with all parameter lock settings and paste it to a new location in the track 1 Make sure you are in GRID RECORDING mode indicated by the RECORD LED giv ing off a steady light 2 Press and hold the no...

Page 59: ...ct which page you want to copy by pressing the SCALE SETUP key 3 When you have chosen the page you want to copy hold the SCALE SETUP key and press REC The message COPY PAGE page will appear 4 Select the pattern page you want to paste the copied page into by pressing the SCALE SETUP key Paste the data by holding SCALE SETUP and then pressing the STOP key A message saying PASTE PAGE will be shown in...

Page 60: ... off a steady light Select the source track pressing the appropriate TRACK key 2 Press REC while holding FUNCTION to copy the data of the track The message COPY TRACK will be shown in the display 3 Select the destination track using the TRACK wheel 4 Paste the data by pressing and holding FUNCTION and then pressing the STOP key A message saying PASTE TRACK will be shown in the display The track da...

Page 61: ... another pattern location follow the steps below 1 Make sure that the RECORD LED is not lit so you are not in GRID RECORDING mode 2 Select the source pattern by using the BANK and TRIG keys Hold FUNCTION and then press REC A message COPY PATTERN will be shown in the display 3 Choose the pattern where you wish to paste your pattern data 4 Paste the data by holding FUNCTION and then pressing the STO...

Page 62: ...erforming the clear pattern opera tion one more time The message UNDO PATTERN will be shown in the display Pattern clear clears everything except the kit association SUPER COPY For track pattern and machine copy operations the default copy behaviour can be replaced by the super copy function 1 Hold the FUNCTION and REC for around a second and the default message box will expand to a larger one inc...

Page 63: ... one more time The message UNDO PATTERN will be shown in the display if a pattern has been copied SUPER CLEAR For track pattern and machine clear operations the default clear behavior can be replaced by the super clear function 1 Hold the FUNCTION and PLAY for around a second and the default message box will expand to a larger one including a selection box 2 You can now release FUNCTION while hold...

Page 64: ... the tap tempo window You can continue tapping the TEMPO key and the taps will be used for refine the average tempo A maximum of 16 tempo taps are considered EXTERNAL SYNCHRONISATION The Monomachine can be set to either internal or external synchronisation When in inter nal clock mode the Monomachine can output a high quality MIDI clock through the MIDI OUT port This can be used for keeping extern...

Page 65: ...ow be firmly lit 3 Press and hold a TRIG key for the step where you want to add a lock Note that if there is a trig already set for the step it is not removed if you keep the TRIG held down until you see the mini keyboard 4 While holding the TRIG key you can now tweak the parameter of your choice with the appropriate DATA ENTRY knob You can tell that the parameter has been locked by the parameter ...

Page 66: ...PLAY This starts the sequencer recording and the record LED will start flashing 3 Record parameter locks by adjusting the corresponding DATA ENTRY knob while the sequencer is playing and recording When changing a parameter the parameter lock will be set to the next trig step played on the track If a parameter is not changed between two trigs no parameter lock will be recorded for that step 4 To re...

Page 67: ...et for the trig track selected but on some other trig track or if it has a Trigless Trig see section TRIGLESS TRIGS on page 59 For example a FILTER trig will be indi cated with a green TRIG LED when the AMP trig track is active given an AMP trig is not placed on the same step When Trig Track ALL is selected the TRIG LED s are lit red if a trig is set on all AMP FILTER and LFO Trig Tracks If one or...

Page 68: ...THE PATTERN SEQUENCER 60 FIGURE 7 Trig track illustrations ...

Page 69: ... the default value OFF to either KEY SID or ADD OFF Deactivates the arpeggiator KEY The arpeggiator operates on the keys currently played This is the way an arpeggiator traditionally works When the first note is pressed the arpeggiator is acti vated and start playing the note repeatedly with the timing specified by the SPD parame ter When more notes are added the arpeggiator cycles between playing...

Page 70: ...hord has played 1 means one step before the end of the chord 2 means two steps before the end of the chord and so on To activate the arpeggiator in a track enter chords To activate the arpeggiator on the Monomachine tabletop versions you can hold FUNCTION while pressing the TRIG keys Copy clear paste and undo functions are available to the arpeggiato settings using FUNCTION REC PLAY STOP To create...

Page 71: ...f length The LEVEL knob is used for adjusting the length of the track The length is indicated by the TRACK LED s being lit up Green LED s indicate that the arpeggiator is active for the step Red LED s will be will mute out the arpeggiator for that step Use the TRIG keys for switching the steps By holding a TRIG key and using the UP and DOWN keys you can adjust the note off sets for the active step...

Page 72: ...ose is used for transposing No KEY value can be set MAJ The transposed notes are kept within the Major scale specified by the KEY value MIN The transposed notes are kept within the Minor scale specified by the KEY value KEY key is only available for certain SCALE selections and defines in which key the MAJ and MIN scale selections will be Set SCALE to FIX for tracks playing percussive sounds If th...

Page 73: ...le swing for a 4 4 normal speed pattern In double speed mode see page 55 you need to modify the swing pattern to get the same result as was given by the default swing pattern in single speed mode activate swing for every fourth note starting with the third note Please check figure Swing example below for an example of the swing effect with differ ent swing amount and swing track settings The first...

Page 74: ...ide is always com pleted exactly when the next step with the same parameter locked is reached Only parameters locked on the steps selected in the slide track and on a later step will slide Parameters that are unlocked or only locked at one step will not slide If there are trigs in between the two locked parameter where the parameter is not locked the parameter will slide between the two locked pos...

Page 75: ...the MUTE window by pressing BANK while holding FUNCTION The six first boxes refer to the six internal Monomachine tracks In the window above all tracks are un muted The six last boxes refer to the six MIDI sequencer tracks Toggle the Monomachine tracks between muted and un muted using TRIG keys 1 6 The MIDI sequencer tracks are reached through the TRIG keys 9 14 A muted track will be dis played as...

Page 76: ...While working in MUTE mode the MUTE window hide large parts of the main interface screen This can be disturbing if you want to work with mutes at the same time as access ing the sound parameters To avoid this problem the MUTE window transforms to a small centered window when a DATA ENTRY knob is accessed while in MUTE mode To return to the big MUTE window press the ENTER YES button The mute works ...

Page 77: ...lding FUNCTION to enter POLY mode The POLY mode is indi cated by both the PATTERN and SONG LED s being lit In POLY mode all six Monomachine sound engines polyphonically generate the sound of only one track All tracks beside the one currently selected with the TRACK keys are dis abled The currently selected track instead offers six notes of polyphony In POLY mode the internal sequencer operates pol...

Page 78: ...eys to select the MIDI track you wish to edit Note that MIDI tracks are muted separately from the internal tracks with the TRACK keys while holding FUNC TION or through the special MUTE mode interface see section THE MUTE MODE on page 67 To use the MIDI sequencer you need to connect the MIDI OUT port of the Monomachine to the MIDI IN port of another MIDI device The external MIDI device needs to li...

Page 79: ...r more information COMPARISON WITH THE INTERNAL SEQUENCER The MIDI sequencer tracks function to some degree like their internal counterparts Below is a list of similarities and differences The MIDI sequencer tracks do not offer any trig tracks since MIDI does not allow for such type of extended control The MIDI sequencer offers six additional arpeggiators with individual settings but they do not o...

Page 80: ...OVER VIEW OF GRID RECORDING MODE on page 12 The Monomachine makes distinction between MIDI sent out of the unit and MIDI received Even if the same MIDI channel is selected for one track of the MIDI sequencer and the one track of the internal sequencer the MIDI sequencer will not control the internal sounds as the MIDI sequencer data is only going out through the MIDI OUT As the MIDI sequencer trac...

Page 81: ...4 song slots To enter SONG mode by press the PATTERN SONG key so that the SONG LED is lit The screen will change to make room for the song list LOAD SONG 1 To load a song you first need to open the SONG window by pressing the KIT SONG key 2 Use the ARROW keys to move the focus to the LOAD icon and press ENTER YES 3 Choose the song you wish to load by using the UP and DOWN arrow keys Press ENTER YE...

Page 82: ...ters using the UP and DOWN arrow keys or by using the LEVEL knob The LEFT and RIGHT keys move the cursor backwards and forwards on the line 5 Holding the FUNCTION key gives access to the high score selection method in which you see all characters at the same time Keep the FUNCTION key held while navigating using the LEFT RIGHT UP and DOWN buttons Release the FUNC TION key when you have found the r...

Page 83: ... position indicators at the left and right of the song list They are shaped as two arrows Press ENTER YES to move the playback position to the position of the arrows 2 The arrows will flash and alternate between flashing toward the row and in the direction of the current song position When a song row is repeated the number of remaining repeats flashes to the right of the current pattern index 3 On...

Page 84: ...and DOWN keys to select the song row you wish to edit The LEFT and RIGHT keys allow you to move the focus between columns The LEVEL knob alters the value of each setting ROW song row is the amount of steps the song consists of A song can consist of a max imum of 200 rows The song is played from row 0 to the end row PAT pattern is the column which shows which pattern is assigned to the row Set the ...

Page 85: ...settings XTRA song extra column can be used for setting song row mutes and song row BPM If any mute is set for the row it is indicated by a bold M in the XTRA column If a new BPM is set for the row it is indicated by a bold B Press ENTER YES to enter the SONG EXTRA menu Please see section SONG EXTRA on page 79 for more information To insert a row in the song use FUNCTION together with the DOWN key...

Page 86: ... the loop should be repeated Loops can be nested that is loops within other loops A set of infinite loops can be very useful in a live setting With a set of infinite loops the song transport functions can be used to jump between the looping pat terns SONG JUMP A loop can be converted into a forward jump Insert a jump by turning the LEVEL knob so that the number of the second loop row becomes a num...

Page 87: ...tween the song rows Press EXIT NO to exit the SONG TRACK TRANS POSE window TRN pattern transpose control the pattern transpose TR1 6 track 1 6 transpose controls the individual track transpose for the six internal Mon omachine tracks The six parameters on the MIDI row control track transpose for the six MIDI sequencer tracks The track transpose settings made are only valid on that particular row I...

Page 88: ...ing the assigned BPM value To remove the BPM value turn the LEVEL knob so that the lowest possible value is selected You will then see printed in the BPM tab If no BPM value is set for the step the current tempo is used If a song does not have any tempo settings the current tempo is used for the full song The global mutes applies as well as the song row mutes Tracks muted in the glo bal mutes as d...

Page 89: ...e end of the mix bus the sound is by default sent to the audio output pairs AB CD and EF If no FX Machines are used the mix bus selection simply selects the audio stereo output s the track will be sent to In the example above the synthesis tracks are sent to different audio outputs so further external audio processing is possible for the individual tracks The third track is sent to two outputs THE...

Page 90: ... track effects Assign the THRU machine to a track 4 Use the LEFT and RIGHT keys go to the INPUT parameter field and select INP A INP B or INP AB Please note that the INPUT parameter field does not appear until an FX machine is selected with ENTER YES INP A Monophonic audio is used from Audio Input A INP B Monophonic audio is used from Audio Input B INP AB Stereo audio is used from Audio Input A an...

Page 91: ...hine One of the modes for this is the NEIBOR mode To use this mode set track number two or higher to use an FX machine and set INPUT to NEIBOR In NEIBOR mode the output of the previous track is used directly and fed into the input of the FX machine of the current track Only the input of one track is used for the input but NEIBOR FX machines can be chained In the example above all audio outputs are...

Page 92: ... in the audio outputs with the same names The tracks are mixed in the same order as their index with track 1 first The contents of the mix bus can be used as input for the FX machines If the same bus is used for input and output the FX is applied as an insert effect If another bus is used to out put the FX output is mixed into the track normally just like synthesis machines In the example above al...

Page 93: ...or the headphones which carry the same signal you will not hear what is sent to the CD and EF outputs By setting the global routing see section ROUTING on page 89 to 3xSTEREO AB MIX the CD and EF buses will be added to the stereo main AB headphone outputs ROUTING MODE 6xMONO By setting the global routing see section ROUTING on page 89 to 6xMONO the AB CD and EF mix buses will not be sent to the au...

Page 94: ...chines the FX machines need to be trigged before they make any sound The track effects are active as always so if you want the sound to go through without decaying you need to set the DEC and REL parameters to their maximum values 127 4 5 4 4 4 5 4 4 9 063 4 5 4 4 4 5 4 4 9 063 5 9 5 9 5 9 5 9 5 9 5 9 065 065 065 065 065 065 9 9 9 ...

Page 95: ... receive DigiPRO waveform manager MIDI sequencer settings 1 Press FUNCTION and then PATTERN SONG to open the Global slot selection menu 2 Use the ARROW keys for navigating to the Global slot you wish to use and press ENTER YES to select it If it was already selected you have now also entered the Glo bal menu for the slot If not press ENTER YES one more time to enter it It is possible to copy paste...

Page 96: ...ant use The Monomachine defaults to x10 but this value can be lowered should it be needed Press the ENTER YES button to start to negotiate The CURRENT SPEED value will display the change of the MIDI transfer rate If you link two Monomachines together where one of them is a MKI model you might not be able to get a CURRENT SPEED value exceeding 6 7x AUDIO Here you set the master tune as well as the ...

Page 97: ...o mono The tracks are then sent directly to each of the audio outputs Track 1 is sent to output A Track 2 to output B and so on Please see section MONOMACHINE ROUTING on page 81 for detailed information on the Monomachine routing possibilities CONTROL The Monomachine is designed to fit well into a MIDI environment It is well equipped for controlling other units using the MIDI sequencer the MIDI re...

Page 98: ...on page 41 for more information Output data on this channel can only be generated from the keyboard of the SFX 6 when MULTI TRIG Mode is selected MULTI MAP CH multi map channel controls the multi map functionality as described in section MULTI TRIG on page 41 Output data on this channel can only be generated from the keyboard of the SFX 6 when MULTI MAP Mode is selected AUTO TRACK CH auto track ch...

Page 99: ...d DOWN keys Change the parame ter values using LEFT and RIGHT SEQUENCER controls whether MIDI data of the sequencer should be sent to the internal synthesizer tracks MIDI OUT or both ARP controls whether MIDI data of the arpeggiator should be sent to the internal synthe sizer tracks MIDI OUT or both KEYBOARD controls whether MIDI data of the keyboard and joystick SFX 6 only should be sent to the i...

Page 100: ...e changed Read more on how to set the base channel in section MIDI CHANNELS on page 89 CONTROL IN In this menu it is defined how the Monomachine should react to incoming MIDI 1 Select the CONTROL in the GLOBAL menu Then select CONTROL IN using the ARROW keys and press ENTER YES TEMPO SYNC defines how the Monomachine should react to incoming MIDI clock When this parameter is set to EXTERNAL the Mon...

Page 101: ...settings on the row Navigate in the keymap using the ARROW keys Adjust the settings using the LEVEL knob RANGE is a column where the upper and lower key range limits for the keymap range is controlled Only the upper range limit can be set The lower range limit is set one key higher than the previous keymap range upper limit Adjusting the upper range limit will update the lower range limit for the ...

Page 102: ...er 32 parame ter steps VELOCITY CURVE changes the responsivity of the SFX 6 keyboard There are three set tings LINEAR is the default setting The harder you press the higher the velocity value SOFT applies a logarithmic curve to the velocity response This means you won t have to press the keys especially hard to obtain high velocity values FIXED allows you to set a fixed velocity The velocity will ...

Page 103: ...re It is used to manage your waveforms SYSEX SEND This menu is used for sending all or part of the patterns songs kits and global slots 1 Select FILE in the GLOBAL menu Then select SYSEX SEND using the ARROW keys and press ENTER YES Use the RIGHT and LEFT keys to move between the tabs Use the UP and DOWN keys to change the parameters The LEVEL knob can also be used for setting the ranges SELECTION...

Page 104: ...to the device you are sending the data to See the figure below for an example of what the connections could look like when sending sysex data to a computer 2 Select FILE in the GLOBAL menu Then select SYSEX SEND using the ARROW keys and press ENTER YES 3 Select the preferred data send method using the UP and DOWN arrow keys 4 If the selected send method has the option to select a range or a specif...

Page 105: ...the transfer by pressing EXIT NO To ensure that your data was received and stored correctly use the SYSEX VER IFY function found in the SYSEX RECV menu You can always cancel the SYSEX SEND operation by pressing the EXIT NO but ton Use the TM 1 MIDI interface available from Elektron for up to 10x the normal MIDI transfer speed SYSEX RECEIVE The SYSEX receive function makes it possible to restore pr...

Page 106: ...eived is only verified to be correct it is not stored in mem ory Using this method it is not possible to select any start positions in the WRITE POS FROM window WRITE POS FROM is only available when the SPEC method of recieval is chosen After selecting SPEC in the MODE tab enter the WRITE POS FROM tab using the RIGHT key then use RIGHT and LEFT key to move between the parameters Adjust the start p...

Page 107: ...displayed on screen Use the TM 1 MIDI interface available from Elektron for up to 10x the normal MIDI transfer speed DIGIPRO MANAGER MKII UNITS ONLY This menu is used to send receive erase and rename waveforms A set of 64 factory waveforms comes preinstalled but they are replaceable by user waveforms When you want to upload your own waveforms there are a couple of things you need to know that will...

Page 108: ...sfer several wave forms to specified waveform slots To receive waveforms using the ORG method follow the instructions below 1 First of all make sure that the MIDI cables are properly connected The MIDI OUT of the sending device should be connected to the MIDI IN port of the Monomachine To send waveforms from a computer you can use our free C6 program found on the Elektron homepage If loading a wav...

Page 109: ...an use our free C6 program found on the Elektron homepage If loading a wav or aiff file don t forget to convert it to a DigiPRO syx file in C6 before sending it 2 When in the DIGIPRO MGR choose RECEIVE and then press the RIGHT arrow key to move the focus to the POS NAME column Place the focus on the position you want to store the waveform or waveforms by using the UP and DOWN keys 3 Press ENTER YE...

Page 110: ...hould be connected to the MIDI IN port of the receiving device To receive waveforms to a computer you can use our free C6 program found on the Ele ktron website 2 When in the DIGIPRO MANAGER choose SEND and then press the RIGHT arrow key to move the focus to the POS NAME column Choose ALL 3 Put the receiving device into a waiting state ready to receive data 4 Press ENTER YES to make the Monomachin...

Page 111: ...n for up to 10x the normal MIDI transfer speed ERASE WAVEFORMS You can erase either all waveforms at once or just a single waveform When a user wave form is erased it will be replaced by the factory waveform stored on that particular position You can not erase the factory waveforms To erase all waveforms follow the instructions below 1 When in the DIGIPRO MGR choose ERASE and then press the RIGHT ...

Page 112: ... can have up to four characters It is not possible to rename the factory waveforms Follow the instructions below to rename a waveform 1 When in the DIGIPRO MGR choose RENAME and then press the RIGHT arrow key to move the focus to the POS NAME column Choose the waveform you want to rename by pressing the UP and DOWN keys 2 Press ENTER YES A window where you will be able to rename the waveform will ...

Page 113: ...in relation to the Battery Backed Mem ory in the section DRIVE FEATURES on page 3 1 Select the FILE row in the GLOBAL EDIT menu Then select DRIVE and press ENTER YES QUICK MODE decides the behavior of the QUICK MODE menu The setting is truly global and will not be changed when changing Snapshots The QUICK MODE menu allows you to load Snapshots efficiently Access the QUICK MODE menu by holding down...

Page 114: ... erase the Snapshot loaded in the Battery Backed Memory However any user waveforms in the Digibank loaded in the DSP will be cleared immediately and replaced with factory waveforms At the bottom of the DRIVE SETTINGS menu you will see how many Snapshots and Digibanks your unit contains The NEGOTIATE setting in the TURBO menu will just like the QUICK MODE setting stay the same no matter what Snapsh...

Page 115: ...de of the menu window UNLOCK reverts a locked Snapshot to the default unlocked status Copy Clear Paste commands are available in the SNAPSHOT MANAGER menu Warning No Undo command is available in this menu For faster scrolling in the list hold down the FUNCTION button and press the UP DOWN arrow keys To the right under the camera icon you can see which Digibank that is linked to the Snapshot If you...

Page 116: ...ION button and press the UP DOWN arrow keys It s possible to copy DigiPro user waveforms between Digibanks Open the DIGIPRO MGR in the FILE menu Select the user waveform you want to copy and press FUNCTION REC to copy it Load a new Digibank Enter the DIGIPRO MGR select the position to which you want to paste the user waveform Press FUNCTION STOP to paste the user waveform No undo function is avail...

Page 117: ...assign on which MIDI channels the six MIDI sequencer tracks send data CL1 4 control change 1 4 controls which MIDI CC commands that should be availabe for the MIDI sequencer track In addition to CC 0 127 after touch AFT can be selected in this column ...

Page 118: ...al points and then press both OCTAVE keys at the same time A star appears in the lower right corner of the display indicating that the calibration is done EMPTY RESET To perform this operation press the second TRIG key This reset will clear all kits pat terns songs and global settings Factory or user waveforms will still be retained in memory If you have a Drive equipped unit all kits patterns son...

Page 119: ...You can also use another Monomachine with an up to date OS Connect it to the Monomachine that will be upgraded and transmit the OS Read more about this procedure in the SEND UPGRADE section 3 Choose MIDI UPGRADE by pressing the fifth TRIG key The Monomachine will wait for an OS to be transmitted to it and a message stating READY TO RECEIVE MIDI UPGRADEX will appear on the screen 4 Once the Monomac...

Page 120: ...RIG KEY Make sure you see the message READY TO RECEIVE MIDI UPGRADEX on the screen 3 Press the sixth TRIG key of the Monomachine that is used to send the OS upgrade This will start the transmission of the OS to the other Monomachine If you have installed OS 1 07 or above you will experience the speed of the Ele ktron TurboCharge protocol You will need to have the MIDI IN port of the receiv ing mac...

Page 121: ...zer FX SYNTH Reverb gated stereo plate reverb Chorus stereo 6 tap chorus Dynamix dynamics compressor Ring Modulator Phaser Flanger ELECTRICAL SPECIFICATIONS Impedance balanced audio outputs Main out level 15dBu Assignable outs level 10dBu Output impedance 100 unbalanced S N ratio 100dBFS 20 20 000Hz Unbalanced audio inputs Input level 7dBu maximum Audio input impedance 9 k SNR inputs 98dBFS 20 20 ...

Page 122: ...I models which allow the units to be used all over the globe without the need of voltage converters The SFX 60 MKI models use an AC power supply The output specification of the SFX 60 MKI power supply is 6 Volts AC 2800mA 50 60Hz The plug size of the SFX 60 MKI supply is the same as a MKII power supply The SFX 6 has an IEC 60320 C14 3 prong inlet to connect to a grounded main power sup ply using e...

Page 123: ...dt INDUSTRIAL DESIGN Thomas Ekelund Jesper Kouthoofd ADDITIONAL DESIGN Göran Finnberg Charlie Storm USER S MANUAL Thomas Ekelund Daniel Hansson Jon Mårtensson FACTORY DEFAULT SOUND DESIGN Pattern A01 A15 Pattern B03 B06 Pattern B08 B16 Pattern C03 C16 by Daniel Troberg Pattern A16 Pattern B01 B02 Pattern B07 Pattern C01 C02 by Nils Odegaard FACTORY WAVEFORMS Charlie Storm Daniel Troberg ...

Page 124: ...CONTACT INFORMATION 116 CONTACT INFORMATION ELEKTRON WEBSITE http www elektron se POSTAL ADDRESS Elektron Music Machines MAV AB Sockerbruket 9 SE 414 51 Gothenburg Sweden TELEPHONE 46 0 31 743 744 0 ...

Page 125: ...sound is made up from one base sawtooth oscillator Setting all parame ters to their lowest value leaves only the base sawtooth UNIL unison level controls the level for the unison oscillator pair of sawtooth oscillators located over and under the base pitch UNIW unison width sets the distance between the unison oscillators and the base pitch UNIX unison extended level controls the level of the two ...

Page 126: ...higher settings of PWAD PWRS pulse width restart will when acti vated restart the pulse sweep controlled by the PWAD parameter from the PW position each time a note is played TUNE tune sets the tune of the oscillator SUPERWAVE ENSEMBLE SWAVE ENS The SuperWave Ensemble machine offers up to eight analogue style oscillators set up with special controls to create up to four note chords with only one m...

Page 127: ...OTH PULS PULSE MIX MIXED NOIS NOISE Waveforms differing to the standard defini tions are MIXED which is a special digital SID waveform and NOISE which gives dif ferent sound depending on the pitch it is played with MOD modulation controls the type of modu lation to be used The available selections are OFF No modulation RING Ring Modulation SYNC Hard Sync R S Ring Modulation and Hard Sync MSRC modu...

Page 128: ... offers the following selec tions OFF Hard Sync is turned off SFRQ Hard Sync is active frequency from SFRQ PRCH H Sync is active frq from previous channel If SYNC is set to SFRQ the source fre quency is taken from the SFRQ parameter If it is set to PRCH short for previous channel the source frequency is taken from the track places before the current track SFRQ source frequency set the frequency th...

Page 129: ... The higher the value the slower the interpolation will be BR1 bit reduction 1 sets the bit reduction for WAV1 WID width sets the pitch distance between the waveforms BR2 bit reduction 2 sets the bit reduction for WAV2 TUNE tune sets the tune of the oscillator DIGIPRO ENSEMBLE DPRO DENS The DigiPRO Ensemble allow chords to be made out of a single waveform This machine is only available in Monomach...

Page 130: ...FM STAT FM STATIC is the most versatile of the FM machines and the best bet for successful FM synthesis 1FRQ modulator 1 listed frequency offers both fine and coarse frequency tuning The parameter controls the coarse frequency from a choice of listed frequencies selected for yielding good results for FM synthesis 1FIN modulator 1 frequency fine tune con trols the fine frequency tuning for precise ...

Page 131: ...here the frequencies are set continuously instead of using the listed fre quency 1FRQ modulator 1 linear frequency sets the linear continuous frequency control of modu lator 1 1FEN modulator 1 frequency envelope controls the speed and depth of the expone tial envelope The envelope is trigged for all note on s played and is added to 1FRQ 1VOL modulator 1 volume feedback con trols the final output v...

Page 132: ...wel switch controls wheter the vowel sounds should be turned off or not This is good for ending words that end on consonants If no consonant is selected the vowel will be played regardless of the V SW setting VOIC voice type adjusts the voice type from normal to whispering CONS consonant controls if the note trig should start with a consonant or a conso nant like sound If is selected the sound sta...

Page 133: ...Trig the machine and it should say o Now select M with the CONS knob and set CLEN to 5 Now it is time to set the first trig In GRID RECORDING mode set a trig on step 1 Hold it while clicking the knobs for VOC1 VOC2 CONS and CLEN so that these parameters get locked Also adjust the pitch of this trig by pressing LEFT and RIGHT while holding the trig Choose pitch F 2 Now we are ready with the first t...

Page 134: ... machine TUNE tune sets the tune of the oscillator NOISE NOIS Generates different colors of noise ST stereo changes the character of the noise waveform If STON is set to ON increasing the ST parameter will expand the stereo width of the noise waveform RED redness sets the color of the noise When set to zero the noise is white when set to 64 pink noise is generated Red noise is generated when the p...

Page 135: ...Appendix A MACHINE REFERENCE A 11 ...

Page 136: ...al amplification can be adjusted to determine the signal input Remember you can use the amplitude enve lope and the rest of the track effects together with the sequencer if you prefer REVERB The reverb machine is a specially designed version of the Elektron Gate reverb It offers a characteristic gated reverb known from the Machinedrum DEC decay controls the decay time i e how long time the reverbe...

Page 137: ...ignal input DYNAMIX The Dynamix dynamics processor can be used for increasing the overall sound level of a track or pattern It can also be used to enhance or reduce transients ATK attack sets the attack time from 0 5 ms to 100 ms REL release sets the release time from 50 ms to 5 s THRS threshold controls the compressor knee threshold MIX signal mix adjusts the output between the original dry signa...

Page 138: ... wave when set to 127 it outputs a triangle wave EXT external signal sets the amount of the incoming signal that should be ringmodu lated with the waveform selected by the WAVE parameter MIX signal mix adjusts the output between the original dry signal and the wet signal INP input signal amplification adjusts the signal input PHASER The Monomachine phaser lets you apply sweeping effects to your so...

Page 139: ... mix adjusts the output between the original dry signal and the wet signal FB feedback controls the feedback of the original signal WID width controls the stereo width of the affected signal INP input signal amplification adjusts the signal input ...

Page 140: ...A 16 Appendix A MACHINE REFERENCE ...

Page 141: ...o reach if overlapped by any other channel assignment It is possible to overlap when sending midi By setting the span to 0 and turning Multi Trig Multi Map and the Auto Channel off no midi is sent from the Monomachine except if the midi sequencer is used Legend X Acknowledged K Only sent from the Keyboard version SFX 6 B Only received on the MIDI Base Channel NOTE ON NOTE OFF MESSAGES NOTE MIDI Ch...

Page 142: ...ction based on X X settings in global multimap OFF Multi Map Action based on X X settings in global multimap ON Auto Channel Distr to active track X OFF Auto Channel Distr to active track X CONTROL CHANGE MESSAGES MIDI base channel 0 Hex Dec CTRL Parameter Trn Rec 01 01 Track 1 Joystick Up K X 02 02 Track 1 Joystick Down K X 03 03 Track 1 Mute 0 Unmuted 1 127 Muted X 06 06 NRPN Parameter Val B 07 ...

Page 143: ...ter Width X X 58 88 Track 1 LFO 1 Page X X 59 89 Track 1 LFO 1 Dest X X 5a 90 Track 1 LFO 1 Trig X X 5b 91 Track 1 LFO 1 Wave X X 5c 92 Track 1 LFO 1 Multiplier X X 5d 93 Track 1 LFO 1 Speed X X 5e 94 Track 1 LFO 1 Interlace X X 5f 95 Track 1 LFO 1 Depth X X 62 98 NRPN Parameter Lo Parameter B 63 99 NRPN Parameter Hi Track num B 68 104 Track 1 LFO 2 Page X X 69 105 Track 1 LFO 2 Dest X X 6a 106 Tr...

Page 144: ...change Track 1 to Track 4 MIDI base channel 4 Same as MIDI Base Channel 0 but exchange Track 1 to Track 5 MIDI base channel 5 Same as MIDI Base Channel 0 but exchange Track 1 to Track 6 MIDI Multi Trig channel 01 01 ModWeelUp Resent to track 1 6 K X 02 02 ModWeelDown Resent to track 1 6 K X MIDI Multi Map channel 01 01 ModWeelUp Resent to track 1 6 K X 02 02 ModWeelDown Resent to track 1 6 K X MID...

Page 145: ...CTRL parameter YY to val ZZ X 70 112 XXXXXXX Pitch XXXXXXX for Track 1 X X 71 113 XXXXXXX Pitch XXXXXXX for Track 2 X X 72 114 XXXXXXX Pitch XXXXXXX for Track 3 X X 73 115 XXXXXXX Pitch XXXXXXX for Track 4 X X 74 116 XXXXXXX Pitch XXXXXXX for Track 5 X X 75 117 XXXXXXX Pitch XXXXXXX for Track 6 X X 7e 126 XXXXXXX Amp in release phase on Track X X X equal to a Note Off on Track X 7f 127 XXXXALF Tri...

Page 146: ...nel 5 Track 6 Pitchbend K X MIDI Multi Trig channel Pitchbend Resent to track 1 6 K X MIDI Multi Map channel Pitchbend Resent to track 1 6 K X MIDI Auto Track channel Pitchbend resent to active track X PROGRAM CHANGE MESSAGES Customizable in the global slot XX Change pattern XX B X SYSTEM COMMON MESSAGES Customizable in the global slot F2 242 Song Pointer Position X X SYSTEM REALTIME MESSAGES Cust...

Page 147: ...init 50 Global settings dump ID Global setting data bytes f7 SYSEX end SYSEX global setting dump request MIDI Byte Purpose SYSEX init 51 Global setting dump request ID 00000aaa Send global setting aaa 0 to 7 by sysex f7 SYSEX end SYSEX kit sysex dump MIDI Byte Purpose SYSEX init 52 Kit dump ID Kit data bytes f7 SYSEX end SYSEX kit request MIDI Byte Purpose SYSEX init 53 Kit dump request ID 0aaaaaa...

Page 148: ...6 FX DYNAMIX 17 FX RINGMOD 18 FX PHASER 19 FX FLANGER SYSEX set track routing MIDI Byte Purpose SYSEX init 5c Set track routing ID 00000aaa Route track aaa 0 to 5 00000bcd to output bus specified by bcd 00000eee with inputs specified by eee optional parameter f7 SYSEX end b BUS EF c BUS CD d BUS AB e 0 NEIGHBOR e 1 INP A e 2 INP B e 3 INP A B e 4 BUS AB e 5 BUS CD e 6 BUS EF SYSEX digipro waveform...

Page 149: ...Song request ID 000aaaaa send song aaaaa 0 to 23 f7 SYSEX end SYSEX unused MIDI Byte Purpose SYSEX init 6b None f7 SYSEX end SYSEX load song MIDI Byte Purpose SYSEX init 6c Load song ID 000aaaaa Load song aaaaa 0 to 23 f7 SYSEX end SYSEX save song MIDI Byte Purpose SYSEX init 6d Save song ID 000aaaaa Save song to position aaaaa 0 to 23 f7 SYSEX end SYSEX unused MIDI Byte Purpose SYSEX init 6e None...

Page 150: ...n Music Machines MAV ID 00 Generic Elektron product ID 00 Base channel Padding A complete SYSEX message looks like this f0 00 20 3c 00 00 command f7 SYSEX turbomidi speed request MIDI Byte Purpose SYSEX init 10 Speed request ID f7 SYSEX end SYSEX turbomidi speed answer MIDI Byte Purpose SYSEX init 11 Speed answer ID aaaaaaaa bit 0 speed 2 bit 1 speed 3 3 00000bbb bit 0 speed 13 3x bit 1 speed 16x ...

Page 151: ...1 1 2 2 3 3 33 4 4 5 5 6 6 66 7 8 8 10 9 13 3 10 16 11 20 Values within parentheses are not supported Active sensing Active sensing should be sent from any device supporting Turbo MIDI whenever a higher speed is used TM 1 approx 150ms between If a Turbo MIDI device receives active sensing and then active sensing is lost for more than 300ms the device will revert to normal MIDI speed Negotiation Ti...

Page 152: ...C 6 Appendix C SYSEX REFERENCE ...

Page 153: ...clock 92 Program change 92 Transport 92 COPY PASTE Arpeggiator 62 Digibank 108 Kit 21 Machine 23 Note 50 Pattern 53 Slide 66 Snapshot 107 Song 74 Song row 77 Super copy 54 Swing 65 Track 52 Track page 51 D DATA PAGES Amplification page 26 Effects page 32 Filter page 29 Lfo pages 35 DELAY 33 DIGIPRO MANAGER 99 Erase waveforms 103 Receive waveforms 100 Rename waveforms 104 Send waveforms 102 DISTORT...

Page 154: ... MAP EDIT 93 MULTI TRIG 41 MUTE Song mute 79 Track 67 O OS UPGRADE Receive upgrade 111 Send upgrade 111 P PAN 29 PARAMETER EDITING 25 PARAMETER LOCKS 57 Grid recording mode 57 Live recording mode 58 Trigless trigs 59 PATTERN Grid recording 47 Live recording 49 Pattern chaining 46 Pattern selection 45 Scale setup 46 Step recording 50 POLY MODE 69 PORTAMENTO 29 POWER SUPPLY MKI specifications 114 MK...

Page 155: ...rate reduction 32 Track volume 28 TRACK VOLUME 28 TRANSPOSE 63 Pattern 64 Scale 64 Song track 79 Track 64 TRIG TRACK All 59 Amp 59 Filter 59 Lfo 59 TRIG TRACK SETTINGS 40 TRIG TRACKS 58 TRIGLESS TRIGS 59 TURBO MENU 87 U UNDO Arpeggiator clear 62 Arpeggiator paste 62 Digibank clear 108 Digibank paste 108 Kit 20 Machine clear 24 Machine paste 24 Parameter lock clear 51 Pattern clear 54 Pattern copy ...

Page 156: ...4 INDEX ...

Page 157: ......

Page 158: ...ElektronMusicMachinesAB ErikDahlbergsgatan3 41126Gothenburg Sweden www elektron se ...

Reviews: