background image


INSTALLATION AND OPERATION 


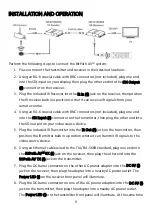
Perform the following steps to connect the BitPath AV™ system: 

1.


Place or mount the transmitter and receiver in their desired locations. 

2.


Using an RG-6 coaxial cable with BNC connectors (not included), plug one end 
into the SDI input on your display, then plug the other end into the SDI Output 
(5) connector on the receiver. 

3.


Plug the included IR Receiver into the IR In (4) jack on the receiver, then position 
the IR receiver bulb in a position so that it can receive IR signals from your 
remote control. 

4.


Using an RG-6 coaxial cable with BNC connectors (not included), plug one end 
into the SDI Input (5) connector on the transmitter, then plug the other end into 
the SDI output on your video source device. 

5.


Plug the included IR Transmitter into the IR Out (4) jack on the transmitter, then 
position the IR emitter bulb in a position where it can transmit IR signals to the 
video source device. 

6.


Using an Ethernet cable wired to the TIA/EIA-568B standard, plug one end into 
the BitPath AV™ RX (3) jack on the receiver, then plug the other end into the 
BitPath AV TX (3) jack on the transmitter. 

7.


Plug the DC barrel connector on the other AC power adapter into the DC 5V (1) 
jack on the receiver, then plug the adapter into a nearby AC power outlet. The 
Power LED (1) on the receiver front panel will illuminate. 

8.


Plug the DC barrel connector on one of the AC power adapters into the DC 5V (1) 
jack on the transmitter, then plug the adapter into a nearby AC power outlet. 
The Power LED (1) on the transmitter front panel will illuminate. At the same time 

Summary of Contents for BitPath AV 16227

Page 1: ...MONOPRICE BitPath AV SDI Extender over Single Cat6 Cable 120m P N 16227 User s Manual ...

Page 2: ...eratures Do not place it in on or near heat sources such as a fireplace stove radiator etc Do not leave it in direct sunlight Prior to operation check the units and power adapters for physical damage Do not use if physical damage has occurred Take care to prevent damage to the power cord Do not allow it to become crimped pinched walked on or become tangled with other cords Ensure that the power co...

Page 3: ... meters over a single Cat6 Ethernet cable Supports resolutions up to 1080p 60Hz Uses the BitPath AV transmission protocol CUSTOMER SERVICE The Monoprice Customer Service department is dedicated to ensuring that your ordering purchasing and delivery experience is second to none If you have any problem with your order please give us an opportunity to make it right You can contact a Monoprice Custome...

Page 4: ...ransmitter 1x Receiver 2x AC Power Adapters 1x IR Transmitter 1x IR Receiver 1x User s Manual PRODUCT OVERVIEW Front Panels 1 Power LED Illuminates when power is applied 2 Data Transmission LED The LED flashes slowly when a connection is being established then flashes rapidly when successfully connected and transmitting data 3 Connection LED The LED illuminates when there is a solid connection wit...

Page 5: ...3 5mm jack for connecting the IR transmitter 5 SDI Input BNC connector for connecting the video source device Receiver Rear Panel 1 DC 5V DC barrel connector for attaching the included AC power adapter 2 Reset Button for restarting the receiver 3 BitPath AV RX RJ45 connector for attaching the Ethernet cable 4 IR In 3 5mm jack for connecting the IR receiver 5 SDI Output BNC connector for connecting...

Page 6: ...d into the SDI output on your video source device 5 Plug the included IR Transmitter into the IR Out 4 jack on the transmitter then position the IR emitter bulb in a position where it can transmit IR signals to the video source device 6 Using an Ethernet cable wired to the TIA EIA 568B standard plug one end into the BitPath AV RX 3 jack on the receiver then plug the other end into the BitPath AV T...

Page 7: ...nly shows waiting for connection in the bottom right corner A1 Verify that the AC adapters for both the transmitter and receiver are plugged in and that the Power LED 1 on each unit is illuminated Try swapping out the SDI cable with a known good one Q2 The television displays Please check the TX input signal A2 Verify that the video source device is playing video content Try swapping out the SDI c...

Page 8: ...ular business hours 7 days a week You can also get assistance through email by sending a message to tech monoprice com SPECIFICATIONS Model 16227 Video Standard SD SDI HD SDI 3D SDI Maximum Video Resolution 1080p 60Hz Transmission Protocol BitPath AV Maximum Transmission Distance 394 feet 120 meters using Cat6 cable 328 feet 100 meters using Cat5e cable 262 feet 80 meters using Cat5 cable IR Exten...

Page 9: ...mful interference in a residential installation This equipment generates uses and can radiate radio frequency energy and if not installed and used in accordance with the instructions may cause harmful interference to radio communications However there is no guarantee that interference will not occur in a particular installation If this equipment does cause harmful interference to radio or televisi...

Reviews: