background image

8

English

3> Rotate K1 to adjust the cooking time when cooking begins. Then press 

 to 

confirm. If 

 not pressed within 3 seconds, the oven will revert back to the previous 

time to continue cooking.

4> Rotate K2 to adjust the temperature when cooking begins. The related indicator 

will be illuminated. Then press 

 to start cooking. If 

 not pressed in 3 seconds, 

the oven will revert back to the previous temperatrue to continue cooking.

3. Lamp Setting

1> Rotate K1 to select the relevant function, then the corresponding icon will be on.
2> Press 

 button to start, «0:00» and lamp icon   will light up, « : » will flash.

4. Inquiring Function

In the following states, you can use inquiring function, after 3 seconds return to 

the current state.

1> During working state, if the clock was set, press   button to see the current 

time; if the reminder function was set, press  , button to see the time of reminder.

2> In reminding state, if the clock was set, press   button to see the current time.
3> In clock display state, if the reservation function was set, press   button to see 

the time of reservation.

5. Child lock Function
To Lock: 

press 

 and 

 simultaneously for 3 seconds, there will be a 

long «beeping» sound and the   will be illuminated.

Lock quitting:

 press 

 and 

 simultaneously for 3 seconds, there will be a 

long «beeping» sound indicating the child-lock is released.

NOTE: 

During working mode, if you want to stop cooking, press stop button quickly. 

Do not need to long pressing on stop button, it is invalid.

6. Reminder Function

This function will help to remind you to start cooking in a certain time from 0:01 

to 9:59. Only when oven in standby mode, the reminder can be set. 

Follow below to set the reminder:

Summary of Contents for MOE 6181

Page 1: ...MOE 6181 User manual Built in Electric Oven...

Page 2: ...THE CAVITY During the first use it is completely normal that there will be a slight smoke and odors If it does occur you merely have wait for the smell to clear before putting food into the oven Pleas...

Page 3: ...sory or mental capabilities or lack of experience and knowledge unless they have been given supervision or instruction concerning use of the appliance by person responsible for their safety Accessible...

Page 4: ...t is advised to plug it off FITTING THE OVEN INTO THE KITCHEN UNIT Fit the oven into the space provided in the kitchen unit it may be fitted underneath a work top or into an upright cupboard Fix the o...

Page 5: ...e oven The hob must have a rear gap of at least 45 mm DECLARATION OF COMPLIANCE When you have unpacked the oven make sure that it has not been damaged in any way If you have any doubts at all do not u...

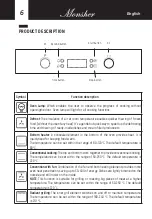
Page 6: ...ture is 60O C Conventional cooking The top and bottom work together to provide convectional cooking The temperature can be set within the range of 50 250 O C The default temperature is 220 O C Convent...

Page 7: ...utes will flash 4 Rotate K2 to adjust the minutes setting time should be within 0 59 5 Press to finish the clock settings will flash and the time will be illuminated NOTE The clock is 24 hours After p...

Page 8: ...ing state if the clock was set press button to see the current time if the reminder function was set press button to see the time of reminder 2 In reminding state if the clock was set press button to...

Page 9: ...nce to pause the cooking Press twice to cancel the cooking 8 Energy Saving Function 1 In waiting state and reminding state press for three seconds the LED display will go off and set to energy saving...

Page 10: ...defrost probe can t be reserved 2 During the status of reservation press cancel button once time and temperature of reservation menu will be shown with menu icon lighting constantly Press again scree...

Page 11: ...oved dishes and tray can be put on the oven floor using functions as Radiant grilling Double grilling Double grill with fan NOTE When placing dishes on the oven floor please DO NOT use functions with...

Page 12: ...tray hot food items should not slide out Telescopic runner Some models might with telescopic runners to facilitate the use of oven These telescopic runners and slider brackets could be disassembled b...

Page 13: ...counter clockwise note it may be stiff and replace the bulb with a new one of the same type 3 Screw the glass lamp cover back in place NOTE Only use 25 40W 220V 240V T300 C halogen lamps SECURING THE...

Page 14: ...pause state or in waiting state if the oven s center temperature is over 75 degree the cooling fan will continue working for 15 minutes Or when the oven s center temperature becomes lower than 75 degr...

Page 15: ...TALLATION REMARK 1 Only plus deviations are admissible for all dimension 2 The cabinet is not include the power switch or socket NOTE The number of accessories included depends on the particular appli...

Page 16: ...1 To remove the door open the door to the maximum angle Then pull the buckle at the door hinge backward Figure 1 2 Close the door to an angle approximately 15 Lift up and slowly pull the door out from...

Page 17: ...ass into the position indicated by the arrow in Figure 5 Gently pull the glass out of the socket 6 After pulling out the inner glass please take out the middle layer glass as shown in Figure 6 7 When...

Page 18: ...d to the glass being damaged Never leave acidic substances lemon juice vinegar on stainless steel parts Do not use a high pressure cleaner for cleaning the unit The baking pans may be washed in mild d...

Page 19: ...19 English please contact your local city office your household waste disposal service or the shop where you purchased the product...

Page 20: ...BY SERIAL NUMBER Year Month MANUFACTURERS Guangdong Midea Kitchen Appliances Manufacturing Co Ltd No 6 Yongan Road Beijiao Shunde Foshan Guangdong Province 528311 China IMPORTERS LLC MG Rusland 14140...

Page 21: ...21 English NOTES...

Page 22: ...22 250 90 8...

Page 23: ...23 8...

Page 24: ...24...

Page 25: ...25 120 C 45...

Page 26: ...26 60 120 C 60 C 50 250 C 220 C 30 40 50 250 C 220 C 180 240 C 210 C K1 K2...

Page 27: ...27 180 240 C 210 C 180 240 C 210 C 1 0 00 1 2 K2 0 23 3 4 K2 0 59 5 24 0 00 2 1 K1 2 K2 3 4 2 9 1 0 0 30 1 0 30 9 00 5 2 5 C 30 C...

Page 28: ...28 3 K1 3 4 K2 3 3 1 K1 2 0 00 4 3 1 2 3 5 3 3...

Page 29: ...29 6 0 01 9 59 1 2 K2 0 9 3 4 K2 0 59 5 10 7 1 2 8 1 2 10 3...

Page 30: ...30 9 1 a b K2 0 23 c d K2 0 59 K1 2 K1 K2 3 3 4 1 2...

Page 31: ...31 3 10 1 2 5 3 4...

Page 32: ...32...

Page 33: ...33...

Page 34: ...34 1 2 3 25 40 220 240 300 C...

Page 35: ...35 1 2 3 75 C 15 75 C...

Page 36: ...36 1 2...

Page 37: ...37 1 1 2 15 2 3 3 4 25 4 5 5 6 6 7...

Page 38: ...38 OFF 2012 19 EC WEEE...

Page 39: ...39...

Page 40: ...40 z z 7 495 236 90 67 z z MONSHER 8 800 250 17 18 9 00 18 00 z z MONSHER http monsherrus ru z z z z z z 19 2 1 2 Monsher 10 2 3 4 5 7 8 15...

Page 41: ...41 1 2 3 4 5 6 7 8 9 10 11 12 13 1 2 3 4 1 Monsher 2 3 4...

Page 42: ...42 XX XX XX X X 6 528311 141400 4...

Page 43: ...43...

Page 44: ...User manual...

Reviews: