background image

11

Using Your Steam Cleaner

Using Your Steam Cleaner

Nicotine and Tar

Nicotine and tar dissolve at high 

temperatures and become a light 

yellow oil that has the consistency 

of sewing machine oil. When the 

nicotine/tar film is touched by a 

hot Cotton Cloth clipped over 

the Floor Brush, it immediately 

dissolves into the cloth. You can 

remove it from flat surfaces as fast 

as you can move the Brush over 

the surface.

Removing Wax, Tar, Etc.

Many stains are only stuck on the 

surface of materials and can be 

easily and quickly removed by 

“blowing” excess material away 

from the surface at an angle. 

This is accomplished by using the 

Detail Nozzle. 
Hold a Cotton Cloth to the side to 

catch loose residue as it is blown 

by the Nozzle.  

NOTE: Always vacuum any loose 

residue off the surface before you 

apply steam to it.
Oven

When cleaning an oven, use the 

Nylon Detail Brush to clean around 

the elements and drip trays. Use 

Detail Nozzle and Detail Brush 

for cracks, crevices, and hard to 

reach areas.

Refrigerator


Use Detail Nozzle to blow away dirt 

in the ice machine and on door 

seals. The steam will not dry out or 

crack the seals. 

Can Openers & Other Kitchen 

Equipment


These can be easily cleaned with 

the Nylon Detail Brush on the 

Nozzle to get into all the nooks and 

crannies. 

Microwaves & Small Appliances


Use Nylon Detail Brush.

WARNING: Always unplug small 

appliances before cleaning.
Kitchen Work Surfaces

Use Floor Brush with Cloth at-

tached. For heavily soiled areas, 

use Brush without the Cloth, first in 

order to loosen the debris, then fol-

low with Cloth attached to finish. 

soap scum and leave a gritty resi-

due on the surface. If this happens, 

apply steam with the Floor Brush (no 

Cloth) again, and re-clean.
Bathroom Areas

To clean the bath or shower area, 

use the Nylon Detail Brush for grout, 

shower door tracks, hard to get 

areas and heavily soiled areas. The 

Window Squeegee will be the most 

efficient way to clean the rest of the 

tiled area and glass shower doors. 
Allow plenty of time for the heat to 

penetrate the surface. This is espe-

cially helpful in the shower area if 

there is tile or grout.
To clean sanitary fixtures, use the 

Detail Nozzle with or without the 

Nylon Detail Brush. Use a terry cloth 

towel or paper towel to wipe up 

excess moisture and residue.
Use Nylon Detail Brush to clean the 

sink and taps.

Garden Furniture

Use either of the brushes depending 

on the surface area.  

Work quickly when cleaning resin 

outdoor furniture. 

Exterior Areas

To clean car interior, use the Floor 

Brush with Cotton Cloth attached,  

just as in the home. You should not 

expose the bristles to leather – use 

only the Brush with Cotton Cloth 

attached. For detailing wheels, use 

the Detail Nozzle and Nylon Detail 

Brush. Exterior windows are clea-

ned best by applying steam with 

the Detail Nozzle and wiping with a 

paper towel.

To clean bicycles

: use the Nylon 

Detail Brush.

Artificial Plants

Use Detail Nozzle only, to blow off 

dust and dirt.

Fabric Steamer

The Monster SC60 is excellent for 

removing wrinkles from fabrics. 

You can use the Monster SC60 as 

a fabric steamer. Simply steam 

the surface from a distance. The 

dry steam removes wrinkles and 

refreshes the fabric without leaving 

it wet.

Us

in

g Y
o

u

r S

tea
m C

lea
ne

r

Fo

r A
ut

he

nt

ic M
o

ns

te

r R

e

p

la

c

e

m

e

nt P

a

rts

C

a

nada
:


88

8.9

78

.3

26

2  

U

S:

 8

88-8
96

-8

78

6

Summary of Contents for SC60 HSD

Page 1: ...Model SC60 HSD MONSTER SC60 STEAM CLEANER INSTRUCTION MANUAL For Authentic Monster Replacement Parts Canada 888 978 3262 US 888 896 8786 ENGLISH ...

Page 2: ...tly around appliance Never carry by the cord or yank to disconnect from an outlet To unplug always grasp plug to remove from outlet do not pull on cord 7 Do not handle cord or appliance with wet hands or without shoes on 8 Keep cord away from heated surfaces e g cooking surfaces and sharp edges and corners 9 Follow all labels and marking instructions on Steam Cleaner 10 Do not put any objects into...

Page 3: ...ce is not intended for use by persons including children with reduced physical sensory or mental capabilities or lack of experience and knowledge unless they have been given supervision or instruction concerning use of appliance by a person responsible for their safety 23 Read and follow all important notices in this guide 3 Safety Instructions IMPORTANT Please read all of the instructions for use...

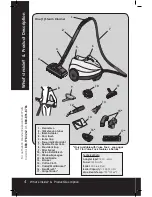
Page 4: ...raper 14 Cotton Cloth 15 Caddy Wall Bracket 16 Small Brush 17 Carpet Slider What s Inside Product Description 4 What s Inside Product Description Technical Data Adapter Input 120V 60Hz Power 1450 watts Boiler Stainless Steel Boiler Capacity 1 2 liter 2 pints Max Steam Temp 130 C 266 F Only available with Value Pack see pages 15 19 for Value Pack Features Details One 1 Steam Cleaner For Authentic M...

Page 5: ... 7 Stainless Steel Boiler non corroding 18 10 stainless steel boiler welded construction 8 Multiple uses clean bathrooms kitchens living areas pet areas appliances and much more Accessories Attachment Descriptions Additional Accesories are available with the purchase of a Value Pack See Value Pack Features Details on pages 15 19 of this manual A Connecting Brush Adapter to Floor Brush 1 2 Continue...

Page 6: ...n temperature to prevent glass breakage or cracks The Detail Nozzle is very useful for cleaning hard to reach areas It is ideal for radiators door and window jambs shutters and sanitary fixtures To use Attach Detail Nozzle directly to the Steam Gun or Extension Tubes The Nylon Detail Brush is best for cleaning grout between tiles ceramic and marble To use Push the Nylon Detail Brush on the end of ...

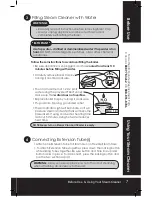
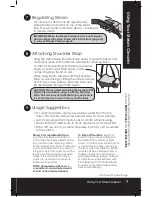
Page 7: ...ns to avoid overfilling the Boiler Be sure appliance is unplugged and has cooled for at least 10 minutes before filling with water Carefully remove Boiler Cap by turning it counterclockwise Pour in a maximum of 1 2 L 2 pints water using the provided Filler Funnel Make sure that water does not overflow Replace Boiler Cap by turning it clockwise Plug unit into 3 prong grounded outlet Power Indicator ...

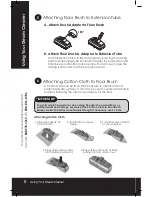
Page 8: ...nto Brush Adapter Be sure button and hole line up and button locks in place To disconnect press the locking button and pull the two pieces apart 5 6 IMPORTANT To avoid scratching surfaces when using Floor Brush on wood floors or painted walls and ceilings securely attach Cotton Cloth to Floor Brush Make sure Brush bristles do not break through If necessary use 2 cloths 1 Place Floor Brush on Cotto...

Page 9: ... excess water from the top down This catches dirty water before it drips on clean surfaces Avoid changing attachments back and forth while cleaning Start with the smallest brush to clean tight spots and corners first Wipe dirt as soon as possible otherwise it will dry and re adhere to the surface To Strip off Floor Wax Use Floor Brush for open areas and Nylon Detail Brush for corners or tight area...

Page 10: ...er to soften minerals Moving too slowly can dry out the Polished Floors Wrap clean Cloth around Floor Brush brush quickly This will cause dirt to be removed but not the wax Vinyl Floors Work quickly and do not allow heat to build up on any kind of vinyl it can affect its texture Tile Floors Clean grout between tiles using the Detail Nozzle and Nylon Detail Brush Use Floor Brush with Cloth attached...

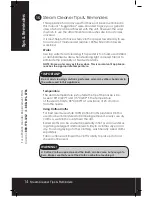
Page 11: ... attached to finish soap scum and leave a gritty resi due on the surface If this happens apply steam with the Floor Brush no Cloth again and re clean Bathroom Areas To clean the bath or shower area use the Nylon Detail Brush for grout shower door tracks hard to get areas and heavily soiled areas The Window Squeegee will be the most efficient way to clean the rest of the tiled area and glass shower...

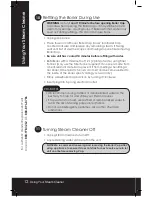
Page 12: ...g when filling a hot boiler Other plastic funnels can melt and become welded to the inside of the boiler spout voiding your warranty Firmly screw Boiler Cap back on by turning it clockwise Insert plug into 3 prong electrical outlet REMINDERS We recommend using distilled or demineralized water as the best way to care for and utilize your Steam Cleaner If tap water is too hard use distilled or demin...

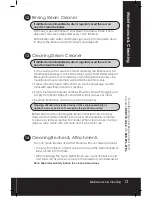
Page 13: ...er and fill with water Rinse thoroughly and empty from Boiler Repeat until water in tank comes out clear Replace Boiler Cap and store appliance properly Cleaning of Boiler and Steam Cleaner is the sole responsibility of appliance owner and is not covered by the product warranty Before first use after cleaning the Boiler hold Steam Gun facing downward and direct steam into a sink or other suitable ...

Page 14: ... is be tween 105 C 221 F and 115 C 239 F The temperature of the steam falls to 38 C 100 F at a distance of 25 cm 10 in from the nozzle Using Cotton Cloths For best results use white 100 Cotton Cloths provided Cloth is used to absorb moisture and dirt being removed Always use dry cloths A wet cloth could smear the dirt Soiled cloths can be washed repeatedly in hot or warm water us ing strong deterg...

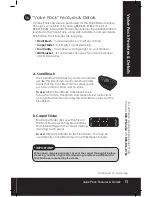
Page 15: ...that the Floor Brush cannot easily reach such as corners of floors and on stairs To use Attach Small Brush to Extension Tube follow the Attach Floor Brush to Extension Tube instructions on page 8 of this manual using the Small Brush in place of the Floor Brush B Carpet Slider The Carpet Slider clips over the face of the Floor Brush preventing brush bristles from interacting with the carpet making ...

Page 16: ...e going to perform Tool Caddy Installation Hook the top front of the Tool Caddy over the two hooks on the back of the SC60 Push the bottom part of the Caddy under the body of the cleaner and line up screw holes on the Caddy with the fixing lug holes on the steamer body Turn Steamer over and insert the two plastic head screws through the fixing lugs into the screw holes and turn clockwise to tighte...

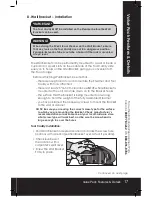
Page 17: ...sing the correct screw type for the surface to which you are mounting the Bracket Check manufacturer s recommendations or ask someone at your local hardware store what screw type will work best and be sure the screw head is large enough to cover the holes Tool Caddy Installation Hold Wall Bracket in desired location and mark the screw hole positions with a pencil position Bracket over a stud if po...

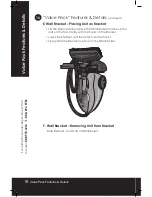
Page 18: ...above the Wall Bracket and line up the slots on the Tool Caddy with the hooks on the Bracket Lower the Steamer until the slots fit over the hooks Slowly slide the Steamer in place on the Wall Bracket 16 F Wall Bracket Removing Unit from Bracket Slide Steamer up and off of Wall Bracket For Authentic Monster Replacement Parts Canada 888 978 3262 US 888 896 8786 ...

Page 19: ...19 Notes Notes For Authentic Monster Replacement Parts Canada 888 978 3262 US 888 896 8786 ...

Page 20: ... or voltage other than that stamped on the product alteration or repair not authorized by Euroflex or damage due to faulty packaging or mishandling in transit by any common carrier Repair or disassembly by anyone other than a Euroflex authorized service center will void the warranty This warranty is extended to the original purchaser of the unit and excludes all other legal and or conventional war...

Page 21: ...N de modèle SC60 HSD NETTOYEUR VAPEUR MONSTER SC60 MANUEL D UTILISATION Pour obtenir des pièces de rechange Monster Canada 888 978 3262 États Unis 888 896 8786 FRANÇAIS ...

Page 22: ...ation Ne tirez pas sur le cordon pour le débrancher saisissez toujours la fiche d alimentation 7 Ne touchez pas l appareil ou le cordon d alimentation avec les mains mouillées ou les pieds nus 8 Éloignez le cordon des surfaces chaudes cuisinière par exemple des surfaces coupantes ou des arêtes vives 9 Respectez toutes les instructions indiquées sur les étiquettes du nettoyeur vapeur 10 N insérez a...

Page 23: ...es y compris des enfants aux capacités physiques sensorielles ou mentales réduites ou des personnes ne possédant aucune connaissance ou expérience dans ce domaine à moins qu un individu responsable de leur sécurité leur ait donné des instructions ou les ait surveillées lors de l utilisation de l appareil 23 Lisez et respectez les instructions importantes contenues dans ce manuel 3 Instructions de ...

Page 24: ...es et tapis Contenu de l emballage et description du produit 4 Contenu de l emballage et description du produit Caractéristiques techniques Adaptateur 120 V 60 Hz Puissance 1450 watts Cuve Inox Capacité de la cuve 1 2 litre Température de vapeur max 130 C Pour obtenir des pièces de rechange Monster Canada 888 978 3262 États Unis 888 896 8786 Disponibles uniquement avec le lot à prix réduit voir pa...

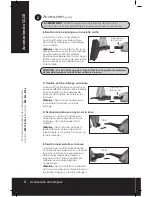
Page 25: ... inoxydable cuve inox 18 10 anticorrosion assemblage soudé 8 Multiples usages Nettoyage de la salle de bains de la cuisine des pièces à vivre des zones fréquentées par les animaux domestiques des appareils divers etc Accessoires Fixation et description Des accessoires supplémentaires sont disponibles à l achat d un lot à prix réduit Voir Caractéristiques et détails du lot à prix réduit pages 15 à ...

Page 26: ...érature pour ne pas briser ou fissurer le verre La buse est très pratique pour nettoyer les zones difficiles d accès Elle est idéale pour les radiateurs les huisseries de portes et de fenêtres les volets et les sanitaires Utilisation Fixez la buse directement sur le pistolet à vapeur ou le tube rallonge La brosse en nylon est parfaitement adaptée au nettoyage des joints de carrelage de la céramiqu...

Page 27: ...cuve ne déborde Assurez vous que l appareil est débranché et laissez le refroidir au moins 10 minutes avant de verser l eau dans la cuve Retirez délicatement le bouchon de la cuve en le tournant dans le sens inverse des aiguilles d une montre Versez au maximum 1 2 l d eau en vous aidant de l entonnoir Assurez vous que l eau ne déborde pas Refermez le bouchon de la cuve en le tournant dans le sens ...

Page 28: ...ateur Assurez vous que le bouton et l orifice soient alignés et que le bouton soit bloqué Pour les désassembler appuyez sur le bouton de blocage et tirez sur les deux pièces 5 6 IMPORTANT Pour éviter de rayer les parquets ou les murs et plafonds recouverts de peinture que vous nettoyez utilisez le chiffon en coton sur la brosse à plancher Vérifiez que les poils de la brosse ne traversent pas le ti...

Page 29: ... propres Évitez de changer les accessoires pendant le nettoyage Commencez par nettoyer les renfoncements et les coins avec la brosse en nylon Essuyez les salissures dès que possible pour éviter qu elles ne sèchent et se recollent sur la surface que vous venez de nettoyer Décapage de la cire Utilisez la brosse à plancher sur les surfaces importantes et la brosse en nylon dans les coins ou les renfo...

Page 30: ...e calcaire Si vous déplacez le Sols cirés Enroulez un tissu propre autour de la brosse à plancher et passez la rapidement de manière à enlever les salissures mais pas la cire Sols en vinyle Travaillez rapidement et ne laissez pas la chaleur en contact trop longtemps avec le sol au risque d en modifier la texture Carrelages Nettoyez les joints entre les carreaux à l aide de la buse et de la brosse ...

Page 31: ...des mouvements trop lents les traces risquent de sécher et de laisser une pellicule granuleuse Dans ce cas appliquez à nouveau la vapeur avec la brosse à plancher sans chiffon et nettoyez de nouveau Salles de bains Pour nettoyer la baignoire ou le bac à douche utilisez la brosse en nylon sur les joints les gouttières du pare douche et les zones difficiles d accès ou très encrassées La raclette à v...

Page 32: ...lors du remplissage d une cuve déjà chaude Les entonnoirs en plastique du commerce risquent de fondre et de rester collés dans l ouverture de la cuve ce qui annulerait la garantie Revissez à fond le bouchon en le tournant dans le sens des aiguilles d une montre Branchez le cordon d alimentation dans une prise 3 broches RAPPELS Nous vous recommandons d utiliser de l eau distillée ou déminéralisée a...

Page 33: ...lissez la d eau Rincez soigneusement et videz la cuve Répétez cette opération jusqu à ce que l eau soit claire Remettez le bouchon de la cuve en place et rangez l appareil Le nettoyage de la cuve et du nettoyeur vapeur se fait sous la responsabilité de l utilisateur et n est pas couvert par la garantie Avant d utiliser l appareil après son nettoyage orientez le pistolet à vapeur vers le bas et dir...

Page 34: ...la sortie de la buse se situe entre 105 et 115 C À 25 cm de la buse elle n est plus que de 38 C Utilisation des chiffons en coton Les chiffons en coton fournis avec l appareil offrent les meilleurs résultats Le tissu permet d absorber l humidité et les salissures de la surface nettoyée N utilisez que des chiffons secs Un chiffon mouillé ne ferait qu étaler les salissures Les chiffons sales peuvent...

Page 35: ...ment accessibles à la brosse à plancher tels que les coins et les escaliers Utilisation Fixez la petite brosse au tube rallonge et suivez les instructions de la section Attachez la brosse à plancher au tube rallonge à la page 8 de ce manuel en utilisant la petite brosse au lieu de la brosse à plancher B Adaptateur moquettes et tapis L adaptateur moquettes et tapis se fixe sous la brosse à plancher...

Page 36: ...ue vous allez nettoyer Installation du porte accessoires Accrochez l avant du porte accessoires aux deux crochets situés à l arrière du SC60 Poussez la partie inférieure du porte accessoires sous le nettoyeur vapeur et alignez les trous de vis du porte accessoires avec les trous de connecteur de l appareil Retournez le nettoyeur vapeur insérez les deux vis à tête plastique dans les trous de connec...

Page 37: ...ixez le support Pour connaître le type de vis le plus adapté veuillez consulter les recommandations du fabricant ou vous renseigner dans une quincaillerie Assurez vous également que la tête de vis est suffisamment large pour couvrir les trous Installation du porte accessoires Placez le support mural à l emplacement souhaité et marquez l endroit où devront se trouver les vis à l aide d un crayon si...

Page 38: ...hets du support Abaissez le nettoyeur vapeur jusqu à ce que les crochets du support s insèrent dans les fentes de l appareil Faites glisser le nettoyeur vapeur lentement sur le support mural 16 F Support mural Détacher l unité du support Faites glisser le nettoyeur vapeur vers le haut jusqu à ce qu il se détache du support mural Pour obtenir des pièces de rechange Monster Canada 888 978 3262 États...

Page 39: ...19 Notes Notes uit suite gnez les pport al Pour obtenir des pièces de rechange Monster Canada 888 978 3262 États Unis 888 896 8786 ...

Page 40: ...rmations données sur le produit à une modification ou à une réparation non autorisée par Euroflex à un emballage ou à une manipulation inadapté e au cours du transport par un transporteur habituel La réparation ou le démontage par une personne non agréée par Euroflex annule la garantie Cette garantie couvre l acheteur initial du produit et exclut toute autre garantie juridique ou conventionnelle L...

Reviews: