background image

Monster Guarantee

If you wish to return a product in perfect working order, we provide a 30 day returns policy as long as the 

item is unopened and in a resalable condition. 

A 12 month warranty applies to all of our electrical products; we will cover the cost of labour and parts. Our 

policy is to try to repair the item before arranging an exchange or refund. 

If for any reason a part is missing please get in touch with us within 7 days on receipt of your order. You 

can contact our friendly and helpful Customer Support Team via email or call. For full terms and conditions 

contact our Support Department via the details on the Contact Us page.

Monster Group (UK)’s liability will be limited to the commercial value of the product only. 

NOTE: This assembly requires two persons. We strongly recommend you DO NOT attempt the assembly 

by yourself.

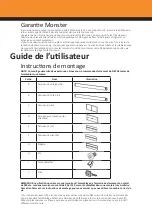
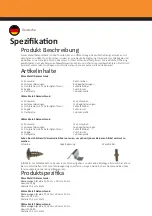
Part

Part Name

Illustration

A

Left Side Panel

B

Right Side Panel

C

Rear Panel

D

Front Panel (with doors 

attached)

E

Roof Panel

F

Floor Panel

G

Shelf

H

Screw

I

Shelf Bracket

J

Keys

User Guide

Assembly Instructions

NOTE: The pictures in this manual show assembly for the 180cm Metal Filing Cabinet. Both the 90cm and 

140cm Metal Filing Cabinets are assembled in a very similar format. Read these Assembly Instructions 

carefully to ensure you are using the correct number of screws. 

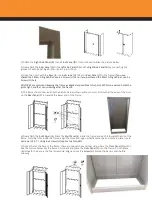
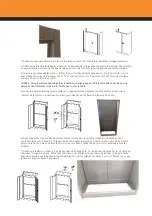
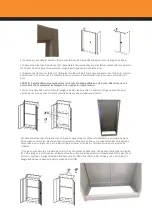
1) On the 

Front Panel (D)

, ensure the doors are locked so that they cannot swing open during assembly. 

Attach the 

Left Side Panel (A)

 to the edge of the 

Front Panel (D)

. Notice that the grooves on each panel lock 

into place without screws. Ensure the joint is flush like the picture below.

Summary of Contents for 24247

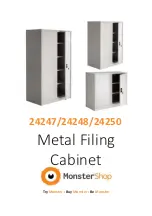
Page 1: ...Metal Filing Cabinet Try Monster Buy Monster Be Monster 24247 24248 24250 ...

Page 2: ...with 2 x Doors attached 2 x Metal Dowels 3 x Shelves 2 x Keys 1 x Roof Panel 1 x Floor Panel 180cm Metal Filing Cabinet 1 x Rear Panel 13 x Screws 2 x Side Panels 16 x Shelf Brackets 1 x Front Panel with 2 x Doors attached 2 x Metal Dowels 4 x Shelves 2 x Keys 1 x Roof Panel 1 x Floor Panel Specification Product Description Item Contents For your reference please consult the pictures below to fami...

Page 3: ...ommercial value of the product only NOTE This assembly requires two persons We strongly recommend you DO NOT attempt the assembly by yourself Part Part Name Illustration A Left Side Panel B Right Side Panel C Rear Panel D Front Panel with doors attached E Roof Panel F Floor Panel G Shelf H Screw I Shelf Bracket J Keys User Guide Assembly Instructions NOTE The pictures in this manual show assembly ...

Page 4: ...r can screw together the frame 5 The frame should now look like the picture below shown without doors Notice that the apex of the cross on the Rear Panel C is towards the lower end of the frame 6 Now attach the Roof Panel E Place the Roof Panel E inside the frame and push it towards the top of the frame Standing from inside the frame align the holes and again whilst another person holds in place u...

Page 5: ...ckage contact our Customer Support team via the details on the Contact Us page within 7 days of receipt Q My shelves are warping A The shelves may be loaded with a higher weight than their maximum capacity Remove some of the items to prevent further damage Q How do I clean and or maintain my Filing Cabinet A A damp cloth can be used to clean the shelves Do not use oil or harsh abrasives when clean...

Page 6: ...m Dimensions 90cm x 90cm x 40cm Poids 22 KG Matériel 0 5mm acier Cabinet de classement en métal 140cm Dimensions 140cm x 90cm x 40cm Poids 28 5 KG Matériel 0 5mm acier Cabinet de classement en métal 180cm Dimensions 180cm x 90cm x 40cm Poids 36 KG Matériel 0 5mm acier Contenu de l emballage Cabinet de classement en métal de 90cm 1 x panneau arrière 9 x vis 2 x panneaux de côté 8 x porte tablettes ...

Page 7: ... l utilisateur Instructions de montage NOTE Ce montage nécessite deux personnes Nous vous recommandons fortement de NE PAS tenter de l assembler vous même Partie Nom Illustration A Panneau de côté gauche B Panneau de côté droit C Panneau arrière D Panneau avant avec portes attachées E Panneau de toit F Panneau de plancher G Étagère H Vis I Porte tablettes J Clés REMARQUE Les illustrations de ce ma...

Page 8: ...eut visser le cadre 5 Le cadre devrait maintenant ressembler à l image ci dessous représentée sans portes Notez que le sommet de la croix sur le panneau arrière C est orienté vers l extrémité inférieure du cadre 6 Fixez maintenant le panneau de toit E Placez le panneau de toit E à l intérieur du cadre et pous sez le vers le haut du cadre De l intérieur du cadre alignez les trous et encore une fois...

Page 9: ...s coordonnées sur la page Contactez nous dans les 7 jours suivant la réception du produit Q Mes étagères sont déformées R Les étagères peuvent être chargées avec un poids qui dépasse leur capacité maximale Retirez certains éléments pour éviter tout dommage supplémentaire Q Comment puis je nettoyer et ou maintenir mon classeur A Un chiffon humide peut être utilisé pour nettoyer les étagères N utili...

Page 10: ...olle Gehäuse die wir kennen die du lieben wirst 90cm Metall Aktenschrank 1 x Rückwand 9 x Schrauben 2 x Seitenverkleidungen 8 x Regalhalterungen 1 x Frontplatte mit 2 x befestigten Türen 2 x Metalldübel 2 x Regale 2 x Schlüssel 1 x Dachplatte 1 x Bodenplatte 140cm Metall Aktenschrank 1 x Rückwand 11 x Schrauben 2 x Seitenverkleidungen 12 x Regalhalterungen 1 x Frontplatte mit 2 x befestigten Türen...

Page 11: ... Group UK Limited ist ausschließlich auf den kommerziellen Wert des Produkts beschränkt Monster Garantie HINWEIS Diese Montage benötigt zwei Personen Wir empfehlen Ihnen dringend die Montage NICHT selbst durchzuführen Teil Teilname Illustration A Linke Seitenverkleidung B Rechte Seitenverkleidung C Rückwand D Frontplatte mit Türen ange bracht E Dachplatte F Bodenplatte G Regal H Schraube I Regalha...

Page 12: ...kann eine andere den Rahmen verschrauben 5 Der Rahmen sollte jetzt wie unten abgebildet aussehen ohne Türen Beachten Sie dass die Spitze des Kreuzes auf der Rückseite C zum unteren Ende des Rahmens zeigt 6 Befestigen Sie nun die Dachplatte E Setzen Sie die Dachplatte E in den Rahmen und drücken Sie sie zur Oberseite des Rahmens Richten Sie im Inneren des Rahmens die Löcher aus und verwenden Sie 6 ...

Page 13: ... Team über die Einzelheiten auf der Seite Kontakt Sicherheitshinweise Sichere Arbeitspraxis Bitte lesen Sie die sichere Praxis lesen Prävention von Verletzungen oder Schäden die auf das Gerät zu gewährleisten Dieser Punkt ist schwer Versuchen Sie nicht das Gerät allein anzuheben Um Verletzungen zu vermeiden stellen Sie sicher dass die Hebe von 2 Personen bewegt Stellen Sie sicher dass der Schaltsc...

Page 14: ...al con 2 x Puertas Unidas 2 x Clavijas Metálicas 3 x Estantes 2 x Llaves 1 x Panel Superior 1 x Panel Inferior Gabinete Archivador Metálico 180cm 1 x Panel Posterior 13 x Tornillos 2 x Paneles Laterales 16 x Soportes de Estante 1 x Panel Frontal con 2 x Puertas Unidas 2 x Clavijas Metálicas 4 x Estantes 2 x Llaves 1 x Panel Superior 1 x Panel Inferior Especificación Descripción del Producto Conten...

Page 15: ...Usuario Instruccions de Montaje NOTA El montaje requiere dos personas Le recomendamos que NO intente armar por su cuenta Parte Nombre de parte Ilustración A Panel Lateral Izquierdo B Panel Lateral Derecho C Panel Posterior D Panel Frontal con puertas unidas E Panel Superior F Panel Inferior G Estante H Tornillo I Soporte de Estante J Llaves NOTA Las imágenes de este manual muestran el ensamblaje p...

Page 16: ...arco ahora debe verse como la imagen de abajo se muestra sin puertas Tenga en cuenta que el vértice de la cruz en el Panel trasero C esté hacia el extremo inferior del marco 6 Ahora conecte el panel superior E Coloque el panel superior E dentro del marco y empújelo hacia la parte superior del marco Desde el interior del marco alinee los orificios y de nuevo mientras otra persona se mantiene en su ...

Page 17: ...l cliente a través de los detalles en la página de contacto dentro de los 7 días de su recepción P Mis estanterías están deformándose R Los estantes pueden estar cargados con un peso mayor que su capacidad máxima Retire algunos de los elementos para evitar más daños P Cómo puedo limpiar y o mantener mi archivador R Se puede utilizar un paño húmedo para limpiar los estantes No utilice aceite o abra...

Page 18: ...2 x porte agganciate 2 x Chiavi 3 x Scaffali 11 x Viti 1 x Pannello Superiore 1 x Pannello Inferiore Mobile in Metallo 180 cm 1 x Pannello Posteriore 16 x Staffe da Scaffale 2 x Pannelli Laterali 2 x Tasselli in metallo 1 x Pannello Frontale con 2 x porte agganciate 2 x Chiavi 4 x Scaffali 13 x Viti 1 x Pannello Superiore 1 x Pannello Inferiore Per riferimento si prega di consultare le immagini qu...

Page 19: ...to Guida Utente Istruzioni per l Assemblaggio NOTA Questo assemblaggio richiede la presenza di due persone Consigliamo vivamente di NON provare ad assemblarlo da soli Parte Nome Parte Illustrazione A Pannello laterale sinistro B Pannello laterale destro C Pannello posteriore D Pannello frontale con porte fissate E Pannello Superiore F Pannello Inferiore G Scaffale H Vite I Staffa Scaffale J Chiavi...

Page 20: ...laio 5 Il telaio dovrebbe avere l aspetto dell immagine sottostante visualizzata senza porte Notare che l apice della croce sul Pannello Posteriore C sarà verso l estremità inferiore del telaio 6 A questo punto collegare il Pannello Superiore E Posizionare il Pannello Superiore E all interno del telaio e spingerlo verso l alto Stando in piedi nel telaio allineare i fori e mentre una persona lo sor...

Page 21: ...upporto Clienti tramite i recapiti forniti nella pagina Contattaci entro 7 giorni dalla consegna D I miei scaffali sono deformati R Gli scaffali potrebbero essere troppo carichi rispetto al peso massimo supportato Togliere qualche oggetto per prevenire danni futuri D Come pulisco il mio Mobiletto R Può essere utilizzato un panno umido per pulire gli scaffali Non utilizzare oli né abrasivi aggressi...

Page 22: ...ndence or return items our address is provided below Contactez Nous Tél 44 0 1347 878888 Email hello monstershop co uk Monster House Alan Farnaby Way Sheriff Hutton Industrial Estate Sheriff Hutton York YO60 6PG Département Commercial Pour les interrogations concernant cet appareil la garantie les retours ou les défauts de déclaration veuillez utiliser les détails suivants ci dessous Tél 44 0 1347...

Page 23: ...unsere fantastischen angebote in den Monster Abteilungen anzuschauen besuchen sie bitte unsere webseite Contáctanos Teléfono 44 0 1347 878888 Correo electrónico hello monstershop co uk Monster House Alan Farnaby Way Sheriff Hutton Industrial Estate Sheriff Hutton York YO60 6PG Departamento de Ventas Para consultas sobre este dispositivo la garantía devoluciones o denuncias de fallos por favor use ...

Page 24: ...7 Email help monstershop co uk Dipartimento Supporto www monstershop co uk Sito Web Indirizzo Per visitare il nostro ufficio Monster House e vedere i nostri prodotti inviare corrispondenze postali o rendere un prodotto fare riferimento all indirizzo sotto riportato Per informazioni riguardanti questo dispositivo o altri prodotti dalle categorie Monster utilizzare i dettagli sotto riportati Per ved...

Page 25: ...iche Kundenzufriedenheit zusätzlich kostenloser UK Lieferung auf alle unsere Produkte und einer Monster Garantie für 100 Zufriedenheit bereitzustellen Unser freundliches Kundenservice Team ist gerne bereit Ihnen bei jeglichen Fragen behilflich zu sein Haus Garten Lagerregale Grafik Design Lösungen für Einzelhandel Gastronomie Lösungen für kommerzielle Zwecke Monster Group UK è uno dei dei rivendit...

Reviews: