background image

9

© 2015 Monte Carlo Fan Company

12/2017

REMOTE CONTROL SETTING and OPERATION

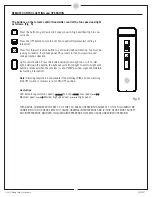
Press the button to get desired fan speed, Low to High and then High to Low 

cyclically. 

Press the OFF button to turn fan off. Fan speed will maintain last setting if 

turned off.

Press this forward/reverse button to get desired airflow direction. Fan must be 

running to reverse. It will take about 25 seconds for fan to slow down and 

change rotation direction. 

Light control button. Press this button quickly to turn light on or off. To dim 

light, hold down the button, the light will cycle from bright to dim to bright until 

button is released when the receiver is set at “DIM” position. Light will maintain 

last setting if turned off.

Note

: Dimming function is not available if the dimming (DIM) and non dimming 

(ON/OFF) switch in receiver is set at ON/OFF position. 


Useful tips

LED indicator against fan speeds,            Fan off,            Low speed,            

Medium speed,            Medium high speed and             High speed.                    

Fig. 5

The buttons on the remote control transmitter control the fan speed and light 

as follows. (Fig. 5)

THIS DEVICE COMPLIES WITH PART 15 OF THE FCC RULES OPERATION IS SUBJECT TO THE FOLLOWING TWO 

CONDITIONS. (1)THIS DEVICE MAY NOT CAUSE HARMFUL INTERFERENCE AND (2) THIS DEVICE MUST ACCEPT 

ANY INTERFERENCE RECEIVED, INCLUDING INTERFERENCE THAT MAY CAUSE UNDESIRED OPERATION.

Summary of Contents for 3DIR52 D-V1 Series

Page 1: ...DATE OF PURCHASE MODEL NUMBER RETAILER NAME RETAILER ADDRESS Attach sales receipt to this card and retain as your proof of purchase To register your fixture please visit our website www montecarlofans com 3DIR52XXD V1 Series Fan UL Model NO 3DIR52XXD V1 8 2 kgs 18 lbs ...

Page 2: ...9 kg 35 lbs or less And Use Mounting Screws Provided With The Outlet Box CAUTION For Compliance with Local Codes and Regulations If Installing The Secondary Support Safety Cable in the U S Do Not Remove Knockouts In The Outlet Box Mount the secondary support safety cable through the reserved nail screw hole on the outlet box to the building structure or the ceiling joist WARNING To reduce the risk...

Page 3: ...ember a loose box will cause the fan to wobble Remove the two outlet box screws provided with the box aligning the holes of the mounting bracket with the holes of the outlet box Reinstall the 2 outlet box screws securely Partially loosen downrod set screws from yoke at top of motor assembly Remove preassembled cross pin and keeper pin from downrod Place downrod over canopy canopy bottom ring and y...

Page 4: ... from remote marked AC IN N Black from house to Black from remote marked AC IN L Connect all green grounded wires to Grounded wire from House Make sure that no filaments are outside of the wire connectors Insert the remote receiver into mounting bracket Refer to page 7 for receiver setting After making the wire connections the wires should be spread apart with the grounded conductor and the equipm...

Page 5: ... to White from remote marked N Black from fan to Black from remote marked L Blue from fan to Blue from remote marked FOR LIGHT White from house to White from remote marked AC IN N Black from house to Black from remote marked AC IN L Connect all green grounded wires to Grounded wire from House Make sure that no filaments are outside of the wire connectors Insert the remote receiver into mounting br...

Page 6: ... the plate on motor Save screw for later use Connect plug from fan to plug from light pan Be sure plugs connection clasped together completely Aligning the keyhole slots on the light pan with the preassembled screws on the plate Twist clockwise till lock Reinstall the screw which was just removed Tighten all screws securely Loosen 2 and remove 1 preassembled screw from light pan Save screw for lat...

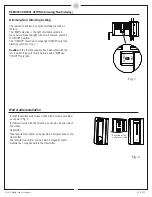
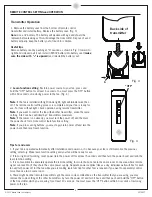
Page 7: ...function Fig 1 Caution If the remote receiver has been wired with fan turn power off by wall switch before switch DIM and ON OFF selection DIM ON OFF Fig 1 Wall cradle installation Install Transmitter wall mount cradle with 2 screws provided as shown in Fig 2 Install wall cradle with the direction as shown on back side of the cradle Useful tips Take remote transmitter up by pushing it at lower are...

Page 8: ...L SETTING and OPERATION 2 Learn function setting Restore power source to your fan press and hold the OFF button for at least 4 seconds You must press the OFF button within 60 seconds of restoring power to the fan Fig 4 Note If the fan is installed with light down light light will twinkle twice then off The remote control setting process is complete and your fan is ready for use For fans without li...

Page 9: ...cycle from bright to dim to bright until button is released when the receiver is set at DIM position Light will maintain last setting if turned off Note Dimming function is not available if the dimming DIM and non dimming ON OFF switch in receiver is set at ON OFF position Useful tips LED indicator against fan speeds Fan off Low speed Medium speed Medium high speed and High speed Fig 5 The buttons...

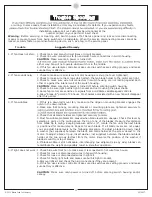
Page 10: ... If this is a downrod mount fan make sure the ridge on mounting bracket engages the notch in the downrod ball 2 Make sure that canopy mounting bracket or mounting plate are tightened securely to 4 Check that all blade holders are tightened securely to motor 5 Most fan wobble problems are caused when blade levels are unequal Check this level by selecting a point on the ceiling above the tip of one ...

Page 11: ...Dec 2017 V1 edition ...
Reviews: