© 2013 Monte Carlo Fan Company
8/13/2013
6
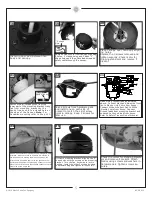
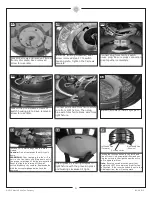
Install 3 screws to install light pan.
32
Connect plug from fan to switch
house plug. Be sure plugs connection
snap together completely.
29
Install by twisting clockwise, add 1
screw removed step 27 to switch
housing plate. Tighten the 3 screws
securely.
28
Connect white wire from fan to white
wire from light fixture. Then plug
blue wire from fan to black wire from
light fixture.
31
Loosen the pre installed screws of
switch housing plate. Save removed
screw for use later.
Install a JD 75 watt halogen bulb, bulb in-
cluded.
Caution
: Do not replace bulb until it cools
down.
WARNING:
Over lamping the fan will re-
sult in the fan lights shutting down until
the proper wattage of bulbs are installed.
Reset the lights by turning off the wall
switch, breaker,or by remote. Replace bulbs
with the correct wattage bulbs, turn the
power on.
33
30
Attach glass by locating dimples in
light fixture with the groves in glass
and twisting clockwise till tight.
34
Setting the reverse switch in the left hand
side will result in downward airflow and set-
ting the switch in the right hand side will re-
sult in upward airflow.
Note
: Reverse switch must be set either
completely LEFT or completely Right for fan
to function. If the reverse switch is set in the
middle position, fan will not operate.
35
Reverse switch
Left hand side
(Forward)
Right hand side
(Reverse)
Loosen 2 screws and remove 1 screw
from motor plate. Save removed
screw for use later.
27


