background image

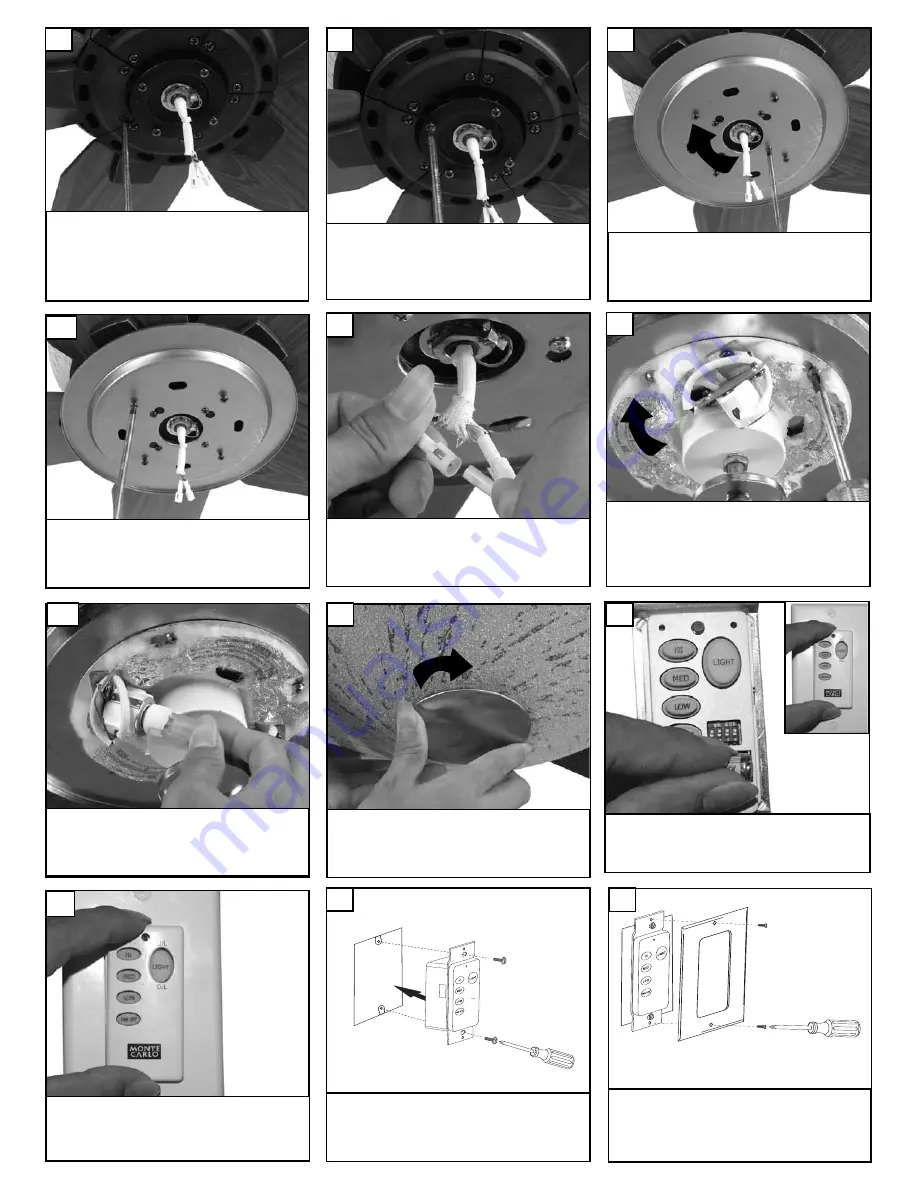
Install wall control unit to outlet box

using machine screws provided.

29

Attach front cover to wall control

with screws provided.

Twist lower cover plate into place by

twisting in direction of arrow.

Replace 1 screw removed and tighten

all 4 screws securely.  

21

30

Check the motor for shipping stabilizer

and remove if present. The screws, wash-

ers and motor pads are pre-installed to

the blade holders. Attach blade assembly

to motor and tighten screws securely.

19

Remove cover by snaping off from

top or bottom. Install 12V battery

into wall remote. Duracell MN21 /

Eveready A23 / GP 23A all 12V.

27

Attach cover of remote by placing

over buttons and snaping into place.

28

Loosen 4 screws on lower cover

plate.

Plug white wire from fan to white

wire from light kit. Then plug black

wire from fan to black wire from light

kit.

22

23

Place glass on light kit, hold in place

and tighten finial cap in direction of

arrow. 

26

Install the 2 x 50 watt halogen

bulbs.  Do not touch bulb surface as

oily residue from skin can cause the

bulb to explode.  

25

Place light kit over screws and twist

direction of arrow into place. Then

tighten all 4 screws securely.

24

Loosen 3 screws with key slots and

remove the 1 screw with closed slot.

Save screw removed. 

20

Summary of Contents for 5GMR52XXD Series

Page 1: ...Quality Ceiling fans Owner s Manual Ceiling Fan Installation Instructions For 5GMR52XXD Series Fans READ AND SAVE THESE INSTRUCTIONS Total fan weigh with light ...

Page 2: ...for safe operation of fuel burning equipment may be affected by this unit s operation Follow the heating equip ment manufacturer s guideline safety standards such as those published by the National Fire Protection Association NFPA and the American Society for Heating Refrigeration and Air Conditioning Engineers ASHRAE and the local code authorities Before servicing or cleaning unit Switch power of...

Page 3: ...side of the outlet box 16 Lift canopy to ceiling aligning the key hole slots with the screws on the bottom of the mounting bracket Rotate the canopy counter clockwise to lock in place Tighten the screws to secure the canopy See inset for keyhole shape 17 Install remote receiver by sliding into opening in the Mounting bracket Make sure that the dip switches on the Transmitter and the Receiver are s...

Page 4: ...ll 12V battery into wall remote Duracell MN21 Eveready A23 GP 23A all 12V 27 Attach cover of remote by placing over buttons and snaping into place 28 Loosen 4 screws on lower cover plate Plug white wire from fan to white wire from light kit Then plug black wire from fan to black wire from light kit 22 23 Place glass on light kit hold in place and tighten finial cap in direction of arrow 26 Install...

Page 5: ...ton To dim Lower lights press and hold D L button To turn off either up or down light press and quickly release either U L or D L button Fan speed control but tons Fan on off Light dim mer for up and down lights 31 Reverse function for this fan is a switch on top housing of the fan body Turn fan off and flip switch to reverse the direction of the blades 32 ...

Page 6: ...ou can adjust blade levels by the following procedure To adjust a blade tip down insert a washer not supplied between the blade and blade holder at the screw closest to the motor To adjust a blade tip up insert washer not supplied between the blade and blade holder at the two screws farthest from the motor Reverse the position of the washer if blades mount from top of blade 6 If blade wobble is st...

Reviews: