background image

6

© 2014 Monte Carlo Fan Company

11/1/2014

19

20

21

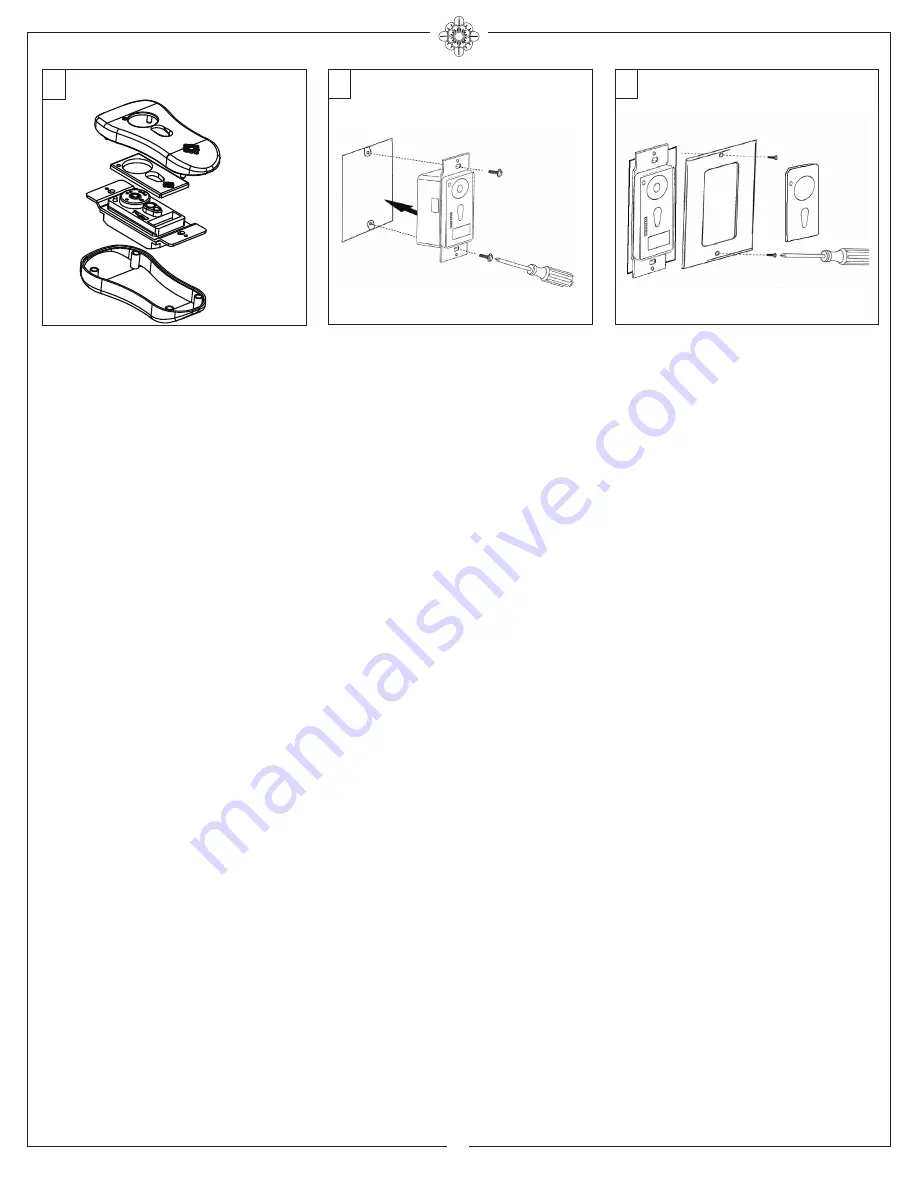
Place battery cover over battery 

compartment and buttons. Place remote 

over 2 pins on front cover. Attach cover 

of remote by placing over 4 pins and 

snapping into place.

Install wall control unit to outlet box using 

machine screws provided. 


WALL MOUNT INSTALL

Attach front cover to wall control unit with 

screws provided. Snap battery cover in 

place

HAND HELD INSTALL

Summary of Contents for Diamond 4DDR52 D Series

Page 1: ...t DATE OF PURCHASE MODEL NUMBER RETAILER NAME RETAILER ADDRESS Attach sales receipt to this card and retain as your proof of purchase To register your fixture please visit our website www montecarlofans com 4DDR52XXD Series Fan UL Model NO 4DDR52XXD 9 9 kgs 21 8 lbs ...

Page 2: ... personal injury do not bend blade holders during installation to motor balancing or during cleaning Do not insert foreign object between rotating blades Attach the mounting bracket using only the hardware supplied with the outlet box WARNING To reduce the risk of fire or electric shock this fan must be installed with an isolating wall control switch WARNING To reduce the risk of fire or electric ...

Page 3: ... points to a structural ceiling member a loose box will cause the fan to wobble Remove the two outlet box screws provided with the box aligning the holes of the mounting bracket with the holes of the outlet box Reinstall the 2 outlet box screws securely Partially loosen downrod set screws from yoke at top of motor assembly Remove preassembled cross pin and keeper pin from downrod Place downrod ove...

Page 4: ...ectors provided as indicated above White from fan to White from remote marked N Blue from fan to Blue from remote marked For Bottom Light Orange from fan to orange from remote marked For Upper Light Black from fan to Black from remote marked L White from house to White from remote marked AC N Black from house to Black from remote marked AC L Connect all green grounded wires to Grounded wire from H...

Page 5: ... removed in step 15 Tighten all screws securely Attach Acrylic shade by locating dimples in light pan with grooves on the Acrylic shade and twist clockwise until tight Remove battery cover Install 12V battery into wall remote Duracell MN21 Evereday A23 GP 23A all 12V Attach cover of remote by placing over buttons and snap the battery cover in place Attach light pan onto the plate on motor aligning...

Page 6: ...s Place remote over 2 pins on front cover Attach cover of remote by placing over 4 pins and snapping into place Install wall control unit to outlet box using machine screws provided WALL MOUNT INSTALL Attach front cover to wall control unit with screws provided Snap battery cover in place HAND HELD INSTALL ...

Page 7: ...ht will cycle from bright to dim to bright until button is released Light will maintain last setting if turned off FORWARD REVERSE Depress reverse button with fan running Allow a few seconds for fan to slow down and change rotation direction Clicking noise may be heard after depressing button Note If not using for long periods of time remove battery to prevent damage to remote transmitter and stor...

Page 8: ...N LQ SHULRG RI KRXUV 0RVW QRLVHV DVVRFLDWHG ZLWK D QHZ IDQ ZLOO GLVDSSHDU DIWHU WKLV SHULRG I WKLV LV D GRZQURG PRXQW IDQ PDNH VXUH WKH ULGJH RQ PRXQWLQJ EUDFNHW HQJDJHV WKH QRWFK LQ WKH GRZQURG EDOO 0DNH VXUH WKDW FDQRS PRXQWLQJ EUDFNHW RU PRXQWLQJ SODWH DUH WLJKWHQHG VHFXUHO WR FHLOLQJ MXQFWLRQ ER DQG MXQFWLRQ ER LV PRXQWHG UPO WR FHLOLQJ MRLVW KHFN WKDW DOO EODGHV DUH VFUHZHG UPO LQWR EODGH KRO...

Page 9: ...Nov 2014 ...

Reviews: