background image

  13

12

1

888

557

3848

Wards.com      

Installation

A/C Removal

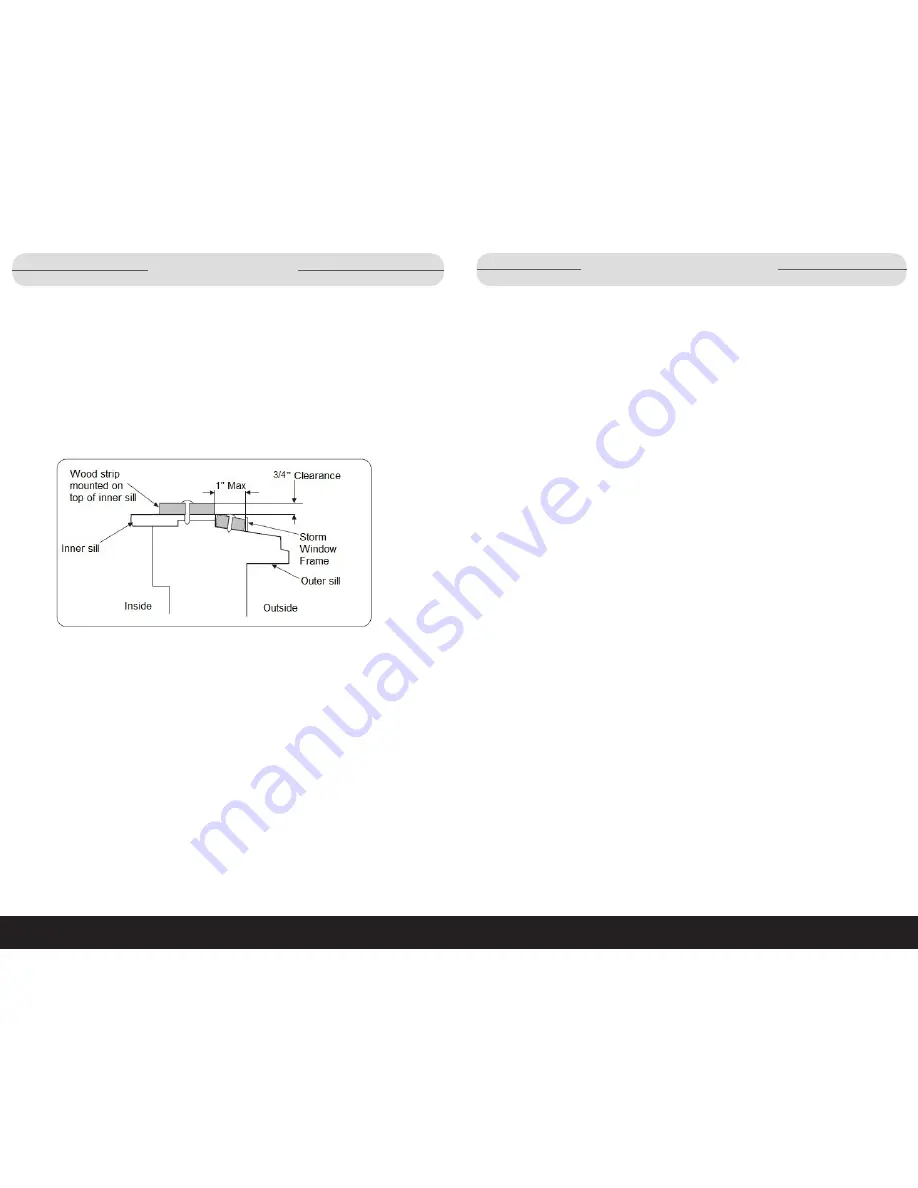
Storm Window Drainage

When the air conditioner is properly installed it should tilt back and down on the 

outside of the window. If it does not, there is a problem with the installation. Correct 

installation allows for proper drainage of the condensation.

If AC is blocked by storm window frame, fasten a 2

"

 wide wood strip to the inner 

window sill across the full width of the sill. The wood strip should be thick enough  

to raise the height of the window sill so that the unit can be installed without  

interference from the storm window frame (approximately 

¾

"

 above storm window 

frame).

Install a second wood strip (approximately 6

"

 long by 1

½

"

 wide and the same thick-

ness as the first wood strip) in the center of the outer sill. Place it flush against  the 

back of the inner sill.

IMPORTANT:

 See Cleaning and Care section prior to removal.

To remove air conditioner, turn power OFF and disconnect power cord. Pull foam 

seal out from between window sashes. If wood strips were installed, remove them. 

Remove screws from:

•  Sash Lock (total 6 screws)

•  Curtain Locks (total 2 screws)

•  Flanges (total 2 screws)

•  Upper guide (total 2 screws)
1.  Close curtains on side of the unit

2.  Remove the front grill and the air filter.

3.  Remove and set aside the 4 screws that holds in the louvres and control panel 

frame.

4.  Carefully pry the frame away from the cabinet and set aside.

5.  Remove the ground screw on the lower left corner of the unit and set aside.

6.  Carefully remove the chassis from the cabinet.

7.  Lift off the bottom seal and remove the 3 screws that secure the cabinet to the sill. 

8.  From inside the cabinet, remove the screws that secure it to the outside window 

brackets. 

9.  (Optional) Remove window brackets from outside of window.

10.  Take cabinet out of window frame and set on a sturdy surface.

11.  Place the chassis back into the cabinet, making sure that it is firmly seated 

towards the back of the cabinet.

12.  Replace the grounding screw on the grounding wire on the inside, bottom left 

of the unit.

13.  Reattach the louver/control panel frame.

14.  Insert the air filter and snap the front grill back into place.

To Store:

Be sure all parts are clean and dry before storing. Store hardware in a bag and put 

in box with unit. Store appliance in original box.

Summary of Contents for AW121005E

Page 1: ...57 115V 60Hz 3517W Wards com 1 888 557 3848 Montgomery Ward Customer Service 1112 7th Avenue Monroe WI 53566 8 00 a m to Midnight CT Monday through Friday Wards com 1 888 557 3848 Window AC 12000BTU Energy Saving Mode MODEL AW121005E ...

Page 2: ...nsion cord with this appliance 12 Do NOT operate any appliance with a damaged cord or plug or after the appliance malfunctions or has been damaged in any manner Call our toll free customer service number for information regarding replacement or returning the product 13 Do NOT remove front grill when machine is in use 14 The back of the unit must be lower than the front of the unit to allow for ade...

Page 3: ...ntrol Lever Air Inlet 10 Air Inlets Parts Features cont d 1 2 3 4 5 6 7 8 9 10 Control Panel 1 Digital Display Room temp fan mode Unit temp cool dry mode Remaining run time on timer 6 Check Filter When the LED is illuminated filter cleaning is necessary 2 Energy Saver Feature is in use when the LED is illuminated 7 Filter Reset Button After cleaning the filter press to turn off check filter LED 3 ...

Page 4: ...control panel frame Installation Your 12000BTU air conditioner is designed to be installed into a standard double hung window with a 31 43 opening width and 19 vertical height Item Name of Part Qty Item Name of Part Qty 1 Side Curtain 2 8 Flat Head Bolt Lock Nut 2 2 Short Screws 10 9 Window Support Bracket 2 3 Wood Screws 13 10 Upper Guide 1 4 Sash Lock 1 11 Window Sash Seal 2 5 Curtain Lock 2 12 ...

Page 5: ...ld be facing out towards you Flange Flange 10 Cut the adhesive backed foam seal Item 11 to the width of the window Remove backing from foam and attach strip to the underside of the window 11 Cut the adhesive backed foam pads Item 8 to the height of the opening and adhere to the insides of the window frame 12 With the window open find and mark the center of the inner sill 13 Place the cabinet in th...

Page 6: ...binet 20 Trim the non adhesive backed window sash seal Item 11 to the width of the window and insert in between the upper and lower sashes This will help to keep out drafts and bugs 21 Attach the sash lock Item 4 to the top of the lower sash and the window frame using 3 wood screws Item 3 22 Place the chassis back into the cabinet making sure that it is firmly seated towards the back of the cabine...

Page 7: ...em Remove screws from Sash Lock total 6 screws Curtain Locks total 2 screws Flanges total 2 screws Upper guide total 2 screws 1 Close curtains on side of the unit 2 Remove the front grill and the air filter 3 Remove and set aside the 4 screws that holds in the louvres and control panel frame 4 Carefully pry the frame away from the cabinet and set aside 5 Remove the ground screw on the lower left c...

Page 8: ...nergy Saver button Use to start or stop Energy Saver mode which is only functional when cool mode is ON 6 ON OFF button Press to start or stop operations on the unit 7 Timer button Use this button to set the number of hours up to 24 the unit should run continuously until automatically shutting down To set the timer press the timer button then use the and buttons to set the number of hours Pressing...

Page 9: ...he interior of the unit 2 Clean the filter 3 Remove the batteries from the remote control Troubleshooting Before calling for service try these troubleshooting tips Problem Possible Cause Remedy AC is cooling but room is still warm 1 Air filter may be dirty 2 Temperature on unit is too warm 3 Air flow is restricted 1 Clean filter 2 Lower temperature 3 Remove any obstacles drapes furniture etc from ...

Page 10: ...our order number and reason for return We recommend keeping the receipt for 4 weeks Returns Montgomery Ward Inc warrants this product to be free from defects in material and workmanship for one year from provable date of purchase Within this warranty period Montgomery Ward will repair or replace at its option defective parts of this product at no charge provided the product is returned freight pre...

Reviews: