background image

Page 4

Part No. XG0512

Rio DX Cast Stove

Direct Vent Installation

This section covers the installation of venting and terminations. 

Installation Requirements

  Rio Stoves are certified for use with 

Montigo Standard Series

 (4" 

/ 7") venting components and approved Vent Kits (listed below)

  Minimum 

1" clearance to combustibles 

required for vent pipes

  Use only 

certified Montigo vent components.

 (Use of other parts 

will void the Montigo warranty, and may impede the operation of 

the stove.)

  All joints must be secured with a minimum of two screws per joint

  Vent terminations must not be recessed in walls or siding

   Horizontal runs must be supported by a minimum of two supports 

per horizontal run. A minimum of one screw on each side of sup-

port is also required

  Flex vent sections may be stretched up to 50% of their total length 

(eg. a 24" section may be stretched to 36")


Maximum horizontal run for a flex section with no vertical rise is 3 

feet.


Flex vent sections over 3 feet must fall within the limits set by the 

venting graph and must have a minimum vertical rise of 3 inches 

per foot of flex.


Venting components can be used in any combination of solid/rigid


Solid vent sections may be cut less than half way from the tapered 

end


Venting components can be used in any combination of solid/rigid 

pipe or flex pipe and in any orientation (Male connectors can face 
in any direction)

Vent Terminations

Selecting A Termination Location

Choosing your vent termination location will help to determine whether 

Installing The Gas Line

The gas line must be installed before completing the installation. 

Nat-

ural Gas

 requires a minimum  inlet gas supply  pressure of 5.5" W.C. 

& a manifold pressure of 3.5" W.C. 

Propane Gas

 requires a minimum 

inlet gas supply pressure of 11" W.C. & a manifold pressure of 10" 
W.C. Provision must also be made for a 1/8" N.P.T. plugged tapping 
and be accessible for test gauge connection immediately upstream 
of the gas supply controls to the appliance. The stove is supplied with 
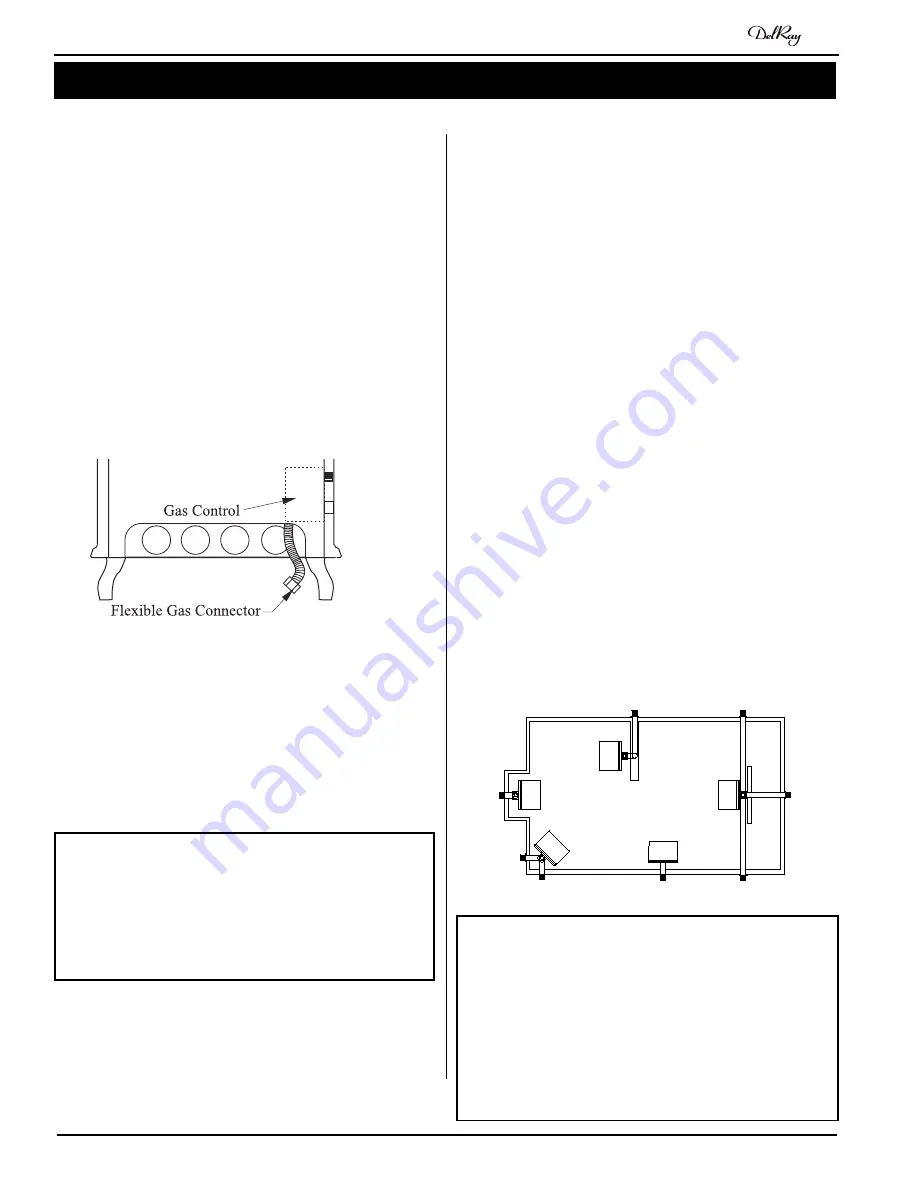
a flexible gas connector which is factory installed. The gas valve is 
located on the back of the stove as indicated in figure 4. It should be 
attached to the gas line  with an approved fitting, as required by the 

applicable installation codes

.

• Only use gas shut-off valves approved for use by the state, province, 
region, or governing body, in which the appliance is being installed, or 
as required by the applicable installation codes.
• Flexible gas connectors must not exceed 3 feet in length, unless it is 
allowable  within applicable installation codes.

Installation

Figure 5.


Fireplace locations and vent terminations.

Note:

  After gas line is connected, 

each 

appliance connection

,


valve and valve train

 must be checked while under normal 

operating pressure with either a liquid solution, or leak 
detection  device,  to  locate  any  source  of  leak. Tighten 
any areas where bubbling appears or leak is detected until 
bubbling stops completely or leak is no longer detected. 

DO  NOT use a flame of any kind to test for leaks.

During any pressure testing of the gas supply piping that 

excedes

 1/2 

psig (3.5 kPa), the appliance and its individual shutoff valve must be 

disconnected


from gas supply system.

When pressure testing the gas supply piping system at test pressures 
of 

less than or equal to 

1/2 psig (3.5 kPa), the appliance must be 

isolated

 from the gas supply piping system by closing its individual 

manual shutoff valve.

Figure 4.  

Gas line access.

Cautions:

  Vent terminations can be very hot. If the termination is less 

than 7 feet above a public walkway, it should be fitted with a 
certified Montigo Heat Guard. (Part no. MTKOG)

  Do not obstruct, or attempt to conceal, the vent termination. 

These actions will affect the operation of the fireplace, and may 
be hazardous.

  In heavy snow areas, take extra care to prevent snow buildup 

from obstructing the vent termination.

Summary of Contents for Rio DX

Page 1: ...place has been turned off Safety screens are available and can reduce the risks of severe burns C US Warning Improperinstallation adjustment alteration serviceormaintenancecancause injury or property damage Refer to this manual For assistance or additional information consult a qualified installer service agency or the gas supplier Warning What to do if you smell gas Do not try to light any applia...

Page 2: ... this manual Consult your local Gas Inspection Branch on installation require ments for factory built gas fireplaces Installation repairs should be done by a qualified contractor Installations in Canada must conform to the current CAN CGA B 149 1 and 2 Gas Installation Code and local regulations If the optional air circulating fan kit is installed it must be electrically grounded in accordance wit...

Page 3: ... the stove to a combustible surface is 42 Minimum 1 clearance must be maintained around the vent pipes Figure 2a Minimum clearances to combustible surfaces Top View Clearances The Rio DX Cast Stove s minimum clearances to combustible materials are A Back 3 B Control Side 24 C Right Side 10 D Floor 0 E Top 44 F Corner 2 See diagrams below for explanation Clearance from the top of the stove to a com...

Page 4: ...also be made for a 1 8 N P T plugged tapping and be accessible for test gauge connection immediately upstream of the gas supply controls to the appliance The stove is supplied with a flexible gas connector which is factory installed The gas valve is located on the back of the stove as indicated in figure 4 It should be attached to the gas line with an approved fitting as required by the applicable...

Page 5: ...n and the run between each elbow Hx may be any length as long as it does not exceed HT Vent Rise1 Max Max Horiz V of elbows Run HT 29 1 2 min 1 10 4 2 10 5 2 10 10 3 10 15 3 10 20 3 10 25 max See vertical vent section 1 Vertical rise is measured from the center of the stove s flue collar to the center of the termination 2 See Through the Roof Installations Example If V 12 the vent run may use up t...

Page 6: ... a brass decorator ring The rings should cover the joint as well as the sheet metal screws Attach the ring using the black 3 8 screws provided Make sure the screw is facing the back of the stove See Figure 11 Installation Direct Vent A Through the Wall Horizontal Venting Option The horizontal venting option requires an FSTK05 Vent Kit Figure 9 shows the components which are used to attain differen...

Page 7: ...ure a minimum of 6 1 4 between the centre of the pathway and the back wall as shown in figure 13a For corner installations measure 24 1 4 between the back corner and the intended pathway as shown in figure 13b This will maintain the stove s minimum clear ances as shown on page 3 Cut and frame an 11 x 11 hole in the ceiling and roof as required Install the ceiling box as shown in Figure 13c Ensure ...

Page 8: ...ion See Figure 15 Secure each stove pipe joint with at least three hex screws spaced approx 3 4 from the joint so that the brass ring will cover both the joint and the screws Finishing Install the ceiling collar over the ceiling box to provide a finished look Cover each joint in the stove pipes with a brass decorator ring The rings should cover the joint as well as the sheet metal screws Attach th...

Page 9: ...r optional blower kit 1 Optional Fan Switch Motor Speed Control 15 1 60 Supply G L1 L2 Wiring 2 Place the Back log onto the back log rest as shown in figure 22 The log has a lip on the bottom which fits into the slot on the log rest 3 Place the Front log onto the front log rest as shown in figure 22 Center the log from side to side and push it against the back of the log rest Carefully push the lo...

Page 10: ... gas control knob slightly and turn clockwise to Off Do not force 1 Turn off remote switch 2 Locate the gas control valve on the back left side of the unit 1 STOP Read the safety information above on this label 2 Locate the gas control valve on the back left side of the unit 3 Push in gas control knob and turn clockwise to OFF 4 Wait five 5 minutes to clear out any gas Smell for gas including near...

Page 11: ...e glass This is a normal condition and is the result of burning of protective coatings on new metal Glass must be cleaned periodically to remove any film which is a normal biproduct of combustion which may be visible Film can easily be removed by removing the door as shown on page 8 Handle the door carefully and clean it with non abrasive glass cleaners One of the most effective products is Kel Ke...

Page 12: ...eck wiring diagram figure 28 Main burner will 1 Check wiring see figure 28 not light 2 Check wall switch for proper con nection Gas Control Valve Figure 17 Honeywell VS8520 valve TH On Off Switch Power Generator TP TH TP Turn Gas Supply Off Set thermostat to call for heat SV9500 SV9600 is powered 24VAC nominal HSI Terminals NOTE Before Troubleshooting Familiarize Yourself With The Startup And Chec...

Page 13: ...nts not manufactured or supplied by The Companies 2 The DelRay Gas Appliance must be subjected to normal use The Gas Appliances are designed to burn gas only Burning conventional fireplace fuels such as wood coal or any other solid fuel will cause damage to the Gas Appliance will produce excessive temperatures and will result in a fire hazard Limitations On Liability It is expressly agreed and und...

Page 14: ...he United States 6 feet 1 8 m minimum in Canada L clearance to nonmechanical air supply inlet to building or the combus tion air inlet to any other appliance 16 inches 41 cm minimum for appliances 100 000 BTU H 30kW M clearance to mechanical air supply inlet 6 feet 1 8 m minimum N clearance above paved sidewalk or a paved driveway located on public property 7 feet 2 1 m minimum P clearance under v...

Page 15: ...2 17 Black Stove Pipe 5 lenght std female female 1 18 Black 90o Elbow male male 1 19 Brass Decorator Ring 3 20 Termination 1 21 Self Tapping 1 2 Screws 24 21 Screw Phillips Black 1 per brass ring 3 21 1 1 4 Drywall Screws 4 21 sheet metal screws 8 x 3 8 9 Vent Components Avail Individually Item Quantity Pkg Part Black Stove Pipe 24 std female female 1 FST05 Black Stove Pipe 18 std female female 1 ...

Page 16: ... Wall Kit Direct Vent Through the Roof Kit 9 5 7 14 06 6 5 10 11 13 12 15 20 16 18 16 22 19 21 17 Notes Spare Parts List Part No NG Gas Valve RGC1021 LP Gas Valve RGC1022 NG Pilot RPA019 LP Pilot RPA019A Front Burner NG RBT1089 Rear Burner LPG RBT1090 RBT1091 RBT1092 Door RDRFS1 Logs RLGS15 Part Description ...

Page 17: ...line with the exhaust vent terminal for the horizontally vented gas fueled heating appliance or equipment The sign shall read in print size no less than one half 1 2 inch in size GAS VENT DIRECTLY BELOW KEEP CLEAR OF ALL OBSTRUCTIONS 4 INSPECTION The state or local gas inspector of the side wall horizontally vented gas fueled equipment shall not approve the installation unless upon inspection the ...

Page 18: ...Page 18 Part No XG0512 Rio DX Cast Stove Notes ...

Page 19: ...Page 19 Part No XG0512 Rio DX Cast Stove Notes ...

Page 20: ...Canadian Heating Products Inc Langley BC V4W 4A1 Montigo Del Ray Corp Ferndale WA 98248 XG0512 120507 ...

Reviews: