background image

EN

6

been given supervision or instruction 
concerning use of the appliance by a 
person responsible for their safety. 

•  Children should be supervised to 

ensure that they do not play with the 
appliance.

Electrical Requirements 

•  Before you insert the plug into the 

wall socket make sure that the 
voltage and the frequency shown on 
the rating plate inside the appliance 
corresponds to yourelectricity supply.

•  Rating label is on the left hand side of 

fridge inner liner.

•  We recommend that this appliance 

be connected to the mains supply via 
a suitable switched and fused socket. 
The appliance must be positioned so 
that the plug is accessible.

•  Should the mains lead of the 

appliance become damaged or 
should it need replacing at any 
time, it must be replaced by a 
special purpose made mains lead 
which can only be obtained from a 

MONTPELLIER 

 Authorised Service 

Agent.

Warning! This Appliance 

Must Be Earthed

•   If the fitted moulded plug is not 

suitable for your socket, then the plug 
should be cut off and an appropriate 
plug fitted. Destroy the old plug 
which is cut off as a plug with bared 
cord could cause a shock hazard if 
inserted into a socket elsewhere in 
the house.

•  The moulded plug on this appliance 

incorporates a 13 A fuse. Should 
the fuse need to be replaced an 

ASTABEAB approved BS 1362 fuse 
of the same rating must be used. Do 
not forget to refit the fuse cover. In the 
event of losing the fuse cover the plug 
must not be used until a replacement 
fuse cover has been fitted. 

•  Colour of the replacement fuse cover 

must be the same colour as that 
visible on the pin face of the plug. 
Fuse covers are available from any 
good electrical store.

Important! Fitting A Different 

Plug 

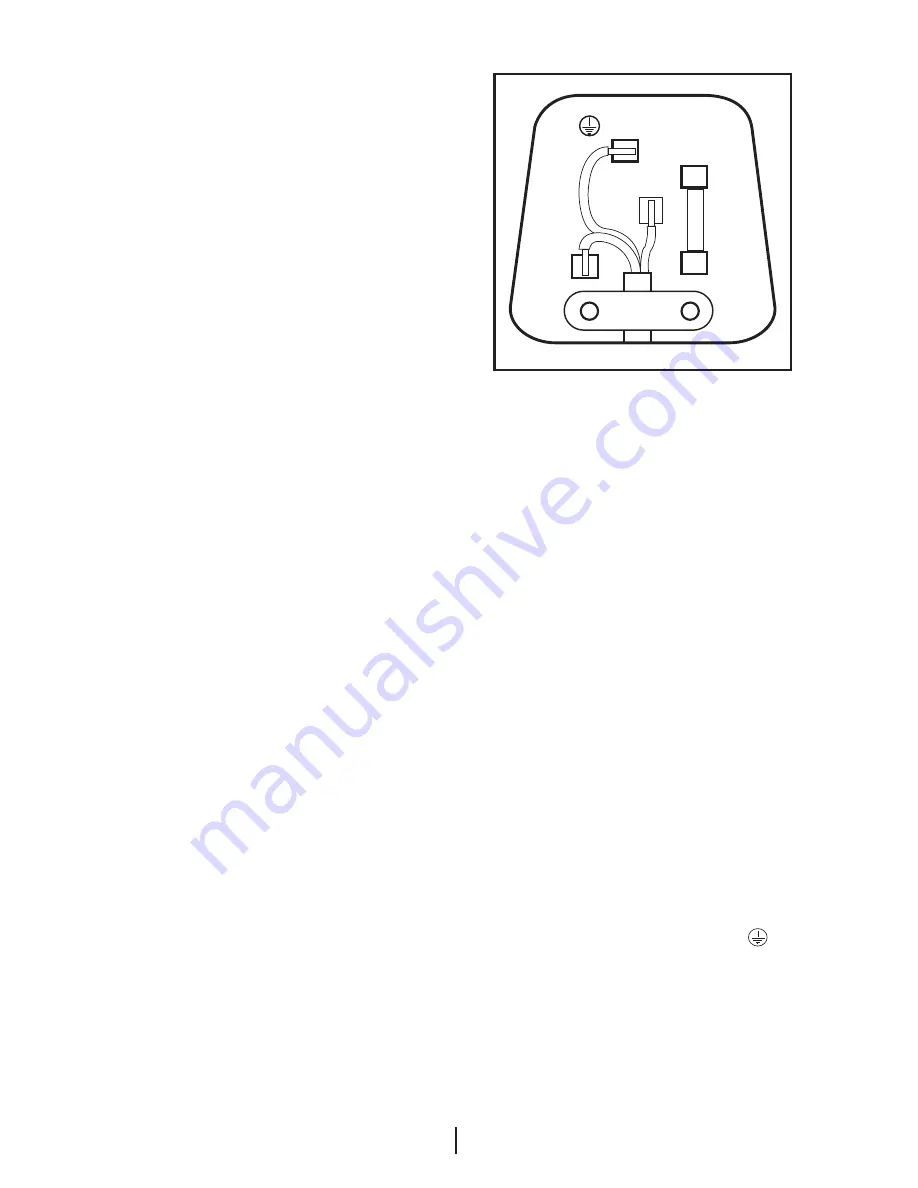
•  As the colours of the wires in the 

mains lead of this appliance may 
not correspond with the coloured 
markings identifying the terminals in 
your plug proceed as follows: (See 
diagram).

1. 

Connect the green-yellow or green 

(Earth) wire to the terminal in the plug 
marked ‘E’ or with the symbol   or 
coloured green and yellow or green.

2. 

Connect the blue (Neutral) wire to 

the terminal in the plug marked ‘N’ or 
coloured black.

3. 

Connect the brown (Live) wire to the 

terminal in the plug marked ‘L’ or 
coloured red.

FITTED WITH

BS 1362 13A FUSE ALWAYS FIT BS 1362 REPLACEMENT

CARTRIDGE FUSE

GREEN &

YELLOW

OR

GREEN

N

BLUE

OR

BLACK

L

BROWN

OR

RED

22mm.

6mm.

6mm.

6mm.

32mm.

12mm.

FUSE

CORD GRIP

Summary of Contents for MBUF300

Page 1: ...Instruction Manual en MBUF300...

Page 2: ...ly and safely Read the manual before installing and operating your product Follow the instructions especially those about safety Keep the manual in an easily accessible place as you may need it later...

Page 3: ...RoHS Directive 7 Package information 7 3 Installation 8 Electric connection 8 Disposing of the packaging 8 Disposing of your old freezer 8 Placing and Installation 8 Reversing The Doors 11 Installati...

Page 4: ...hown in this manual are schematic and may not correspond exactly with your product There may be items shown that are not present in your product 1 Your Freezer 1 Fast freeze compartment 2 Frozen food...

Page 5: ...tilate the room where the appliance is situated We suggest you contact your local authority for disposal information and facilities available See Installation Instructions on on page 8 for information...

Page 6: ...with bared cord could cause a shock hazard if inserted into a socket elsewhere in the house The moulded plug on this appliance incorporates a 13 A fuse Should the fuse need to be replaced an ASTABEAB...

Page 7: ...arts and materials which can be reused and are suitable for recycling Do not dispose of the waste product with normal domestic and other wastes at the end of its service life Take it to the collection...

Page 8: ...ong with the normal household waste The packing of your freezer is produced from recyclable materials Disposing of your old freezer Dispose of your old freezer without giving any harm to the environme...

Page 9: ...vibration and noise 4 Refer to Cleaning and Care section to prepare your appliance for use To avoid any loss in performance air suction channels should not be obstructed 140 cm2 Minimum distance betwe...

Page 10: ...10 30 mm 40 mm 40 mm Wall 30 mm Appliance To avoid any loss in performance air suction channels should not be obstructed 140 cm2 Minimum distance between the wall and the appliance must be at least 30...

Page 11: ...items and fittings from inside the appliance and door shelves 3 Unscrew the bolts and remove the upper and bottom hinges from the cabinet and door 1 2 4 Remove stoppers 3 4 5 Fit the stoppers on the...

Page 12: ...EN 12...

Page 13: ...EN 13 Installation Instructions Detailed Step By Step 820 870 140 190 help of...

Page 14: ...EN 14...

Page 15: ...EN 15 Installation step No 2 do not fasten screws tightly as may need to be adjusted Caution For Integrated Handle Door Reverse brackets...

Page 16: ...EN 16 Caution For Integrated Handle Door Reverse brackets...

Page 17: ...EN 17 Caution For Integrated Handle Door Reverse brackets...

Page 18: ...EN 18...

Page 19: ...k the temperature with an accurate thermometer see Temperature Control and Adjustment Important Notes 1 If there is a power failure do not open the door Frozen food should not be affected if the failu...

Page 20: ...thermostat knob to zero position Alternatively you may switch off the freezer at the socket outlet and pull out the mains plug All food should be wrapped in several layers of newspaper and stored in...

Page 21: ...mum and maximum values Orange LED 3 Lights up when the fast freeze button on the LED panel is pressed In this case your freezer operates continuously Press the button again when the food you would lik...

Page 22: ...t of water to clean the interior and wipe it dry Excess deposit of ice should be removed on a regular basis using the rounded handle of a spoon Large accumulation of ice will impair the performance of...

Page 23: ...sealed cans containing carbonated liquids into the freezer as they may burst Don t Exceed the maximum freezing loads 10 kg in any 24 hours when freezing fresh food Don t Give children ice cream and w...

Page 24: ...57 6182 0000 AB...

Reviews: