background image

EN

19

5

  Using your Appliance

The interior temperature of your 
appliance changes for the following 
reasons:
• Seasonal temperatures,
• Frequent opening of the door and

leaving the door open for long

periods,

• Food put into the appliance without

cooling down to the room

temperature,

• The location of the appliance in the

room (e.g. exposing to sunlight).

• You may adjust the interior

temperature by using the
thermostat. Numbers around the
thermostat button (

0

 to 

5

)

 indicates

the cooling degrees,


5

 being


the

coldest position.

• If the ambient temperature is higher

than 32°C you may need to turn the

thermostat dial to the 

position.

If the ambient temperature is lower

than 25°C, turn the thermostat

button to minimum position.

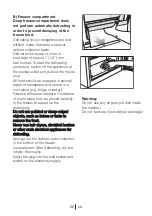
Defrost

A) Fridge compartment

Fridge compartment performs full-
automatic defrosting. Water droplets
and a frosting up to 7-8 mm can occur
on the inner rear wall of the fridge
compartment while your refrigerator
cools down. Such formation is normal
as a result of the cooling system.
The frost formation is defrosted
by automatic defrosting at certain
intervals by the automatic defrosting
system of the rear wall. User is not
required to scrape the frost or remove
the water droplets.
Water resulting from the defrosting
passes into the water collection groove
and  flows into the evaporator through
the drain pipe and evaporates.

Check regularly to ensure the drain

pipe is clogged or not and clear it with

the stick in the hole when necessary.

0

TEMPERATURE CONTROL 

AND ADJUSTMENT

Summary of Contents for MIFF701

Page 1: ...uctions carefully before attempting to install or use this appliance We recommend that you keep these instructions in a safe place for future reference Installation and Operating Instructions THE PERF...

Page 2: ...ith your Fridge you can rest assured that you are fully protected against the cost of repairs for the first 5 Years Please note that any claim must be accompanied by the model reference number serial...

Page 3: ...lling and operating your product Follow the instructions especially those about safety warnings Keep the manual in an easily accessible place as you may need it later Also read the other documents pro...

Page 4: ...6 Disposing of the packaging 6 Disposing of your old appliance 6 3 Preparation 7 Before operating your Fridge Freezer 7 Electric connection 7 Placing and Installation 7 Replacing the interior lamp 8...

Page 5: ...collection channel drain tube 5 Crisper 6 Fast freeze compartment 7 Deep freeze compartment 8 Adjustable door shelves 9 Egg holder 10 Bottle shelf 11 Fridge compartment 12 Freezer compartment 2 3 6 7...

Page 6: ...ilable See Installation Instructions on page 7 for information on suitable location To obtain the best possible performance and trouble free operation from your appliance it is very important to caref...

Page 7: ...ance with our National Environment Regulations Do not dispose of the packaging materials together with the domestic or other wastes Take them to the packaging material collection points designated by...

Page 8: ...of your appliance open longer than necessary and ensure they are closed properly after each opening 4 Defrost frozen food in the fridge compartment so that frozen food acts as an ice pack to assist co...

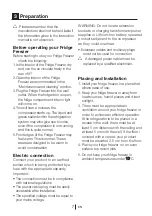
Page 9: ...e with the appropriate capacity Important The connection must be in compliance with national regulations The power cable plug must be easily accessible after installation The speci ed voltage must be...

Page 10: ...zen surface occurs DO NOT TEAR AWAY use cool water to release FIRST AID if necessary Hold affected area under cold running water Replacing the interior lamp To change the Bulb LED used for illuminatio...

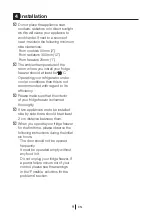
Page 11: ...ditions than this is not recommended with regard to its efficiency C Please make sure that the interior of your fridge freezer is cleaned thoroughly C If two appliances are to be installed side by sid...

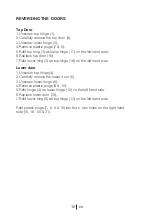
Page 12: ...p door 18 7 Refit lower hing 3 as top hinge 19 on the left hand side Lower door 1 Unscrew top hinge 4 2 Carefully remove the lower door 5 3 Unscrew lower hinge 6 4 Remove plastic plugs 9 10 5 Refit hi...

Page 13: ...EN 11 Reversing the doors Proceed in numerical order 1 4 3 6 2 5 7 8 9 10 17 19 20 21 15 16 18 13 14 12...

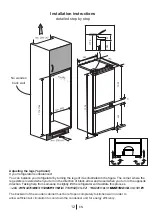
Page 14: ...ere the leg exists is lowered when you turn in the direction of black arrow and raised when you turn in the opposite direction Taking help from someone to slightly lift the refrigerator will facilitat...

Page 15: ...EN 13 629 40 71 1001 1778 1788...

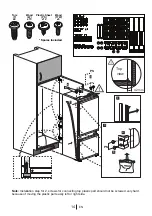
Page 16: ...x6 Wood W x15 Plastic Sheet PS x12 Wood 1TW x3 42 mm Top view 5 Spares Included Note Installation step for 2 screws for connecting top plastic part should not be screwed very hard because of moving t...

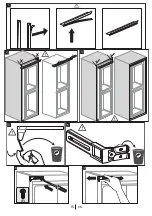
Page 17: ...EN 15 1 2 3 4 5 6 T 7...

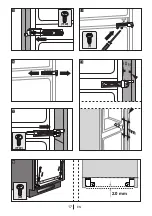
Page 18: ...8 10 9 11 T 42 0 mm 42 0mm 1TW 12 42 0 mm 42 0mm EN 16...

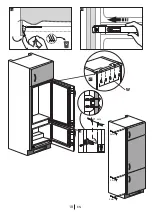
Page 19: ...EN 17 14 13 T 1TW 15 17 16 1TW 42 0 mm 42 0mm W 2 0 mm 18...

Page 20: ...EN 18 20 22 90 o 21 mm W 19 21 W 2 mm 2 mm 2 mm...

Page 21: ...is lower than 25 C turn the thermostat button to minimum position Defrost A Fridge compartment Fridge compartment performs full automatic defrosting Water droplets and a frosting up to 7 8 mm can occu...

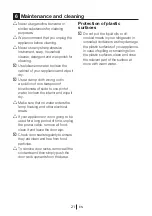
Page 22: ...ayers of newspaper and stored in a cool place e g fridge or larder Remove all freezer drawers Containers of warm water may be placed carefully in the freezer to speed up the defrosting Do not use poin...

Page 23: ...no water enters the lamp housing and other electrical areas B If your appliance or is not going to be used for a long period of time unplug the power cable remove all food clean it and leave the door...

Page 24: ...in open containers Leaving the door ajar Switching the thermostat to a colder degree Decreasing the time the door left open or using it less frequently Covering the food stored in open containers with...

Page 25: ...e soiled worn out broken or not properly seated Clean or replace the seal Damaged broken seal causes the refrigerator to run for a longer period of time in order to maintain the current temperature Fo...

Page 26: ...s might have been opened frequently or left ajar for a long time open them less frequently Humidity occurs on the outside of the refrigerator or between the doors There might be humidity in the air th...

Page 27: ...horised modification or inexpert repair Cost of Call out where a fault cannot be found with the appliance Cost of Call out for work covering routine maintenance such as but not exclusively cleaning of...

Page 28: ...l help prevent potential negative consequences for the environment and human health which could otherwise be caused by inappropriate waste handling of this product For more detailed information about...

Reviews: