background image

19

Reversing the appliance door

We recommend you seek the help of another individual to support the 
doors whilst performing this operation. Always wear adequate PPE 
(Personal Protective Equipment) for the task at hand. Prepare a 
surface with a soft, clean towel or similar where you can place the 
door during these steps.

1. Carefully prise off the cover cap for the top hinge and unscrew the

screws fixing the top hinge to the appliance, you should support
the door whilst doing this.

2. Carefully remove the door from the bottom hinge (by lifting) and

place it somewhere safe. Note that there may be spacers between
the door and the hinge; note how many and their position.

3. Swap the previous top hinge to the opposite side at the bottom.
4. Place the door onto the new bottom hinge. Support it.
5. Refit the “new” top hinge and fix securely to the appliance.
6.  Fit the central cover caps and top hinge cover pieces in place to

complete the process.

7. Unscrew all four slider brackets from the door and swap them over

to the side furthest from the new hinge positions, before the decor
door is fitted.

Ensuring the door seals correctly:
It is normal for the seal to be compressed after the door has been 
reversed. With the door closed, use a hair dryer to expand the seal 
and fill the gap between the door and the body of the appliance. 
Take care not to use the hair dryer too close to the appliance, 
which could damage the seal.  A distance of approximately 10cm 
should be 

Summary of Contents for MITF210

Page 1: ...hese instructions carefully before attempting to install or use this appliance We recommend that you keep these instructions in a safe place for future reference Installation and Operating Instruction...

Page 2: ...ssured that you are fully protected against the cost of repairs for the first 5 Years Please note that any claim must be accompanied by the model reference number serial number and proof of purchase T...

Page 3: ...the freezer 8 Storage 10 Care and cleaning 11 Defrosting the freezer 11 Changing the light Troubleshooting Installation preparation Ventilation requirements 16 Installation into the cabinet Mounting...

Page 4: ...e had supervision or instructions on how to use the appliance by someone who is responsible for their safety Under no circumstances should any external covers be removed for servicing or maintenance e...

Page 5: ...ch require specialised waste disposal The valuable materials contained in this appliance can be recycle It must be taken to a special local authority differentiated waste collection centre or to a dea...

Page 6: ...hildren to play with or near the appliance The internal surface of freezer compartment is very cold when the appliance is running Do not touch the surface especially when hands are wet Do not splash w...

Page 7: ...n this surface it then dissipates and drains through a small drain at the bottom where it evaporates harmlessly The presence of some frosting is not a malfunction of the freezer Freezer use The freeze...

Page 8: ...ess it has been completely cooked Only defrost as much food as is required to prevent wastage Bottled or canned drinks should not be stored in the freezer compartment as they could explode Check the r...

Page 9: ...tomatically deactivate after approximately 24 hours Fig 1 Fig 2 Storage The freezer is for short mid term food storage Although low temperatures can be maintained extended periods of food storage is n...

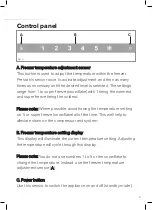
Page 10: ...note Where possible avoid having the temperature setting on 5 or super freeze snowflake all of the time This well help to alleviate strain on the compressor and system B Freezer temperature setting d...

Page 11: ...not use abrasive products or detergents After washing rinse and dry thoroughly Clean the compartments separately by hand with a mild solution of washing up liquid and water Do not use abrasive cleane...

Page 12: ...of the appliance and dissipated by evaporation when the compressor gets hot Please note If you are regularly finding pools of water in the freezer frost build ups or you notice that the compressor is...

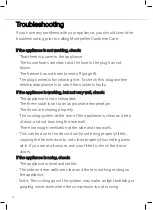
Page 13: ...overloaded The thermostat is set to an appropriate temperature The doors are closing properly The cooling system at the rear of the appliance is clean and free of dust and not touching the rear wall T...

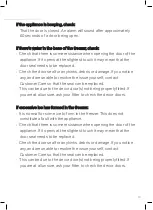
Page 14: ...be due to the decor door s not being properly fitted If you are at all unsure ask your fitter to check the decor doors If excessive ice has formed in the freezer It is normal for some ice to form in...

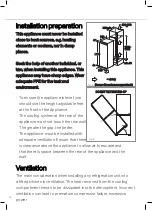
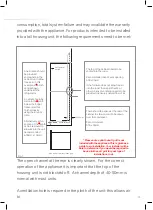
Page 15: ...to be dissipated into the atmosphere Incorrect ventilation can lead to premature compressor failure excessive power 1776 45 57 540 540 1785 1788 min 30 560 570 550 min air ow Fig 5 Freezer dimensions...

Page 16: ...then a plinth vent or other means of ventilation needs to be provided to ensure a natural flow of air There should be space at the rear of the cabinet to allow cool air to be drawn over the condenser...

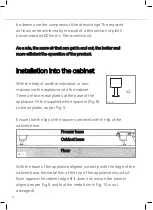
Page 17: ...appliance into the cabinet There are two metal plates at the base of the appliance Fit the supplied white spacers Fig 8 to these plates as per Fig 9 Ensure that the lips of the spacers are level with...

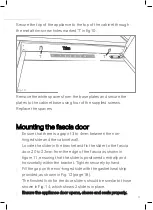
Page 18: ...and the cabinet wall Locate the slider in the bracket and fix the slider to the fascia door 20 to 22mm from the edge of the fascia as shown in figure 11 ensuring that the slider is positioned centrall...

Page 19: ...shown by the dotted outline in fig 13 Leave the rest of the spacer cover in place over the metal plates Gasket Important After completing the installation check that the appliance is secured within th...

Page 20: ...hinge note how many and their position 3 Swap the previous top hinge to the opposite side at the bottom 4 Place the door onto the new bottom hinge Support it 5 Refit the new top hinge and fix securely...

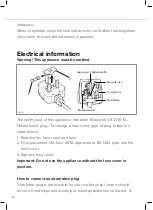
Page 21: ...plug follow the steps below 1 Remove the fuse cover and fuse 2 Fit replacement 13A fuse ASTA approved to BS 1362 type into the fuse cover 3 Replace fuse cover Important Do not use the appliance withou...

Page 22: ...r by the Earth symbol or coloured GREEN and YELLOW The wire which is coloured BLUE must be connected to the terminal which is marked with the letter N or coloured BLACK The wire which is coloured BROW...

Page 23: ...22 NOTES...

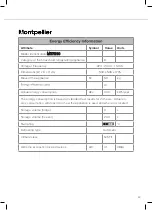
Page 24: ...f the appliance M 59 kg A Annual energy consumption AEc 300 kWh year The energy consumption is based on standard test results for 24 hours Actual en ergy consumption will depend on how the appliance i...

Page 25: ...sed modification or inexpert repair Cost of Call out where a fault cannot be found with the appliance Cost of Call out for work covering routine maintenance such as but not exclusively cleaning of fil...

Page 26: ...l help prevent potential negative consequences for the environment and human health which could otherwise be caused by inappropriate waste handling of this product For more detailed information about...

Reviews: