background image

Thank you for choosing this Montpellier 

Integrated


Larder 

F

ridge

.

Our 

refrigeration products have

 been designed to provide you with the best combination of style, reliability and 

performance to give you years of trouble-free use.

You may be familiar with a similar product, but please take time to read these instructions carefully before installing 

or using your 

F

r

idge

to ensure you get the most from your purchase.

We recommend that you keep this manual in a safe place for future reference.

Your 

Integrated 

Fr

idge


is

 covered by a comprehensive 

5 Year

 Parts & Labour 

Guarantee. In the unlikely event that you experience a problem with your 

Fr

idge

, you can rest assured that you are fully protected against the cost of 

repairs for the first 

5 Years

. Please note that any claim must be accompanied 

by the model reference number, serial number and proof of purchase.

To  activate  your  guarantee,  you  will  need  your  product  serial  number.  This 

can be found inside your appliance on the left ha

n

d wall on a small sticker. 

There are two ways to register your Guarantee:


Online:

 Visit the Support page on our website and complete the online Product 

Registration form. 

www.montpellier-appliances.com


By Post:

 Simply detach and fill in the form provided, attach a stamp and send 

it in the post. Don’t forget to include your e-mail address so that we can send 

confirmation through to you.

Welcome

Note:  

We are unable to take registrations over the phone.

ACROSS 

INTEGRATED COOLING

YEAR

GUARANTEE

PARTS &  LABOUR

www.montpellier-appliances.com

Summary of Contents for MITL320

Page 1: ...ese instructions carefully before attempting to install or use this appliance We recommend that you keep these instructions in a safe place for future reference Installation and Operating Instructions...

Page 2: ...assured that you are fully protected against the cost of repairs for the first 5 Years Please note that any claim must be accompanied by the model reference number serial number and proof of purchase...

Page 3: ...f the fridge 8 Storage 10 Care and cleaning 11 Defrosting the fridge 11 Changing the light Troubleshooting Installation preparation Ventilation requirements 16 Installation into the cabinet Mounting t...

Page 4: ...e had supervision or instructions on how to use the appliance by someone who is responsible for their safety Under no circumstances should any external covers be removed for servicing or maintenance e...

Page 5: ...ch require specialised waste disposal The valuable materials contained in this appliance can be recycle It must be taken to a special local authority differentiated waste collection centre or to a dea...

Page 6: ...children to play with or near the appliance The internal surface of the fridge compartment is very cold when the appliance is running Do not touch the surface especially when hands are wet Do not spla...

Page 7: ...cold It is normal for frost to build up on this surface it then dissipates and drains through a small drain at the bottom where it evaporates harmlessly The presence of frosting at the back is not a...

Page 8: ...y the door being open for prolonged periods Do not overfill the fridge There should be sufficient space between the foods to allow the cool air to circulate Thawing frozen foods in the fridge compartm...

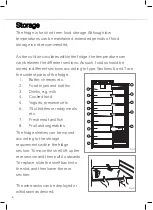
Page 9: ...ldest parts of the fridge 1 Butter cheeses etc 2 Food in jars and bottles 3 Drinks e g milk 4 Cooked food 5 Yogurts preserves etc 6 75cl bottles or ready meals etc 7 Fresh meat and fish 8 Fruit and ve...

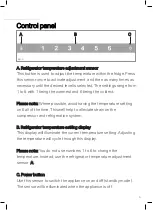
Page 10: ...the temperature setting on 6 all of the time This well help to alleviate strain on the compressor and refrigeration system B Refrigerator temperature setting display This display will illuminate the...

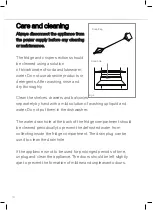
Page 11: ...eparately by hand with a mild solution of washing up liquid and water Do not put them in the dishwasher The water drain hole at the back of the fridge compartment should be cleaned periodically to pre...

Page 12: ...note If you are regularly finding pools of water in the fridge or you notice that the compressor is always running then it is likely that the door is not sealing properly This could be due to a defec...

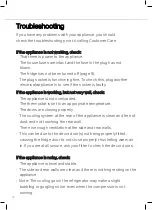
Page 13: ...d The thermostat is set to an appropriate temperature The doors are closing properly The cooling system at the rear of the appliance is clean and free of dust and not touching the rear wall There is e...

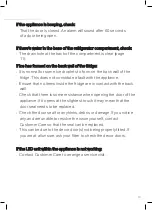
Page 14: ...re that no items inside the fridge are in contact with the back wall Check that there is some resistance when opening the door of the appliance If it opens at the slightest touch it may mean that the...

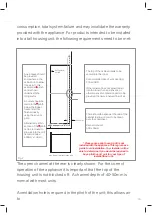
Page 15: ...to be dissipated into the atmosphere Incorrect ventilation can lead to premature compressor failure excessive power 1776 45 57 540 540 1785 1788 min 30 560 570 550 min air ow Fridge dimensions are ap...

Page 16: ...P WKHQ D SOLQWK YHQW RU RWKHU PHDQV RI YHQWLODWLRQ QHHGV WR EH SURYLGHG WR HQVXUH D QDWXUDO IORZ RI DLU 7KHUH VKRXOG EH VSDFH DW WKH UHDU RI WKH FDELQHW WR DOORZ FRRO DLU WR EH GUDZQ RYHU WKH FRQGHQVH...

Page 17: ...e appliance into the cabinet There are two metal plates at the base of the appliance Fit the supplied white spacers Fig 8 to these plates as per Fig 9 Ensure that the lips of the spacers are level wit...

Page 18: ...and the cabinet wall Locate the slider in the bracket and fix the slider to the fascia door 20 to 22mm from the edge of the fascia as shown in figure 11 ensuring that the slider is positioned centrall...

Page 19: ...shown by the dotted outline in fig 13 Leave the rest of the spacer cover in place over the metal plates Gasket Important After completing the installation check that the appliance is secured within th...

Page 20: ...hinge note how many and their position 3 Swap the previous top hinge to the opposite side at the bottom 4 Place the door onto the new bottom hinge Support it 5 Refit the new top hinge and fix securely...

Page 21: ...plug follow the steps below 1 Remove the fuse cover and fuse 2 Fit replacement 13A fuse ASTA approved to BS 1362 type into the fuse cover 3 Replace fuse cover Important Do not use the appliance withou...

Page 22: ...r by the Earth symbol or coloured GREEN and YELLOW The wire which is coloured BLUE must be connected to the terminal which is marked with the letter N or coloured BLACK The wire which is coloured BROW...

Page 23: ...22 NOTES...

Page 24: ...s of the appliance M 52 kg A Annual energy consumption AEc 147 kWh year The energy consumption is based on standard test results for 24 hours Actual en ergy consumption will depend on how the applianc...

Page 25: ...sed modification or inexpert repair Cost of Call out where a fault cannot be found with the appliance Cost of Call out for work covering routine maintenance such as but not exclusively cleaning of fil...

Page 26: ...l help prevent potential negative consequences for the environment and human health which could otherwise be caused by inappropriate waste handling of this product For more detailed information about...

Reviews: