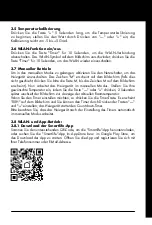
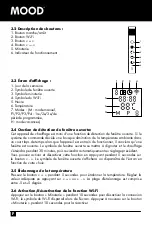
background image

3.7 Contrôle manuel

Pour entrer en mode manuel, appuyez sur le bouton marche/arrêt afin d'allumer 

l'appareil de chauffage. Le « M » s'affichera à l'écran (si pas, veuillez presser le 

bouton M jusqu'à ce que le symbole correspondant s'affiche à l'écran). Maintenant 

que l'appareil est en mode manuel, réglez la température de votre choix en 

appuyant sur « + » ou « - ». Deux secondes plus tard, l'écran reviendra à l'affichage 

de la température ambiante.

Si vous souhaitez configurer la minuterie, appuyez sur le bouton « Minuterie ». 

Lorsque le symbole « 00H » apparaît à l'écran, vous pouvez régler la minuterie en 

appuyant sur « + » ou « - ». Ensuite, l'appareil de chauffage entamera le décompte.

Remarque : une fois que la minuterie est configurée, l'appareil de chauffage passe 

automatiquement en mode manuel.

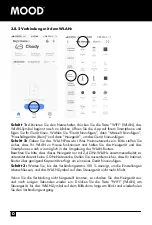
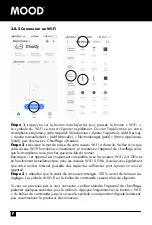
3.8 Utilisation du Wi-Fi et de l'application

3.8.1 Télécharger l'application Smart Life

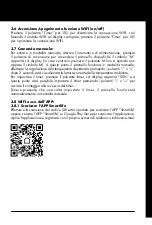
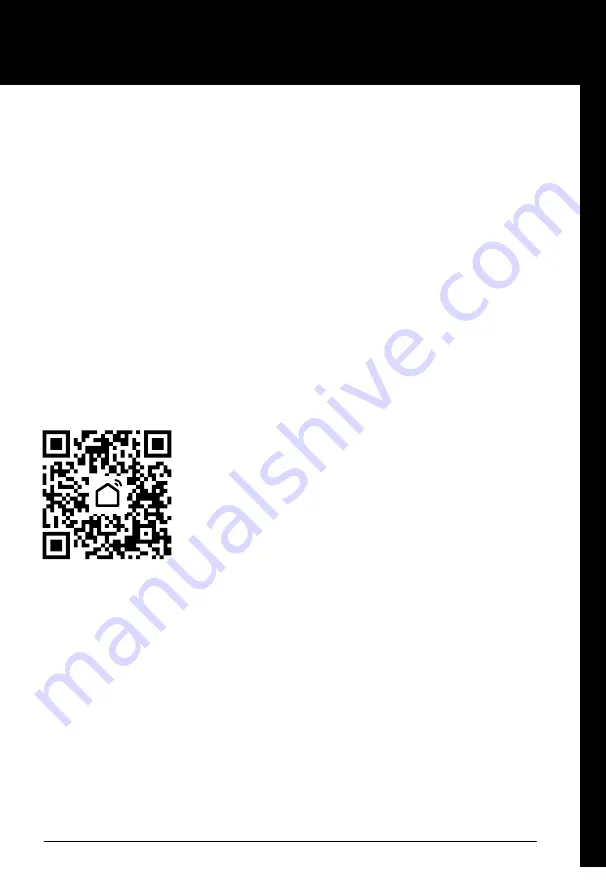
Scannez le code QR ci-dessous pour télécharger l'application « Smart Life », ou 

recherchez « Smart Life » dans l'App Store ou le Google Play Store. Téléchargez 

l'application, ouvrez-la et inscrivez-vous à l'aide de votre numéro de téléphone ou 

adresse e-mail.

Summary of Contents for 1359320

Page 1: ... Notice d installation et d utilisation Istruzioni per il montaggio e l utilizzo Installation and Operating Instructions BLANCO Infrarot Heizplatte Panneau de chauffage infrarouge Pannello radiante a infrarossi Infrared heating panel ...

Page 2: ...e das Gerät benutzen Entspricht den Europäischen Normen Warnung Um Überhitzen zu vermeiden das Heizgerät nicht abdecken Warnung vor heisser Oberfläche Das Symbol mit der durchgestrichenen Abfalltonne bedeutet dass das Produkt getrennt vom Haushaltsabfall entsorgt werden muss Das Produkt muss gem den örtlichen Entsorgungsvorschriften der Wiederverwertung zugeführt ...

Page 3: ...ert ist Stellen Sie das Gerät und das Kabel nicht in die Nähe von Wärmequellen Achten Sie darauf dass das Gerät oder das Kabel nicht durch spitze Gegenstände oder anderes beschädigt wird Um Überhitzen zu vermeiden das Heizgerät nicht bedecken Um Brandgefahr zu vermeiden blockieren Sie die Lüftungsschlitze nicht mit Gegenständen Berühren Sie nicht die heissen Flächen Achten Sie darauf dass keine Fr...

Page 4: ... jedoch darauf dass alle in dieser Anleitung genannten Sicherheitsvorkehrungen getroffen werden müssen auch wenn die Bedienung per Fernbedienung erfolgt 1 2 Gefahren für Kinder und Menschen mit eingeschränkten Fähigkeiten Dieses Gerät kann von Kindern ab einem Alter von acht 8 Jahren und von Personen mit eingeschränkten physischen sensorischen oder geistigen Fähigkeiten oder einem Mangel an Erfahr...

Page 5: ...en ACHTUNG Einige Geräteteile können sehr heiss werden und Verbrennungen verursachen In Anwesenheit von Kindern oder schutzbedürftigen Personen besondere Vorsicht walten lassen 1 3 Elektrische Sicherheitshinweise Betreiben Sie das Gerät nicht wenn das Kabel oder der Stecker beschädigt ist Wenn die Netzanschlussleitung dieses Gerätes beschädigt wird muss sie durch den Hersteller oder seinen Kundend...

Page 6: ...leitung Hinweis Der im Lieferumfang enthaltene Bausatz ist für die vertikale Montage an einer festen Wand vorgesehen Bei Montage an anderen Wandtypen benötigen Sie entsprechende Befestigungen nicht im Lieferumfang enthalten Bitte stellen Sie sicher dass die Wand für die Montage sicher ist Wir empfehlen dringend die Installation der Heizplatte von einem qualifizierten Elektriker durchführen zu lass...

Page 7: ...3 Betrieb 3 1 Allgemeine Vorstellung des Steuerungssystems Die XB Serie verfügt über ein integriertes WLAN Steuergerät d h es wird kein weiterer zusätzlicher Thermostat zur Steuerung des Heizgeräts benötigt Sobald das Heizgerät mit der App verbunden ist übernimmt das Smartphone die Steuerung und kommuniziert mit dem Steuergerät Wenn Ihre Internetverbindung zuhause nicht funktioniert können Sie das...

Page 8: ...etrieb P1 P2 P3 P4 1 2 3 4 Programmzeitbereich H Urlaubsmodus 3 4 Erkennungsfunktion für offene Fenster Dieses Heizgerät ist mit einer Funktion zur Erkennung offener Fenster ausgestattet Wenn unser Steuersystem feststellt dass die Raumtemperatur in kurzer Zeit stark absinkt während das Heizgerät aktiv ist erkennt es dass ein Fenster geöffnet ist Das Fenstersymbol im Bildschirm beginnt zu blinken d...

Page 9: ...Bildschirm erscheint Nun arbeitet das Heizgerät im manuellen Modus Stellen Sie Ihre gewünschte Temperatur ein indem Sie die Taste oder drücken 2 Sekunden später wechselt der Bildschirm zur Anzeige der aktuellen Raumtemperatur Wenn Sie den Timer einstellen möchten so drücken Sie die Timer Taste Es erscheint 00H auf dem Bildschirm und Sie können den Timer durch Drücken der Tasten und einstellen das ...

Page 10: ... nah wie möglich in der Umgebung des WLAN Routers Beachten Sie bitte dass dieses Heizgerät nur mit 2 4 GHz WLANs zusammenarbeitet es unterstützt derzeit keine 5 GHz Netzwerke Stellen Sie ausserdem sicher dass Ihr Internet Router über genügend Kapazität verfügt um ein neues Gerät hinzuzufügen Schritt 3 Warten Sie bis der Verbindungsstatus 100 anzeigt um die Einstellungen abzuschliessen und das WLAN...

Page 11: ...rennen Wenn Sie die WLAN Verbindung Ihres aktuellen Heizgeräts trennen möchten drücken Sie die WLAN Taste 10 Sekunden lang bis das WLAN Symbol wieder zu blinken beginnt Das Heizgerät funktioniert nun wieder ohne WLAN 4 Technische Daten Die von dieser Anleitung betroffenen Heizplatten sind in der folgenden Tabelle aufgeführt Modell Stromversorgung Grösse Montage IP Schutz XB 350 WiFi 350W 60 60cm W...

Page 12: ...szustand elSB 0 001 kW Zwei oder mehr manuell einstellbare stufen keine raumtemperaturkontrolle nein Raumtemperaturkontrolle mit mechanischem thermostat nein Modellkennung en XB 500 WiFi Mit elektronischer raumtemperaturkontrolle nein Angabe Symbol Wert Einheit Elektronische raumtemperaturkontrolle und tageszeitregelung nein Wärmeleistung Elektronische raumtemperaturkontrolle und wochentagsregelun...

Page 13: ...5 Garantie Tel 41 848 11 33 11 ...

Page 14: ...D NOTIZEN ...

Page 15: ... 3 2 1 6 5 4 ERSATZTEILLISTE 1 Platine 8 Interne Verkabelung 2 Temperatursensor 9 Haltestreben 3 Schaltkasten 10 Rückenplatte 4 Schalter 11 Wärmedämmung 5 Kabelklemme 12 Heizelement 6 Kabel 13 Isolierplatte 7 Überhitzungsschutz 14 Frontplatte ...

Page 16: ... surchauffe ne pas couvrir l appareil de chauffage MISE EN GARDE L appareil peut être chaud ne pas le toucher sans prendre de précautions Le pictogramme de la poubelle barrée indique que le produit doit faire l objet d un tri Il doit être recyclé conformément à la réglementation environnementale locale en matière de déchets En triant les produits portant ce pictogramme vous contribuez à réduire le...

Page 17: ...our éviter une surchauffe ne pas couvrir l appareil de chauffage Pour éviter un incendie ne bloquez pas l entrée et la sortie d air de quelque façon que ce soit Ne touchez pas les surfaces chaudes Ne pas insérer ou permettre à des objets étrangers de pénétrer dans toute ventilation ou ouverture d évacuation car cela provoquerait un choc électrique ou un incendie et endommagerait l appareil Assurez...

Page 18: ...les personnes aux capacités limitées Cet appareil peut être utilisé par des enfants âgés d au moins 8 ans et par des personnes ayant des capacités physiques sensorielles ou mentales réduites ou dénuées d expérience ou de connaissance s ils si elles sont correctement surveillé e s ou si des instructions relatives à l utilisation de l appareil en toute sécurité leur ont été données et si les risques...

Page 19: ...3 Consignes de sécurité électriques N utilisez pas l appareil si le câble est endommagé Si le câble d alimentation est endommagé il doit être remplacé par le fabricant son service après vente ou des personnes de qualification similaire afin d éviter un danger Éteignez l appareil et débranchez le lorsqu il n est pas utilisé que vous souhaitez le nettoyer ou effectuer tout autre type d entretien Pou...

Page 20: ...ient à un montage sûr Nous recommandons vivement de faire appel à un électricien qualifié pour installer l appareil 1 2 3 4 5 6 1 2 Étape 1 Utilisez le modèle fourni pour marquer l emplacement des trous sur le mur Étape 2 Percez des trous à l aide d une mèche de 8 mm Étape 3 Insérez les chevilles dans les trous Étape 4 Vissez les vis fournies au mur Étape 5 Accrochez le panneau aux vis Étape 6 Dép...

Page 21: ...e faire fonctionner et de communiquer avec le boîtier de commande Si votre réseau Internet à domicile ne fonctionne pas vous pouvez toujours contrôler l appareil de chauffage manuellement à l aide du boîtier de commande Dès que l appareil se reconnectera au réseau Wi Fi vous pourrez à nouveau utiliser votre smartphone Les modèles Wi Fi XB présentent les fonctionnalités suivantes Mode manuel réglag...

Page 22: ... fenêtre est ouverte Le symbole de fenêtre ouverte se mettra à clignoter et le chauffage s éteindra pendant 30 minutes puis reviendra automatiquement au réglage précédent Vous pouvez activer et désactiver cette fonction en appuyant pendant 5 secondes sur le bouton Le symbole de fenêtre ouverte s affichera ou disparaîtra de l écran en fonction de votre choix 3 5 Étalonnage de la température Pressez...

Page 23: ...configurer la minuterie appuyez sur le bouton Minuterie Lorsque le symbole 00H apparaît à l écran vous pouvez régler la minuterie en appuyant sur ou Ensuite l appareil de chauffage entamera le décompte Remarque une fois que la minuterie est configurée l appareil de chauffage passe automatiquement en mode manuel 3 8 Utilisation du Wi Fi et de l application 3 8 1 Télécharger l application Smart Life...

Page 24: ...hone aussi proches que possible du routeur Remarque cet appareil est uniquement compatible avec les réseaux Wi Fi 2 4 GHz et ne fonctionnent actuellement pas avec les réseaux Wi Fi 5 GHz Assurez vous également que votre routeur Internet possède des capacités suffisantes pour ajouter un nouvel appareil Étape 3 attendez que le statut de connexion atteigne 100 avant de terminer les réglages Le symbol...

Page 25: ...er votre appareil de chauffage du réseau Wi Fi pressez le bouton Wi Fi pendant 10 secondes jusqu à ce que le symbole correspondant recommence à clignoter L appareil de chauffage est alors en mode manuel et ne passe plus par le Wi Fi 4 Caractéristiques techniques Les panneaux concernés par ces instructions sont repris dans le tableau ci dessous Modèle Alimentation électrique Dimensions Montage Prot...

Page 26: ...n En mode veille elSB 0 001 kW Contrôle à deux ou plusieurs paliers manuels pas de contrôle de la température de la pièce non Contrôle de la température de la pièce avec thermostat mécanique non Référence s du modèle XB 500 WiFi Contrôle électronique de la température de la pièce non Caractéristique Symbole Value Unité Contrôle électronique de la température de la pièce et programmateur journalier...

Page 27: ...5 Garantie Tel 41 848 11 33 11 ...

Page 28: ...F REMARQUE ...

Page 29: ...it imprimé 8 Câblage interne 2 Capteur de température 9 Supports de fixation 3 Boîtier de commande 10 Plaque arrière 4 Interrupteur 11 Isolation thermique 5 Embout du câble 12 Élément chauffant 6 Câble 13 Plaque isolante 7 Protection contre la surchauffe 14 Plaque avant ...

Page 30: ...chio Avviso di superficie calda Il simbolo del cassonetto barrato indica che il prodotto non può essere eliminato con i comuni rifiuti domestici Il prodotto dev essere riciclato nel rispetto delle norme ambientali locali per lo smaltimento dei rifiuti Separando un prodotto contrassegnato da questo simbolo dai rifiuti domestici aiuterai a ridurre il volume dei rifiuti destinati agli inceneritori o ...

Page 31: ...le superfici surriscaldate Evitare di inserire o permettere l accesso di oggetti estranei in qualsiasi apertura o scarico dell apparecchio Si potrebbero provocare scosse elettriche incendio o danni all apparecchio Assicurarsi di avere sempre le mani bene asciutte prima di accedere o regolare l apparecchio o prima di toccare la spina e la presa di corrente Non lasciare mai l apparecchio collegato a...

Page 32: ...canza di esperienza e di conoscenza se si trovano sotto adeguata sorveglianza oppure se sono stati istruiti circa l uso dell apparecchio in modo sicuro e se si rendono conto dei pericoli correlati I bambini non devono giocare con l apparecchio Le operazioni di pulizia e di manutenzione non devono essere effettuate dai bambini senza sorveglianza I bambini di età inferiore a 3 anni non devono avvici...

Page 33: ...o esso deve essere sostituito dal costruttore o dal suo Servizio Assistenza Tecnica o comunque da una persona con qualifica similare in modo da prevenire ogni rischio Spegnere e scollegare l apparecchio dall alimentazione di rete quando non è in uso prima di pulirlo o di sottoporlo ad altra manutenzione Per scollegare l apparecchio spegnerlo e staccare la spina dalla presa di corrente Non tirare i...

Page 34: ...ione consenta un montaggio sicuro Si raccomanda vivamente di far installare il pannello da un elettricista qualificato 1 2 3 4 5 6 1 2 Passaggio 1 Utilizzare la sagoma fornita per segnare la posizione dei fori sulla parete Passaggio 2 Praticare i fori con una punta da 8 mm Passaggio 3 Inserire i tasselli nei fori Passaggio 4 Avvitare le rispettive viti nella parete Passaggio 5 Montare il pannello ...

Page 35: ...municherà con l unità di controllo Se la connessione Internet domestica non funziona è comunque possibile azionare il pannello tramite l unità di controllo manualmente una volta ripristinata la connessione alla rete WIFI lo smartphone assumerà di nuovo il controllo I modelli XB WIFI sono dotati delle seguenti caratteristiche Seguenti caratteristiche Modalità manuale semplice controllo della temper...

Page 36: ...tico della temperatura ambiente in un breve arco di tempo quando il pannello sta riscaldando esso rileva che una finestra è aperta Il simbolo della finestra sul display inizierà a lampeggiare e il pannello si spegnerà per 30 minuti per poi ritornare automaticamente all impostazione precedente una volta scaduti i 30 minuti È possibile disattivare e attivare questa funzione premendo il pulsante per ...

Page 37: ... effettuare la regolazione alla temperatura desiderata premendo i pulsanti o dopo 2 secondi sarà visualizzata la lettura corrente della temperatura ambiente Per impostare il timer premere il pulsante timer sul display apparirà 00H e a questo punto sarà possibile impostare il timer premendo i pulsanti o per avviare il conteggio alla rovescia del timer Tenere presente che una volta impostato il time...

Page 38: ...fono e pannello il più possibile vicini al router WIFI Tenere presente che il pannello funziona solo con reti WIFI da 2 4Ghz e che attualmente non supporta le reti da 5GHz Inoltre accertarsi che la capacità del proprio router sia sufficiente per poter aggiungere un nuovo dispositivo Passaggio 3 Attendere che lo stato della connessione raggiunga il 100 per completare le impostazioni e che il segnal...

Page 39: ...so tipo di APP 3 8 4 Disconnessione dalla rete WIFI Per scollegare il pannello dalla rete WIFI premere il pulsante WIFI per 10 secondi fino a quando l indicatore del WIFI non ricomincia a lampeggiare A questo punto il pannello funziona in modalità manuale senza WIFI 4 Specifiche tecniche Panels covered by these instructions are listed in the table below Modello Potenza Dimensioni Montaggio Protezi...

Page 40: ... Due o più fasi manuali senza controllo della temperatura ambiente no Con controllo della temperatura ambiente tramite termostato meccanico no Identicativo del modello XB 500 WiFi Con controllo elettronico della temperatura ambiente no Dato Simbolo Valore Unità Con controllo elettronico della temperatura ambiente e temporizzatore giornaliero no Potenza termica Con controllo elettronico della tempe...

Page 41: ...5 Garanzia Tel 41 848 11 33 11 ...

Page 42: ...I NOTA ...

Page 43: ...cuito stampato 8 Cavi interni 2 Sensore di temperatura 9 Staffe di montaggio 3 scatola di comando 10 Piastra posteriore 4 interruttore 11 Isolamento termico 5 clip del cavo 12 Elemento riscaldante 6 Cavo 13 Piastra isolante 7 Protezione contro il surriscaldamento 14 Piastra frontale ...

Page 44: ...ease refer to the corresponding section in this instruction manual In accordance with European directives applicable to this product WARNING In order to avoid the heater overheating do not cover it Caution high temperature The crossed out wheeled bin symbol indicates that the item should be disposed of separately from household waste The item should be handed in for recycling in accordance with ...

Page 45: ... or burns Do NOT cover the heater with anything Covering may cause overheating and can result in fire The heater should NOT be used to dry textiles and no objects shall be placed or leaned against the heater Keep a distance of at least 40cm in the front and 20cm on the sides to any object wall Failure to do so will cause heat to build up behind the heater and will void your warranty This heater is...

Page 46: ...way unless continuously supervised Children aged from 3 years and less than 8 years shall only switch on off the appliance provided that it has been placed or installed in its intended normal operating position and they have been given supervision or instruction concerning use of the appliance in a safe way and understand the hazards involved Children aged from 3 years and less than 8 years shall ...

Page 47: ...f the heater or the power cord is damaged in any form do NOT use the heater and contact your dealer for repair or replacement Repairs maintenance or any changes must be carried out by an authorized dealer DO NOT attempt to repair the heater by yourself this will void your warranty If the heater has been dropped do NOT operate it and contact your dealer to make sure it is free of any damages This h...

Page 48: ... wall is safe to mount We highly recommend to have the panel installed by a qualified electrician 1 2 3 4 5 6 1 2 Step 1 Use the supplied template to mark the position of the holes on the wall Step 2 Drill holes using a 8mm drill Step 3 Insert the dowels into the holes Step 4 Screw in the supplied screws to the wall Step 5 Mount the panel on the screws Step 6 Move the panel to the left and then do...

Page 49: ... the smartphone will take control and communicate with the control box If your home internet is not working it is still possible to operate the heater via the control box manually once the heater is re connected to the WIFI the smart phone will take control again The XB WIFI models have the following features Manual mode simple temperature control and 24 hours timer function Smart mode 7 days prog...

Page 50: ...cognize that a window is open The window sign on the screen will start to flash and the heater will power off for 30 minutes and get back to the previous setting automatically after 30 minutes You can deactivate and activate this function by long pressing for 5 seconds the button and the open window sign on the screen will disappear and appear accordingly 3 5 Temperature calibration Long press but...

Page 51: ... room temperature If you would like to set up the timer press timer button and 00H will appear on the screen and you can set the timer by press and button to start the count down timer Please notice that once the timer is set the heater will automatically work under the manual mode 3 8 WIFI and APP operation 3 8 1 Download the Smartlife APP Scan the bellow QR code to download the Smartlife APP or ...

Page 52: ...artphone as close as possible to the WIFI router Please notice that this heater is only working with 2 4GHz WIFI networks it doesn t support 5GHz networks currently Also make sure your internet router has enough capacity to add a new device Step3 Wait till the connecting status shows 100 to finish the settings and the WIFI signal on the control box will stop flashing If you failed to connect pleas...

Page 53: ... 8 4Disconnect the WIFI If you would like to disconnect the WIFI of your current heater long press WIFI button for 10 seconds until the WIFI indicator starts to flash again Now the heater is operating manually without WIFI 4 Technical Specifications Panels covered by these instructions are listed in the table below Model Power Size Mounting IP Protection XB 350 WiFi 350W 60 60cm Wall IP44 XB 500 W...

Page 54: ...1 kW tTwo or more manual stages no room temperature control No With mechanic thermostat room temperature control No Models XB 500 WiFi With electronic room temperature control No Item Sign Value Unit Electronic room temperature control plus day timer No Heat output Electronic room temperature control plus week timer Yes Nominal heat output Pnom 0 5 kW Other control options multiple selection possi...

Page 55: ...5 Warranty Tel 41 848 11 33 11 ...

Page 56: ...GB ...

Page 57: ...6 5 4 SPARE PARTS LIST 1 PCB board 8 Internal wiring 2 Temperature sensor 9 Mounting brackets 3 Control box 10 Back plate 4 Switch 11 Heat insulation 5 Cable clip 12 Heating element 6 Cable 13 Insulating plate 7 Over heat protector 14 Front plate ...

Page 58: ......

Page 59: ......

Page 60: ...n exklusiv durch Jumbo Markt AG Industriestrasse 34 8305 Dietlikon Tel 41 848 11 33 11 V190701 Exclusivité JUMBO nos marques fortes Un esclusiva JUMBO i nostri marchi forti Exklusiv von JUMBO unsere starken Marken DE FR IT ...

Reviews: